
Subscribe to Our Youtube Channel
Related Manuals for Westinghouse QL0193


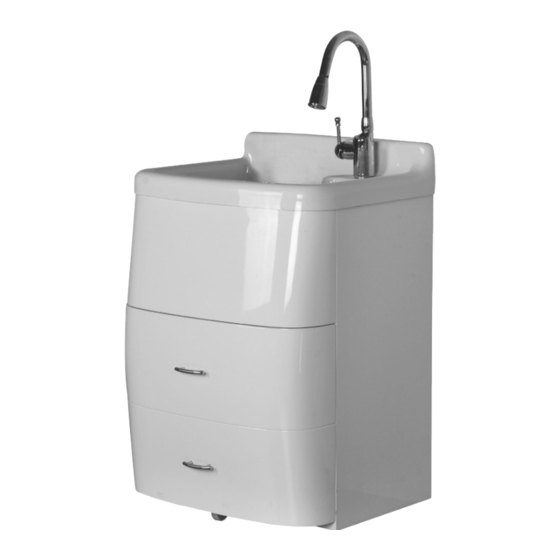
Summary of Contents for Westinghouse QL0193
- Page 1 UTILITY SINK AND STORAGE CENTER ALL-IN-ONE TOUT-EN-UN ÉVIER UTILITAIREAVEC ARMOIRE DE RANGEMENT OWNER’S MANUAL MANUEL DE L’UTILISATEUR # QL0193...
-
Page 2: Table Of Contents
. 4 . Protect the entire surface during installation . 5 . All holes drilled into the unit must be done from the finished surface side with extreme care and caulked very carefully to form a watertight barrier . QL0193... -
Page 3: Warranty
Warranty ONE YEAR LIMITED WARRANTY A thorough inspection must be made before installation and any damage must be promptly reported . We will not be liable for failures or damage that could have been discovered or avoided by proper inspection and testing prior to installation . Conglom Kitchen &... -
Page 4: Pre-Installation
Pre-Installation TOOLS/MATERIALS REQUIRED (NOT SUPPLIED) Adjustable Needle nose wrench pliers Phillips Utility knife screwdriver Pipe wrench Sealant Carpenter’s level Safety goggles Safety gloves PARTS REQUIRED (NOT SUPPLIED) Tail Pipe P-Trap Supply lines (2) QL0193... -
Page 5: Package Contents
Pre-Installation (continued) PACKAGE CONTENTS Part Description Quantity Cabinet Faucet Drawer handles (pre-installed on inside drawer panel) Utility sink Strainer assembly Strainer basket Caster (pre-installed on cabinet) Screws & washers CONGLOMKB .COM Please contact customer.service@conglomkb.com or 1-877-333-0098 for further assistance . -
Page 6: Installation
. 11 . Screw lever (J) into the handle body (L) . If the handle body (L) becomes loose over time, remove the lever (J) and using the supplied Allen key, tighten the screw (K) that is inside . QL0193... -
Page 7: Strainer Installation
Installation (continued) STRAINER INSTALLATION Sealant 1 . Apply a ring of plumber’s putty to the underside of the strainer flange. 2 . Insert the strainer body into the sink . Basket 3 . Assemble the rubber gasket, friction washer and locknut onto the strainer body from under the sink . -
Page 8: Cabinet Installation
3 . Test the fit of the sink (E) on the cabinet (A), and note the final position for your reference . Remove the sink and place upright on a towel or piece of cardboard (see Fig . 1) . Fig . 1 QL0193... -
Page 9: Mounting Utility Sink
Installation (continued) MOUNTING UTILITY SINK 1 . Carefully place a bead of sealant all around the top of the cabinet (see Fig . 2) . 2 . Ease the sink onto the cabinet, and ensure it is placed evenly and centered on the cabinet . Use masking tape to hold the unit in place until the sealant dries (see Fig . -
Page 10: Placement
. 2 . Insert each screw through a washer, then insert screw into the four pre-drilled holes . 3 . Thread each screw into the handles . Do not overtighten screws (see Fig . 4) . Fig. 4 QL0193... -
Page 11: Maintenance
Maintenance CARTRIDGE REPLACEMENT If in the future, the ceramic cartridge needs to be replaced, follow the below instructions: 1 . Turn off the water supply to the faucet . 2 . Unscrew the lever (J) . 3 . With an Allen key, release the screw (K) and pull out the handle body (L) . The top lever of the cartridge (U) will be exposed . -
Page 12: Care And Cleaning
Clean grease, oil, paint and ink stains with dry cleaning solution, lacquer thinners, isopropyl (rubbing alcohol) . Immediately gasoline, pine oil, etc . rinse with water after stain removal . Use caution when using sharp instruments that may fall and scratch the surface . QL0193... -
Page 13: Service Parts
Service Parts If you are missing parts or if you require replacement parts, please contact our customer service team at customer.service@conglomkb.com or 1-877-333-0098, 8:30 am – 5 pm, EST, Monday–Friday . Identify the required part(s) and have the part number(s) ready . Part Description Code Quantity... -
Page 14: Manuel D'utilisation
4 . Protégez toute la surface durant l’installation. 5 . Tous les trous percés dans l’unité doivent être percés à partir de la surface finie en faisant très attention et doivent être très soigneusement calfeutrés pour former une barrière étanche. QL0193... -
Page 15: Garantie
Garantie GARANTIE LIMITÉE D’UN AN Inspecter minutieusement le produit avant l’installation et signaler tout dommage sans délai . Nous ne serons pas responsables des défaillances ou des dommages qui auraient dû être découverts ou évités par une inspection adéquate et des essais avant l’installation . Conglom Kitchen and Bath garantit ce produit contre tout défaut dans les matériaux ou la fabrication, pour une période d’un (1) an à... -
Page 16: Préinstallation
Préinstallation OUTILS REQUIS (NON INCLUS) Clé Pinces Tournevis Couteau à lame Phillips retractable Clé à molette Mastic Lunettes de Niveau à bulle sécurité Gants de sécurité PIÈCES REQUISES (NON INCLUS) Tuyaux Tuyau de Siphon-P d’alimentation vidange QL0193... -
Page 17: Contenu De L'emballage
Préinstallation (suite) CONTENU DE L’EMBALLAGE Pièce Description Quantité Armoire Robinet Poignées de tiroir (pré-percées à l’intérieur du tiroir) Évier utilitaire Corps de la crépine Panier de crépine Roulette (pré-installée sous l’armoire) Vis et rondelles CONGLOMKB .COM Veuillez contacter customer.service@conglomkb.com ou 1-877-333-0098 pour toute assistance supplémentaire . -
Page 18: Installation
11 . Vissez le levier (J) dans le corps de poignée (L). Si le corps de poignée (L) devient lâche avec le temps, retirez le levier (J) et en utilisant la clé Allen fournie, serrez la vis (K) qui est à l’intérieur. QL0193... -
Page 19: Installation De La Crépine
Installation (suite) INSTALLATION DE LA CRÉPINE Mastic 1 . Appliquez une bague d’étanchéité de mastic de plomberie au dessous de la bride de la crépine . 2 . Insérez le corps de la crépine dans l’évier. Panier 3 . Installez le joint en caoutchouc, la rondelle de friction et le contre-écrou sur le corps de la crépine du dessous de l’évier . -
Page 20: Montage De L'armoire
3 . Posez l’évier (E) sur l’armoire (A) à titre d’essai, et notez la position finale pour votre référence. Enlevez l’évier et placez-le debout sur une serviette ou un morceau de carton (voir Fig . 1) . Fig . 1 QL0193... -
Page 21: Montage De L'évier Utilitaire
Installation (suite) MONTAGE DE L’ÉVIER UTILITAIRE 1 . Placez soigneusement un joint de masticde plomberie sur le pourtour de la partie supérieure du meuble (voir Fig . 2) . 2 . Placez doucement l’évier sur l’armoire, et assurez-vous qu’il est placé également et centré sur l’armoire. -
Page 22: Placement
2 . Pour fixer les poignées de tiroir au panneau de tiroir, insérer une rondelle sur chaque vis, puis insérer les vis dans les quatre trous prépercés . 3 . Visser chaque vis aux poignées . Ne pas trop serrer les vis (voir Fig . 4) . Fig. 4 QL0193... -
Page 23: Entretien
Entretien REMPLACEMENT DE LA CARTOUCHE Si à l’avenir, la cartouche en céramique doit être remplacée : 1 . Coupez l’alimentation d’eau allant au robinet. 2 . Enlevez le levier (J). 3 . Avec la clé Allen, desserrez la vis (K) et retirez la poignée du corps (L). Le dessus du levier de la cartouche (U) sera exposé... -
Page 24: Soin Et Nettoyage
à nettoyage à sec, solvant à laque, gazoline, friction. Après avoir enlevé la tache, rincer huile de pin, etc . immédiatement avec de l’eau . Utiliser avec prudence les instruments coupant qui pourrait égratigner la surface . QL0193... -
Page 25: Pièces De Rechange
Pièces de rechange Si des pièces sont manquantes ou vous avez besoin de pièces de rechange, veuillez nous contacter au customer.service@conglomkb.com ou 1-877-333-0098 (service disponible en anglais et en français de lundi au vendredi de 8h30 à 17h, H .N .E .) . Veuillez identifier les pièces nécessaires et ayez les codes à... - Page 26 Imported by / Importé par : St-Laurent, Québec, H4S 2C3 1-877-333-0098 | customer.service@conglomkb.com (service available in English and French, Monday - Friday from 8:30am - 5pm EST) (service disponible en anglais et en français de lundi - vendredi de 8h30 - 17h, HNE) www.conglomkb.com Made in China / Fabriqué...
Need help?
Do you have a question about the QL0193 and is the answer not in the manual?
Questions and answers