Table of Contents
Advertisement
Quick Links
MALLINCAM UNIVERSE
[Version 1.0]
Michael Burns
Rock Mallin
[
Mallincam Universe User Manual
This document will quickly introduce you to the wonders of the MallinCam Universe
Camera. It will include instructions on how to install the Software and Drivers and how
connect the Universe to your computer along with explanations of the camera's
major settings. The purpose of this guide is to quickly get you up and running with the
Universe Camera so that you can image. This guide is based on the original user
guide manual produced by Paul Klauninger.
Universe User Manual
Revision Sheet
]
Page i
Advertisement
Table of Contents

Related Manuals for MallinCam Universe


Summary of Contents for MallinCam Universe
- Page 1 Universe to your computer along with explanations of the camera’s major settings. The purpose of this guide is to quickly get you up and running with the Universe Camera so that you can image. This guide is based on the original user guide manual produced by Paul Klauninger.
-
Page 2: Revision History
Revision Sheet Revision History Version Date Revision Description 03/11/2017 Template Creation Universe User Manual Page ii... -
Page 3: Table Of Contents
Revision History ........................... ii Table of Contents .......................... 1 Introduction ..........................3 The Contents of the Universe - Package ................4 Specifications: ............................4 Field-of-View reference ......................... 5 Included in Package: ..........................5 System Requirements: ........................... 6 Installing Driver and Software ....................7 System Requirements ........................ - Page 4 Area Display ............................58 Sequence Capture Mode ........................58 Custom Sequence Capture Mode ......................60 Saving and Loading the Universe Camera Settings ................62 Saving your camera settings ......................62 Loading a Saved Configuration ......................63 Deleting your camera settings ......................64 Subtracting Background ........................
-
Page 5: Introduction
A constant live image is also displayed for those who wish to use the camera as a live observing system. At the heart of the Universe is a Class 0 scientific grade Sony ICX413AQ-S large APS-C class sensor, with a total size (diagonal) of 28.4 mm across and large 7.8 X 7.8 micron pixel size. -
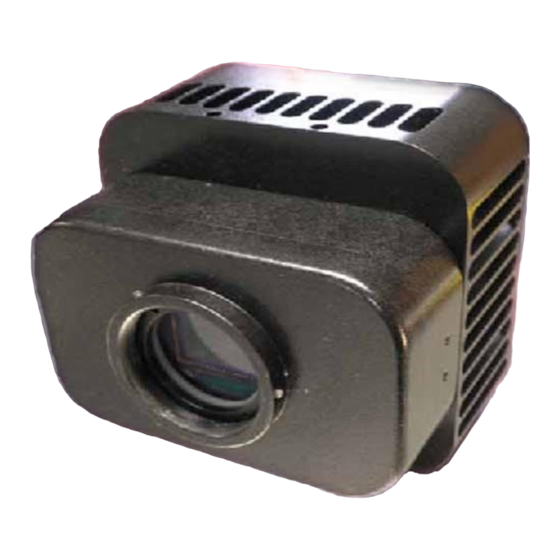
Page 6: The Contents Of The Universe - Package
Mallincam Universe User Manual March 11, 2017 The Contents of the Universe - Package Specifications: CCD sensor: Sony SuperHAD ICX413AQ-S Color (scientific grade) Sensor size: 25.10 x 17.64 mm Active pixel array size: 3032 x 2018 (6.1 megapixels) Pixel size: 7.8 x 7.8 microns... -
Page 7: Field-Of-View Reference
March 11, 2017 Field-of-View reference The following reference table provides a list of some common telescope focal lengths and the approximate angular field-of-view provided by the Universe when connected to these scopes. The measurements shown are in arc-minutes. Focal length Field-of-View Field-of-View with optional 0.5X focal reducer... -
Page 8: System Requirements
• The optional 0.5X focal reducer is a recommended accessory when using the Universe on a telescope with a long focal length and/or a high F-ratio, such as F8 or greater. A long focal length yields a relatively small field-of-view. The 0.5X focal reducer essentially cuts the telescope’s focal length in half and provides a... -
Page 9: Installing Driver And Software
Visit the Software Downloads Page in the Support Tab located on the website: Step 1 www.mallincam.net Select the Blue Download Button to download the Universe Driver and the Step 2 Universe v4.9 Control Software. There is a Download that contains a ASCOM drivers as well, but due to the large amount of data being passed by the Universe, the ASCOM is a use at your own risk. - Page 10 A Select Destination and Extract Files Window will open-up. Just Click on the Extract button to accept destination location. The Destination Folder will now open-up the actual folder that contains the software to install. Double-Click on the folder to open it up, revealing the Mallincam Driver Setup Step 4 program it contains.
- Page 11 Mallincam Universe User Manual March 11, 2017 Step 7 Click on Next to start the installation process. The installation program will then install the drivers onto your computer, a green progress bar will indicate its process. Once completed, now wants to know where you would like to install the software.
- Page 12 Click on the Finish Button. Step 8 Now is the Time to Install the Universe Control Software onto your Computer. Place your mouse on the zipped mallincam_20univserv4.9 file, Right-Click to pop-up an Action Window, and choose Extract All …...
-
Page 13: Mallincam Universe User Manual March
Either choose your own location, or select the default. Click on Next to start the installation. Step 11 The Universe Software will then install the Control Software. When completed, the following screen will appear: Step 12 Click on Finish to complete the installation The Software is now installed and ready to use. -
Page 14: Connecting The Universe
March 11, 2017 Connecting the Universe Connecting the Universe- to your Computer Remove the rubber dust cover from the front of the Universe- camera (place it back in the box for safe keeping). Screw in the optional 1.25” nose piece adapter or the provided 2”... -
Page 15: Mallincam Universe User Manual March
Mallincam Universe User Manual March 11, 2017 Attach the 5 meter USB 2.0 Cable from the back of the Universe to a free USB 2.0 port on your computer. The Universe has some strict power and thru-put requirements, and not all computers are created equal. -
Page 16: Using The Control Software
③ ② ⑤ The Universe Software Window is segmented into a few regions to make viewing and adjusting the Universe camera easy and intuitive. ① The Top Menu Line provides information about the current software ② The Universe Video Window will contain the display image from the Universe Camera. -
Page 17: Universe Quick Setup And Pictorial Work-Flow
Mallincam Universe User Manual March 11, 2017 Universe Quick Setup and Pictorial Work-Flow A typical workflow when using the Universe. Start Universe Choose Resolution Start Camera Set Exposure Adjust Image Stop Camera Exit Universe Universe User Manual Page 15... -
Page 18: Dark Frame Subtraction Pictorial Work-Flow
Mallincam Universe User Manual March 11, 2017 Dark Frame Subtraction Pictorial Work-Flow A typical workflow when Using Dark Frame with Universe. Start Universe Choose Resolution Start Camera Set Exposure Cover Telescope and Choose Name of Dark Frame Capture Dark Frame... -
Page 19: Saving Single Image Pictorial Work-Flow
Mallincam Universe User Manual March 11, 2017 Saving Single Image Pictorial Work-Flow A typical workflow when saving a Single Image with Universe. Start Universe Choose Resolution Start Camera Choose location for Saved Image Capture Image Universe User Manual Page 17... -
Page 20: Saving Multiple Images Pictorial Work-Flow
Mallincam Universe User Manual March 11, 2017 Saving Multiple Images Pictorial Work-Flow A typical workflow when Saving Multiple Images with Universe. Start Universe Choose Resolution Start Camera Choose location for Saved Image Move into Picture Panel Choose number of Images, and Delay... -
Page 21: Record Video Pictorial Work-Flow
Mallincam Universe User Manual March 11, 2017 Record Video Pictorial Work-Flow A typical workflow on how Record a Video with Universe. when Saving Multiple Images with Universe. Start Universe Choose Resolution Start Camera Choose location for Saved video Record Video... -
Page 22: More Detailed Work-Flow Procedures
Property Panel (if not sure, Click on the Property Tab located on the bottom right side of the Mallincam Universe Window). To reiterate, you can only adjust the resolution when the Universe Camera is stopped. But, the other controls can now be adjusted while the camera is continually exposing. - Page 23 Remember these are preview images that let you view what the camera sees through your telescope. They are not saved to your hard drive. We are now going to adjust the exposure setting on the Universe so that you can obtain some level of detail in the image.
-
Page 24: Saving An Image Onto Your Computer
Mallincam Universe User Manual March 11, 2017 If you have the exposure length currently set for a short interval (a few seconds or less) AND the histogram’s Auto function is selected, you may notice that the m-s-ms fields keep resetting to the previous values as you’re trying to change them. -
Page 25: Shutting Down For The Night
Click on the Stop Camera Button in the Control Box in the Picture Tab. Step 1 Allow the Universe to finish its exposure. Click on the X in the upper Right of the Mallincam Universe Control Software to Step 2 shut down the Software. -
Page 26: Detailed Workflow For Mallincam Universe
Later on in his User Guide you will find a section on describing what each control does in more detail, to assist you in experimenting with the controls. Double Click on the Mallincam Universe Icon on your desktop to start the Step 1 software control program. -
Page 27: Focusing The Telescope
They are not saved to your hard drive. Focusing the Telescope We are now going to adjust the exposure setting on the Universe so that you can achieve focus with your Telescope. We will use a short exposure time, so focusing adjustments will be readily reflected on the image window. - Page 28 Mallincam Universe User Manual March 11, 2017 Click the Change Exp button in the Control Panel. The Exposure fields now Step 5 become active. You must set the exposure length to obtain images that show some level of detail. If the current exposure time is too short, the image will appear black or very dark.
- Page 29 Mallincam Universe User Manual March 11, 2017 Move your telescope’s focuser in one direction. If the brightness variations Step 7 become more diffuse or the defocused stars become larger and dimmer, then you’re going the wrong way. Rack the focuser in the opposite direction so that the defocused stars become increasingly smaller and brighter.
-
Page 30: Imaging A Deep Sky Object
Imaging a Deep Sky Object You purchased the Universe Camera to image those amazing Deep Sky Objects, so let’s get to work. Since your telescope is focused, have it point to a Deep Sky Object of your choice. -
Page 31: Improve The Image Detail With The Histogram
Mallincam Universe User Manual March 11, 2017 Now adjust the Gain, Contrast, and Gamma sliders located just beneath the Step 2 Exposure control to improve your image’s appearance. Experiment with these controls in conjunction with the exposure to improve the image’s detail. -
Page 32: Amp Glow Reduction
– that’s amp glow. This results from the CCD chip’s signal amplifier and is normal. The Universe Camera produces very little amp glow and so this is often not apparent. However, the amount of amp glow... -
Page 33: Color Controls
Mallincam Universe User Manual March 11, 2017 To enable this control by clicking in the Noise reduction checkbox. Note that Step 1 some of the faintest nebulosity visible in your image may also be reduced when you use this setting. -
Page 34: Saving Images Onto Your Computer
The Universe Capture application provides a variety of ways to capture and save your images. You can save individual images one at a time, or you can instruct the application to save a sequence of images captured one after another. - Page 35 Click on the Capture button located in the Control box. Step 5 The Universe software will save the image using the location, name, and format previously chosen. It will even add a number behind the name to help distinguish it from other images with the same name.
-
Page 36: Save A Sequence Of Images
Mallincam Universe User Manual March 11, 2017 Save a Sequence of Images Located near the bottom of the Property panel (you will need to use the scroll bar to display) is the Save File Box. It is in the box that you will set up the file name, type, and location for your saves image. - Page 37 Mallincam Universe User Manual March 11, 2017 Now we are ready to save the images to our computer. Click on the Picture Tab, to open up the Picture pane controls. Step 5 Enter a number into the Cycles box that represents the number of images you Step 6 would like to tale.
-
Page 38: Save A Sequence Of Images With Each With Customized Time
Mallincam Universe User Manual March 11, 2017 Save a Sequence of Images with each with Customized Time This feature allows you to configure an automated sequence with various individual exposure times for up to 10 images. This can be very useful if you are shooting an object with a high dynamic range, such as the Orion Nebula. - Page 39 Mallincam Universe User Manual March 11, 2017 Step 4 Click on the Change Setting Button to accept all of these settings. The software will remember the Path for the next time. Now we are ready to save the images to our computer.
- Page 40 Once the custom set of exposures has completed, the Universe resumes taking individual preview images. It uses the time of the last exposure in the custom set for these previews.
-
Page 41: Capturing Images Using The Capture Delay Timer
Mallincam Universe User Manual March 11, 2017 Capturing images using the Capture delay timer You can also set up a sequence of captures using the Capture delay timer section of the Picture panel. This feature is an intervalometer that allows you to set a delay time before the beginning of your sequence, and an interval between exposures. - Page 42 Mallincam Universe User Manual March 11, 2017 Working with the Sequence capture mode Configure all the camera settings properly, including the length of the exposure, Step 1 on the Property panel so that you are satisfied with the preview image.
- Page 43 Mallincam Universe User Manual March 11, 2017 Click the Browse button to select or create the folder you want to store the Step 6 captured images in. You may want to create a new folder here to help organize your captures.
- Page 44 Mallincam Universe User Manual March 11, 2017 pressed Start. For the example in step 9b, it would indicate “48” when the last cycle is complete and all images have been downloaded. To stop a capture sequence before it is entirely completed, Click the Abort button.
-
Page 45: To Exit For The Night
To stop a custom capture sequence before it is entirely completed, Click the Abort button. To Exit for the Night Click on the Stop Camera Button in the Control Box in the Picture Tab. Allow the Universe to finish its exposure. Universe User Manual Page 43... - Page 46 Mallincam Universe User Manual March 11, 2017 Click on the X in the upper Right of the Mallincam Universe Control Software to Step 2 shut down the Software. Step 3 Remove the power from the Universe Camera to shut it down.
-
Page 47: The Universe Software Controls
Mallincam Universe User Manual March 11, 2017 The Universe Software Controls This Chapter of the User Manual will describe in exact detail what each control on both the Property Panel and the Picture Panel does. This Chapter is best read on a rainy day, or can be used to jump to the specific section that describes how to use a particular control. -
Page 48: The Property Panel
Mallincam Universe User Manual March 11, 2017 The Property Panel Histogram The histogram is a graphical view of the brightness range within the image. The horizontal axis represents the variation in brightness, with the darkest pixels to the left (pure black is “0” when the histogram is not stretched) and the lightest pixels to the right (pure white is “255”... - Page 49 Mallincam Universe User Manual March 11, 2017 If the histogram is not stretched, then your computer will attempt to display the full range of brightness proportionately, resulting in a generally dark image. This is the histogram’s initial Default full-range setting, and its effect is seen in the example below, on the left side.
- Page 50 Mallincam Universe User Manual March 11, 2017 In addition, if you use the same range of 112 but at different points along the horizontal axis, for example, shifting it to the right at 20 to 131, the overall image will get darker. Likewise, shifting the same range to the left (say, 2 to 113) will make the overall image lighter.
-
Page 51: Resolution Control
Mallincam Universe User Manual March 11, 2017 ➢ For greater precision, use the text boxes below the display to enter specific black point and white point values, then click OK. The Auto mode must not be checked. The range for each field is 0 to 255 in 8-bit mode (or 0 to 4095 in 16-bit mode), with the left field to be set lower than the right. -
Page 52: 16-Bit
Mallincam Universe User Manual March 11, 2017 Binning combines multiple pixels into fewer, but effectively larger, super-pixels. In 2x2 binning for example, a square of four adjacent unbinned pixels forms one large super-pixel. This increases sensitivity, since the binned super-pixel now delivers the combined signal of the four original unbinned pixels. -
Page 53: Exposure
Mallincam Universe User Manual March 11, 2017 Exposure Used to adjust the length of an image exposure. You should set this control in conjunction with adjusting the Gain, Contrast, and Gamma parameters to produce a satisfactory preview image. Click the Change Exp button and enter the desired values in the m-s-ms fields (minutes-seconds- milliseconds), then click on the Max:56m0s0ms Button. -
Page 54: Noise Reduction
If you want to see the effect of amp glow, try the following tests. Cap the Universe camera so that no light reaches the sensor. The images you’ll take here are called dark frames, with the only “light” showing in an image coming from the camera itself. -
Page 55: Contrast
Mallincam Universe User Manual March 11, 2017 Contrast Used to increase or decrease the differences in luminance to make objects in the image appear more or less distinguishable. This control should be adjusted in conjunction with altering the Exposure length, Gain, and Gamma settings to produce a satisfactory preview image. -
Page 56: Gamma
Mallincam Universe User Manual March 11, 2017 Gamma Used to alter the relationship between a pixel’s actual luminance and its assigned numerical value in an image, in order to compensate for how people perceive light and color. Adjusting the Gamma value essentially alters how image display bandwidth is allocated to light and dark tones. -
Page 57: Horizontal And Vertical
Mallincam Universe User Manual March 11, 2017 Horizontal and Vertical These controls do exactly what you would expect them to, flipping the image horizontally and vertically. This can be useful in matching an image to a view in a star chart. You will see the effect on the next preview image. -
Page 58: Sharpen
Mallincam Universe User Manual March 11, 2017 Sharpen Sharpening provides more pronounced transitions between the brightness and color variations in an image. It does this by exaggerating differences along area boundaries and object edges. Enable the Sharpen checkbox and use the slider to set a value between 0.10 and 3.00. -
Page 59: White Balance
Mallincam Universe User Manual March 11, 2017 White Balance The MallinCam capture application also offers an automatic white balancing solution. Click the One Push WB button to activate this feature. When you use this, the application performs an analysis of the current image. It then applies a mathematical algorithm to transform the data using the image’s histogram and... -
Page 60: Area Display
9 Mb. Sequence Capture Mode You have the ability to not only preview each image as it come off the Universe, you also have the capability to stack the images on top of each other (either absolutely or by averaging) to increase the signal to noise ratio. - Page 61 Mallincam Universe User Manual March 11, 2017 Click on the Change Button to enable this mode (the changed button will Step 1 change its name to OK. Step 2 Check the Stack checkbox to allow the process. Step 3 Enter in the number of frames you would like stacked in the Frames box.
-
Page 62: Custom Sequence Capture Mode
Mallincam Universe User Manual March 11, 2017 Custom Sequence Capture Mode This feature allows you to configure an automated sequence with various individual exposure times for up to 10 images. This can be very useful if you are shooting an object with a high dynamic range, such as the Orion Nebula. Taking a set of images with incrementing exposure times allows you to capture levels of details at different brightness levels by simply varying the exposure durations. - Page 63 Once the custom set of exposures has completed, the Universe resumes taking individual preview images. It uses the time of the last exposure in the custom set for these previews.
-
Page 64: Saving And Loading The Universe Camera Settings
March 11, 2017 Saving and Loading the Universe Camera Settings Once you have used the MallinCam capture application on a variety of targets (deep sky, lunar, planetary, and solar) you’ll notice that the camera’s control settings can vary widely to produce a properly exposed image. Use the Settings configurations commands to save the control settings at any time to a custom configuration that you can load and reuse in the future. -
Page 65: Loading A Saved Configuration
Mallincam Universe User Manual March 11, 2017 Step 4 Click on the OK button. The name “new configuration” is displayed in the Setting and Name boxes. Click the Start Camera button. The camera starts generating preview images Step 5 again. -
Page 66: Deleting Your Camera Settings
Mallincam Universe User Manual March 11, 2017 Click the Start Camera button. The camera starts generating preview images Step 3 again. Deleting your camera settings Click the Stop Camera button. Step 1 Click the dropdown arrow in the Setting field and select the configuration you Step 2 want to delete from the list, if it’s not the one you’re currently using. -
Page 67: Subtracting Background
Dark Frame to. It is recommended that you create a Folder that contains all of your Dark Frames for the Universe Camera. Choose a name that is easy to locate its function and duration as a Dark Frame Time, such as: Dark_Frame_120s. - Page 68 Frame Subtracted. The Dark Frame will now continuously be subtracted from the images being produced by the Universe Camera. To Abort the Dark Frame Subtracting, simply uncheck the Subtract Check box. To reactive the Dark Frame Subtracting you need to repeat recheck the Subtract Check Box and again Click on the Subtract Dark Frame Button to choose a Dark Frame to subtract.
-
Page 69: Saving Files
Mallincam Universe User Manual March 11, 2017 Saving Files Located near the bottom of the Property panel (you will need to use the scroll bar to display) is the Save File Box. It is in the box that you will set up the file name, type, and location for your saves image. -
Page 70: Encode And Record
Mallincam Universe User Manual March 11, 2017 Encode and Record You are now ready to save a Video Stream of the currently displayed image. These avi files can get very large very quickly, so use caution and preplanning if you are saving a video of the current session. First you need to decide if you require the Video image to be compressed or not by choosing the appropriate Codec. -
Page 71: The Picture Panel
Mallincam Universe User Manual March 11, 2017 The Picture Panel Viewing your Captured Images The MallinCam image capture application allows you to view the images you’ve captured in the current session. There are two preview windows on the Picture panel. They are the All images preview and the Sequence capture preview. -
Page 72: Sequence Capture Preview
Mallincam Universe User Manual March 11, 2017 Sequence Capture Preview The Sequence capture preview window lets you view the set of images you’ve captured and saved in the current session using either the Sequence capture mode or the Custom sequence capture mode functions. It only shows the images of the last sequence you obtained by using either of these capture modes. -
Page 73: Capture Delay Timer
Mallincam Universe User Manual March 11, 2017 The Save and Save All buttons only apply to images in the Sequence capture preview window. You may want to browse for a different folder or create a new one to place your duplicate files into before using Save or Save All. - Page 74 Mallincam Universe User Manual March 11, 2017 Perform one of the following: Step 2 a. If you want to capture a set of single images with a specific period of time between each image, then Click the Change button in the Sequence capture mode panel.
- Page 75 Mallincam Universe User Manual March 11, 2017 Set the amount of delay time before the start of the exposures by using the day- Step 7 h-m-s-ms fields in the Delay section of the Capture delay timer located in the Picture Panel. This delay will only be applied at the beginning of the first cycle. It is not repeated between cycles.
- Page 76 Mallincam Universe User Manual March 11, 2017 To stop a capture sequence before it is entirely completed, Click the Abort button. Working with the Custom Sequence capture mode You can also use the Capture delay timer with the Custom sequence capture mode.
- Page 77 Mallincam Universe User Manual March 11, 2017 cycle is then run again, with no delay between the shots. This process is repeated until all the cycles you specified in Step 4 are finished. As an example: If you configured eight custom exposure times in the Custom sequence capture mode and you set the Cycles field to “3”, you will end up with 24 images when...
-
Page 78: Viewing The Preview Images
March 11, 2017 Viewing the Preview Images The Universe offers an additional display mode that is useful for viewing by groups, or if you just want to sit back and enjoy the scene. Once the telescope has been aimed and the camera configured for a proper exposure of the target, the preview image is constantly refreshed as each exposure is completed. - Page 79 March 11, 2017 You can also use this display mode while actually capturing a set of images. M42/M43: MallinCam Universe image courtesy of Paul Comision To reinstate the Property or Picture panel, just Click the Panel Manage tab and then Click on the pin icon again.
-
Page 80: Using Filters And Adjusting Color Balance
Using Filters and Adjusting Color Balance The CCD sensor on the MallinCam Universe is not filtered in any way. This allows you maximum freedom to filter an exposure in the way you want. For instance, you may want to experiment with a Hydrogen-alpha filter to capture the deep red light of many emission nebulae. - Page 81 Mallincam Universe User Manual March 11, 2017 make the differences obvious. No post-processing was done, so the images are shown as they were captured. The capture application’s One-Push WB function was used to try to obtain a good color balance.
- Page 82 Mallincam Universe User Manual March 11, 2017 In both cases, the One-Push WB function adjusted the Red, Green, and Blue gain sliders in a similar fashion, though by different amounts, and with obvious differences in the end results. For the filtered image, the Red slider was decreased to only 0.97, the Green slider was left at the default value of 1.00, and...
-
Page 83: Processing Astronomical Images
24-bit RGB files, since each color channel is 8-bits and there are three channels. However, the Universe can record a much finer level of color resolution than this. It does this by dividing each color channel into 4,096 levels. -
Page 84: Using Dark Frames And Flat Fields
You can use such dark frames to subtract this residual camera noise from your actual images. The MallinCam Universe is remarkably quiet in terms of the noise it generates. You often don’t need to worry about dark frames to produce high- quality images. - Page 85 The result of stacking multiple images into one final combined image can be quite profound. Here’s an example provided by Paul Comision of Ottawa, Canada from his first session with the MallinCam Universe. Five one-minute exposures of M27 were taken and then combined: The image on the left is a single 60-second exposure, while the image on the right is a stack of five 60-second exposures, with no other processing done.
-
Page 86: Troubleshooting
Mallincam Universe User Manual March 11, 2017 Troubleshooting Your computer doesn’t recognize the camera once it is connected. This can occur for a number of reasons, including: ➢ USB 2.0 port: Make sure that you are using a fully-specified USB 2.0 high- speed port. -
Page 87: The Optical Window Above The Ccd Sensor Is Fogged
TEC by moving the recessed slider switch (use a ballpoint pen tip) to the position furthest away from the Power ON indicator. Refer to the Universe picture in The Contents of the Universe Package Section in thus User Manual to locate the switch. - Page 88 Mallincam Universe User Manual March 11, 2017 ➢ In most cases this image preview distortion can be removed by pressing the OK button in the histogram display. You may need to press it more than once if the scrambled preview does not return to normal operation after the first attempt.
-
Page 89: Appendix
Visit www.Mallincam.net Step 1 Select the Support Tab, Go into Software Downloads Near the bottom of the page under is the Mallincam Universe DRIVER link Download the UNIVERSE ASCOM driver (ascom_universe_setup.exe) Step 2 You must have already installed the latest ASCOM Platform on your computer (www.ascom-standards.org). - Page 90 Mallincam Universe User Manual March 11, 2017 Click on Next to Continue. The License Agreement Window should now appear. Step 5 Click in the ‘I accept the agreement’ Radial Button, then Click on Next. The Step 6 Ready to Install Window will appear.
-
Page 91: Setting Up To Broadcast On Night Skies Network
Currently Universe is not capable of modifying the Video Image and having that Video Image be directly captured by NSN Flash. So if you want to use all the features of the Universe software and broadcast those results, as well as save screen shots and videos of your images, then we need another program to capture Universes’s output and have the output from that program... - Page 92 Mallincam Universe User Manual March 11, 2017 Get the image of your object on the Image Window of the Universe Software, adjust the settings on the software for your planned object and size the window so you have room for other software on your monitor real-estate.
- Page 93 Do not move the Universe Window around your desktop when broadcasting, since Manycam /Splitcam/WebcamMax is just grabbing the real-estate location that currently your Universe Software image is situated at. If you move the Universe Software Window, then Manycam /Splitcam/ Webcam Max will still grab the desktop location, but may not grab the whole Universe Video Image.
- Page 94 Mallincam Universe User Manual March 11, 2017 Step 8 Log into Night Skies Network (NSN) Have your Web Brower go to the location: http://www.nightskiesnetwork.ca/ . Locate and click on the BROADCASTERS AND MEMBERS SIGN IN button. The next Login screen will ask you to...
- Page 95 Mallincam Universe User Manual March 11, 2017 Step 10 Turn off your Microphone Until you have your microphone figured out, it is best to initially turn it off. If you do not, the viewers on NSN may hear an extreme loud buzzing (feedback noise). Later on we will look at...
- Page 96 Mallincam Universe User Manual March 11, 2017 ➢ CLICK on the Settings choice and you will be presented with the Adobe Flash Player Settings Window. ➢ CLICK on the Camera Icon and you will be presented with a pull down menu select your camera.
- Page 97 That’s it, you are done. If everything is working well and the Window’s gods are in a good mood, you should be broadcasting whatever object the Universe is capturing. You should now enter another Message and SEND it out to indicate what system you are using and what object you are viewing.
-
Page 98: User Notes
Mallincam Universe User Manual March 11, 2017 User Notes Universe User Manual Page 96...
Need help?
Do you have a question about the Universe and is the answer not in the manual?
Questions and answers