
Related Manuals for Force1 U49C RED HERON


Summary of Contents for Force1 U49C RED HERON
- Page 1 RED HERON With 120° wide-angle 720P HD Camera USER MANUAL U49C FOR MORE INFORMATION Visit us online at force1rc.com for product information, replacement parts, and flight tutorials.
- Page 3 ATTENTION: BEFORE FLYING YOUR DRONE, PLEASE WATCH THIS FLIGHT INSTRUCTION VIDEO. https://youtu.be/tk3qzsUwoWs...
-
Page 4: Table Of Contents
FORCE1 RC CONTENTS Welcome & Safety Precautions ···································· 3 LI-PO Battery Care ······················································· 4 Drone Battery Charging ··············································· 5 Contents & Drone Overview ········································ 6 Transmitter Overview ···················································· 7 Transmitter Battery Installation ····································· 8 Drone Assembly ··························································· 9 Quick Start Guide ······················································· 12 Preflight Checklist ·······················································... -
Page 5: Welcome & Safety Precautions
U49C RED HERON User Manual WELCOME! Welcome to the Force1 Team, and thank you for your Force1 drone purchase. Please read this manual carefully before drone operation. (1) This drone is not a toy! It’s a pro-level drone suitable for experienced RC drone users aged 14 years and older. -
Page 6: Li-Po Battery Care
FORCE1 RC LI-PO BATTERY CARE Avoid Overheating Your batteries will sometimes be warm/hot to the touch after use. This is normal, but beware that battery components will fail if not allowed to cool down between uses. Also, do not leave batteries exposed to direct sunlight. -
Page 7: Drone Battery Charging
U49C RED HERON User Manual DRONE BATTERY CHARGING 1. Connect the drone battery with USB cable first and then choose one of the methods below to connect with USB plug. 2. The red USB indicator light turns on when charging and the light turns green when fully charged. -
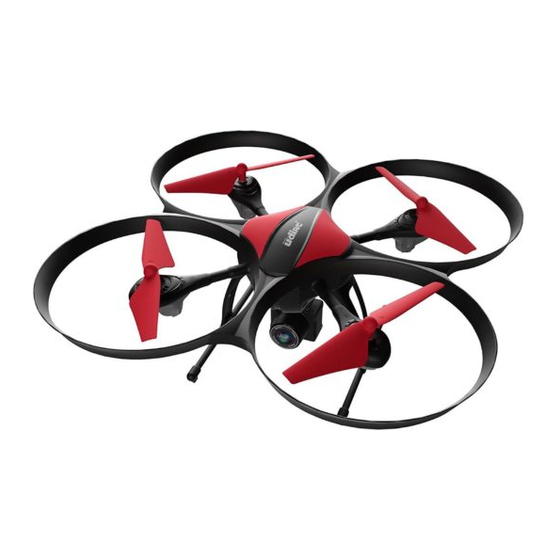
Page 8: Contents & Drone Overview
FORCE1 RC BOX CONTENTS DRONE TRANSMITTER 2 x 7.4v 1000mAh LiPo BATTERY PROPELLERS (4) USB CHARGER CABLE MICRO USB CABLE USB SD CARD READER DRONE TOOLS SD CARD DRONE OVERVIEW FRONT “A” PROPELLER “B” PROPELLER CLOCKWISE COUNTER-CLOCKWISE LEFT RIGHT “B” PROPELLER “A”... -
Page 9: Transmitter Overview
U49C RED HERON User Manual TRANSMITTER OVERVIEW POWER INDICATOR POWER SWITCH VIDEO BUTTON PHOTO BUTTON DIRECTION CONTROL STICK THROTTLE/RUDDER STICK HEADING HOLD MODE 1-KEY LIFT / LAND (HEADLESS MODE) EMERGENCY STOP BUTTON TRIMMER MODE BUTTON HIGH/MEDIUM/LOW SPEED MODE BATTERY COMPARTMENT... -
Page 10: Transmitter Battery Installation
FORCE1 RC TRANSMITTER BATTERY INSTALLATION Open the battery cover and insert 4 AA batteries as shown below (not included). FIGURE 1 FIGURE 2 CAUTION: • The transmitter needs 4 AA batteries to work • Insert batteries in correct polarity (+) and (-) •... -
Page 11: Drone Assembly
U49C RED HERON User Manual DRONE ASSEMBLY PROPELLERS REMOVAL/INSTALLATION REMOVAL Use the screwdriver to remove set screw, then lift propeller up (Fig. 7). INSTALLATION Replace with a new propeller with the same rotation direction. Reinsert the screw into the hole (Fig. 8), then tighten the screw in clockwise. -
Page 12: Battery Installation
FORCE1 RC DRONE ASSEMBLY BATTERY INSTALLATION Install the battery to the mounted box in the drone (Fig. 12). When you install the battery, you need to press down the clip and then push the battery until fully secured. To remove the battery, gently push down on the battery clip, keep it pressed and then slide the battery out (Fig. - Page 13 U49C RED HERON User Manual DRONE ASSEMBLY CAMERA INSTALLATION Insert the camera clip into the bottom of the drone (Fig. 15), and then push the camera in (Fig. 16). FIGURE 15 FIGURE 16 CAMERA WIRE CONNECTION DIAGRAM 1. Insert the attached Micro USB Cord to the camera socket (Fig. 17).
-
Page 14: Quick Start Guide
FORCE1 RC QUICK START GUIDE Turn on the transmitter switch and the power indicator light flashes rapidly. Push the left stick all the way down to the lowest position and then release (Fig. 19). FIGURE 19 Install the battery in the mounted box in the drone, then power on the drone by pressing and holding the black button on the back of the drone, above the battery (Fig. -
Page 15: Preflight Checklist
U49C RED HERON User Manual PREFLIGHT CHECKLIST 1. Fly in an open area and abide by all local and federal guidelines. Check the FAA’s B4UFLY mobile app for up-to-date drone flight info. 2. Make sure your drone and transmitter batteries are fully charged. - Page 16 FORCE1 RC PREFLIGHT OPERATION FREQUENCY PAIRING 1. Turn on the transmitter power switch (Fig. 24) and the indicator light flashes rapidly. Push the left stick all the way down to the lowest position and then release (Fig. 25). The left stick will back to the middle position automatically.
-
Page 17: Flight Controls
U49C RED HERON User Manual BASIC FLIGHT CONTROLS HOVER UP AND DOWN Push the THROTTLE/RUDDER STICK up to fly the drone up, and pull the THROTTLE/RUDDER STICK down to fly the drone down. FLY FORWARD OR BACKWARD Push the DIRECTION CONTROL STICK up to... -
Page 18: Trim Adjustments
FORCE1 RC TRIM ADJUSTMENTS FORWARD/BACKWARD TRIM Press the TRIMMER MODE BUTTON and adjust using the DIRECTION CONTROL STICK. If the drone drifts forward when taking off, push backwards, or forwards if drone drifts backwards. LEFT/RIGHT TRIM Press the TRIMMER MODE... -
Page 19: Functions
U49C RED HERON User Manual FUNCTIONS 1-KEY & MANUAL TAKEOFF 1-KEY LIFT: Press the 1-Key Lift / Land / Emergency Stop button (Fig. 28) after successful pairing. Your drone will rise and hover about 4 feet off the ground. MANUAL TAKEOFF: Push the left and right sticks as shown below to start the motors after successful pairing (Fig. - Page 20 FORCE1 RC ALTITUDE HOLD MODE Altitude Hold places your drone at a consistent altitude while allowing roll, pitch and yaw to be controlled normally. It makes it easier to control the drone for beginners and more stable for aerial photography.
- Page 21 U49C RED HERON User Manual HEADLESS MODE Your drone has a front and back indicated by LED lights, colored propellers and camera placement. This is harder to tell at night, or when the drone is in the air. Headless Mode provides control according to your position, rather than which way the drone is facing.
-
Page 22: Troubleshooting
FORCE1 RC TROUBLESHOOTING Problem Problem Cause Solution 1. Low batteries. 1. Replace all the transmitter batteries. 2. Install the battery in accordance with The transmitter 2. The batteries’ positive poles and negative the User Manual instructions and check power indicator poles are in reverse order. -
Page 23: Spare Parts
U49C RED HERON User Manual SPARE PARTS Drone Housing Drone Bottom Housing A Propeller B Propeller 0001 0002 0003 0004 Landing Gear Motor Cover Holder A Motor Cover Holder B Motor Bottom Holder 0005 0006 0007 0008 Receiver Board Holder... - Page 24 FORCE1 RC SPARE PARTS Drone Battery USB Cable Gear SD Card 0021 0022 0023 0024 SD Card Reader Hex Wrench Screwdriver Transmitter 0025 0026 0027 0028...
- Page 25 FCC INFORMATION This equipment has been tested and found to comply with the limits for a Class B digital device, pursuant to part 15 of the FCC Rules. These limits are designed to provide residential protection against harmful interference in a residential installation. This equipment generates, uses and can radiate radio frequency energy and, if not Installed and used in accordance with the instructions, may cause harmful interference to radio communications.
Need help?
Do you have a question about the U49C RED HERON and is the answer not in the manual?
Questions and answers