Advertisement
Table of Contents
- 1 User Manual
- 2 Power
- 3 Ink Placement
- 4 Operating Panel
- 5 Media Installation
- 6 Distance between Printhead and M Edia
- 7 Single Printhead Installation and Connecting
- 8 Ink Color Order
- 9 Carriage Board and Cable Connecting
- 10 Start To Use
- 11 Set Calibration IP Address
- 12 Step One: Decompress the Software
- 13 Step Five:
- Download this manual
Thank you for purchasing TECJET printers. Hope you have a good operating experience.
In order to safely and correctly use printers, please read this manual carefully and operate as it
informs. If not, it may cause some bad damages.
All Rights Reserved by printers.
1 Safety Instructions . ................................................................................................................. 3
1.1 Power
1.2 Printing Cautions
1.3 Installing Environment
1.4 Ink Placement
2 Installation Requirements ........................................................................................................ 4
2.1-2.7 Body installations
2.8 Operating Panel
2.9 Media Installation
2.10 Distance between Printhead and M edia
2.11 Ink Installation
2.12 Single Printhead Installation and Connecting
2.13 Ink Color Order
2.14 Carriage Board and Cable Connecting
3 About Printing Operation... ................................................................................................... 13
3.1 Start to Use
3.2 How to Calibrate
3.3 Set Calibration IP Address
3.4 How to Use Calibration Software
4 How to Install Software ....................................................................................................... 19
4.1 Step One: Decompress the Software
4.2 Step Two: Select Installation Folder
4.3 Step Three:
4.4 Step Four: Select "Restart later" and Press"Close"
4.5 Step Five:
User Manual
Contents
3 / 24
Advertisement
Table of Contents

Summary of Contents for TecJet S Series
-
Page 1: User Manual
User Manual Thank you for purchasing TECJET printers. Hope you have a good operating experience. In order to safely and correctly use printers, please read this manual carefully and operate as it informs. If not, it may cause some bad damages. All Rights Reserved by printers. Contents 1 Safety Instructions ........................3 1.1 Power 1.2 Printing Cautions 1.3 Installing Environment 1.4 Ink Placement 2 Installation Requirements ......................4 2.1-2.7 Body installations 2.8 Operating Panel 2.9 Media Installation 2.10 Distance between Printhead and M edia 2.11 Ink Installation 2.12 Single Printhead Installation and Connecting 2.13 Ink Color Order 2.14 Carriage Board and Cable Connecting 3 About Printing Operation…... - Page 2 4.6 Step Six: 4.7 Step Seven: 4.8 Step Eight: 4.9 Step Nine: Choose Custom Printer 4.10 Step Ten: Select the Color Curve 4.11 Step Eleven: Set As Default P rinter 5 Common Questions and Answers ..................23 3 / 24...
-
Page 3: Power
1) When turn on the printer, do not move the print head, or the printer may be damaged. 2) Always use the power switch to turn off the printing, but when the button is pressed, the power supply will be cut off. Before the power is cut off, do not unplug the printerʹs plug or cable. 3) Before moving the printer, ensure that the print head in the initial position, and fixed. 4) Do not attempt to remove the dryer or electric control c abinet. 5) Do not remove any other closed or open cover or p lugs. 6) Do not insert any objects in the slot of the p rinter. 7) Do not touch the printer drying systemʹs interior cover. Even after power is disconnected interior surface may still be very hot. 8) When contact material drying channel, special care should be taken. 9) Keep clothes and all parts of the body away from the moving parts of the printer. 10) Do not wear necklaces, bracelets and other hanging articles. 11) Be careful and not to let your sleeve or glove is entangled by moving parts of the printer. 12) During printing, do not touch the gears or the reel. 1.3 Installing Environment To keep Tecjet printers keep smooth operation in a long time, Tecjet printers should be kept in 3 / 24... -
Page 4: Ink Placement
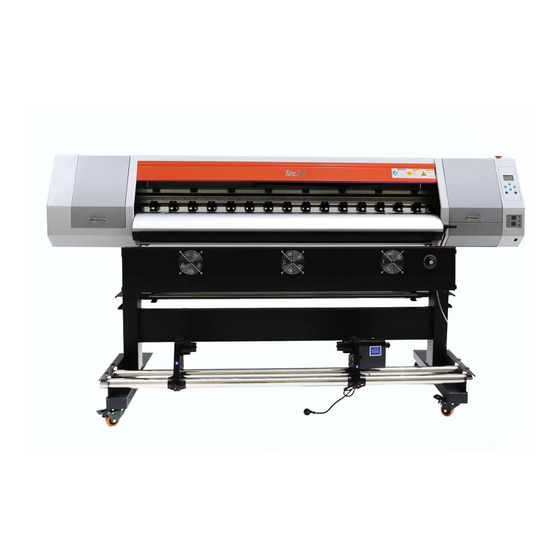
the place where air flows well, room is big enough with smooth floor, and the temperature should be better between 18-26℃. 1.4 Ink Placement Keep the ink bottles out of the childrenʹs reach, don't let the kid drink or touch ink bottles. 1) If the ink sticks to skin, clean with soap and water; if ink splashes in eyes, immediately flush with water. 2) Do not shake ink bottles, which will cause the ink leaking. 3) After using the ink bottles for a certain period (usually three months), immediately removed for thorough cleaning and drying; pay attention to cleaning when replaced a new ink bottle to ensure print quality. 4) Dispose the waste ink according to relevant local laws. 3 / 24... - Page 5 2 Installation Requirements After open the wooden package, please install Tecjet printer as below. Name of parts: (1)Main body(2)Feeding system(3)Drying system(4)Steel leg (5)Horizontal bar(6)Up Fixing plate(7)Fan Fixing Plate (8)Tube Fixing Plate(9)Legs(10)Take up system Leg installation Install the legs as image shows. Fasten legs with 8-M6X20 bolt. Leg brakes should be installed under its legs and fastened by 16- M6X20 Bolt. 3 / 24...
- Page 6 Install and fasten the horizontal bar with 12- M6X20 and Install the Tube Fixing Plate with 16- M6X20 as the image below. Install the Fan Fixing Plate and Steel Legs with 8-M6X20 bolts. After fastening them, fasten the Up Fixing Plates of Main body and Steel Legs with 12-M6X20 bolts. Install dry fans on the fixing plate with 4- M6X15 bolts(Black Plastic Cover). 3 / 24...
- Page 7 Install and fastened the Steel Tubes with 8-M4X25(Black Plastic Cover) on the Tube Fixing Plate. 4 / 24...
-
Page 8: Operating Panel
Install the first Ink Cartridge as the image shows. Install the Feeding System and Take Up System on the Steel Tubes with 4- M6X15 bolts(Black Plastic Cover) and put on the Main body frame as image shows and fix it with 8-M6X20 bolts. 2.6 Operating Panel 5 / 24... -
Page 9: Media Installation
1) Press right or left button to control the carriage movement. Press right long, carriage moves to right; press left long, carriage moves to left. Release button, carriage stops. 2) Press Up and down to make forward or back after entering the menu. Control media to feed or not. 3) Return: Back or cancel what you do. 4) Enter: Confirm your order. 5) When printers go on standby, press right to enter cleaning m enu. 2.7 Media Installation Scroll media is better. Keep media direct and keep media parallel with platform. Media should be smooth and complete. Before install media, lift up the pressing handle. After installing media, you need to lift down the pressing handle. 6 / 24... -
Page 10: Distance Between Printhead And M Edia
2.8 Distance between Printhead and Media Printhead base can be adjusted according to Media thickness. The best distance between printhead and media is 1.5mm, not more than 2mm. Media should be smooth. Adjust the M4X8 bolts as image shows, the distance will be changed accordingly.(Example at DX5 Head) M4X8 Bolt 2.9 Ink Installation 1) Keep ink out of the reach of Children. If it enters your eyes or splash on your clothes, please flush with plenty of water. 2) Clean ink tube with our clean flush. 3) The temperature of ink should be better kept between 1 8℃—28℃. 4) After open the inks, it should not be kept for a long time. Please use it ASAP. 5) Don’t shake the ink bottles. Don’t pollute environment by throwing ink, ink bottle at your will. 6) Add ink as image below shows. Connect ink tube as the image shows. 7 / 24... -
Page 11: Single Printhead Installation And Connecting
Attention: Ink bottle cap cannot be too tight so that there’s no air left. 2.10 XP600&DX5&DX7&5113 Single Printhead Installation and Connecting. 8 / 24... - Page 12 DX5-2 DX5-1 DX7-1 DX7-2 XP600-1 XP600-2 9 / 24...
- Page 13 5113-1 5113-2 Cables should be connected as images below. (IMPORTANT!!!) or DX5 printhead, connection should be as below: or DX7 printhead, connection should be as below: or XP600 printhead, connection should be as below: 10 /...
-
Page 14: Ink Color Order
or 5113 printhead, connection should be as below: 2.11 Ink Color Order For DX5 printhead, it’s the order as below. For DX7 printhead, it’s the order as below. For XP600 printhead, it’s the order as below 11 /... - Page 15 For 5113 printhead, it’s the order as below 12 /...
-
Page 16: Carriage Board And Cable Connecting
2.12 Carriage Board and Cable Connecting For DX5 printhead, it should be connected as below. For DX7 printhead, it should be connected as below. For XP600 printhead, it should be connected as below. 11 / 24... - Page 17 For 5113 printhead, it should be connected as below. 11 / 24...
-
Page 18: Start To Use
3. About Printing Operation 3.1 Start to Use (1)Press the power button like the image below. 开关 (2)Close the printer by press the power button to “O” situation. 3.2 How to Calibrate 1) How to set the IP of your computer(Here run at Windows10 Enterprise 64-bit System) Please check the cable and machine make sure the machine is power on and network cable connected with the machine and computer successfully. Step one:Find Wifi Icon at the right down corner of the desktop and press it. Step two:Find”Network Settings” and press it. 11 / 24... - Page 19 Step three: Go down by the mouse and find “Network and Sharing Center” and press it. Step four: Find “Local Connection” icon and press it. Step five:Find “Properties” and press it. 16 / 24...
- Page 20 Step six:Find “Internet4 (TCP/IPv4)” and press the “Properties”. Step seven:Select the “Use the following IP address” and at IP address enter “196 12 0 188” and press ok. Step eight:After that there is an attention windows will come out,just press ok. Step nine:The Subnet Mask will default to ”255 255 255 0”automatically and press ok and finished. 17 / 24...
-
Page 21: Set Calibration Ip Address
3.3 Set Calibration IP Address Step one:Set the Calibration IP address as below. Step two:Press the “Connect” and see if the IP succeed. How to Use Calibration Software 1 ) Vertical Calibration, adjusting printhead Open the calibration software, after connecting the printer, press “More” first and then press “Vert. test” 18 / 24... - Page 22 Adjust printhead according to printing image. The result should be as below. 2 ) Two-way Calibration 19 / 24...
- Page 23 Press “Hidi.Align” and do two-way calibration and print images : And see which line is the best and enter its number.For example, if number 3 is the best, then enter 30+3=33. 3 ) Feeding calibration 20 / 24...
- Page 24 Image 01 Press the “Step Align” and do the Feeding calibration and print the image. Measure the distance of two arrows and accurate to MM. Put the “Distance number” into image 01.And press calculate and then press save. 4 ) Print setting 21 / 24...
- Page 25 Print setting should be as the image up. 5 ) Advanced setting Press “Entry advanced Setup” and enter Password 16753. 1) Voltage adjust should choose 512, it’s default. 2) If ink emerge light or spitting, you can use higher voltage. If ink didn’t continue, and two much ink, please use lower voltage. The standard value is 512, and the range of value is 460-580. 3) Color order (KCMYCM) can be changed as per your need. 22 / 24...
- Page 26 6 ) Calibration values import and e xport Click “more…”in maintenance area and you will see the following image. After calibrate all values, please save them in your computer. If you need to change carriage board, you should import the files you saved in this step. 23 / 24...
- Page 27 7) Control panel 8) Carriage connection instruction Mainboard 24 / 24...
- Page 28 USB Internet access Connect Feeding Feeding carriage servo 1 servo 2 board Power (3) Wiper motor UV lamp and sensors(4) Ink pump Wipe sensors(5) Connect Led panel 4. How to Install Software 25 / 24...
-
Page 29: Step One: Decompress The Software
4.1 Install Maintop Software Step One:Decompress the software and open the folder and double click “INSTALL” to install the software. 4.2 Step Two: Select Installation Folder and press “OK”. 4.3 Step Three: After depressing, there is a windows come out “MainTop RIP Port Monitor installation is failed!” and press ok. 26 / 24... - Page 30 27 / 24...
-
Page 31: Step Five:
4.4 Step Four: Select “Restart later” and press “Close”. 4.5 Step Five: Press “Close” on the READ MEE. 4.6 Step Six:Select “MainTop Print Manager” and “MainTop” and Send to “Desktop creat shortcut”. 28 / 24... - Page 32 4.7 Step Seven:Open the “MainTop” shortcut on the Desktop, then press “File” and select “Printer Setup” open it. 29 / 24...
- Page 33 4.8 Step Eight:Select the “Microsoft XPS Document Writer,Ne00” and press “Install”. 4.9 Step Nine:Press “Custom”. 4.10 Step Ten:Copy the Color Curve“DYMK_DYE_SY_XP600_20170423” from our CD disk to Desktop, and select the “easyjet”(File inside that folder) and press Open.(The Color Curves is different of Epson DX5,DX7,XP600,5113 printhead). 21 / 24...
- Page 34 4.11 Step Eleven:Press “Set As Default Printer” and press OK then finish. 21 / 24...
- Page 35 5. Common Questions and Answers Common questions Question analysis Answer and solutions Number a) Check power outlet, cable and Check parts related to power and see if power box and see if they are in there’s 24V power output. good condition. b) Main board fused Change fuse After power on, c) Led lamp in carriage board Cables of 26P need to be connected printer has no action, does not work; main board or tightly; Voltage from main board carriage doesn’t move carriage board broken. abnormal, then change main board or carriage board. d)Carriage board servo driver Check connecting between servo driver abnormal and main board; change a new servo driver. a) Wrong signal from raster slip Check raster slip and encoder Carriage board moves b) Carriage moves left only Cables of 26P don’t connect well; change and can’t back ink new carriage board or main board; station. motors connecting not well or change new motors. Carriage board backs Original sensor broken Check sensor connecting ink station normally, but hit the right bar.
- Page 36 print c) cables connecting main board Check cables connecting and carriage board are not connected well a) carriage board is broken Change new carriage board Printing is not finished but data transmission b) there is not enough space to Clean installation disk or change another ends install maintop disk so that the space is big enough a) feeding adjustment is not good Make feeding adjustment again; change different media to adjust Empty or overlapping b) media situation different from Adjust media feeding in system and make printing feeding calibration and printing media feed well Image printing size is a) calibration values are not Calibrate feeding again or change values too long or short correct in maintop a) distance between head and Adjust the distance media is too high( normal 1.8-2.2mm) Bad resolution and ink b) lower than 42V Check 42V power and see if it’s OK spitting c) vertical calibration and Make vertical and two-way calibration two-way calibration is not good again...
Need help?
Do you have a question about the S Series and is the answer not in the manual?
Questions and answers