
Related Manuals for OHAUS Voyager V10640


Summary of Contents for OHAUS Voyager V10640
- Page 1 Ohaus Corporation Ohaus Corporation Ohaus Corporation Ohaus Corporation Ohaus Corporation 29 Hanover Road Florham Park, NJ 07932-0900 INSTRUCTION MANUAL Balances...
- Page 2 Certificado ISO 9001 para Ohaus Corporation. Quality International (BVQI) y ha obtenido el certificado ISO 9001. Esto acredita que Ohaus Corporation, USA, dispone de un sistema de calidad que cumple las normas internacionales para gestión y garantfa de calidad (ISO serie 9000). Con ocasión de las inspecciones de repetibilidad por parte de la BVQI, se comprueba periódicamente si el sistema de calidad se manipula de forma correcta.
- Page 3 Cuando la letra M aparece sobre fondo sólido, la balanza se puede poner inmediatamente en funcionamiento. Si el fondo está dividido y rayado, la balanza ha de ser verificada en el lugar de uso por el sevicio técnico Ohaus certificado.
- Page 4 NOTE: THIS EQUIPMENT HAS BEEN TESTED AND FOUND TO COMPLY WITH THE LIMITS FOR A CLASS A DIGITAL DEVICE, PURSUANT TO PART 15 OF THE FCC RULES. THESE LIMITS ARE DESIGNED TO PROVIDE REASONABLE PROTECTION AGAINST HARMFUL INTERFERENCE WHEN THE EQUIPMENT IS OPERATED IN A COMMERCIAL ENVIRONMENT. THIS EQUIPMENT GENERATES, USES, AND CAN RADIATE RADIO FREQUENCY ENERGY AND, IF NOT INSTALLED AND USED IN ACCORDANCE WITH THE INSTRUCTION MANUAL, MAY CAUSE HARMFUL INTERFERENCE TO RADIO COMMUNICATIONS.
- Page 5 TABLE OF CONTENTS TABLE OF CONTENTS TABLE OF CONTENTS TABLE OF CONTENTS TABLE OF CONTENTS OVERVIEW OF CONTROLS ........................1 GETTING TO KNOW YOUR BALANCE ...................... 2 Introduction ..............................2 INSTALLATION ............................2 Unpacking and Checking the Standard Equipment ..................2 Selecting the Location ..........................
- Page 6 TABLE OF CONTENTS (Cont.) TABLE OF CONTENTS (Cont.) TABLE OF CONTENTS (Cont.) TABLE OF CONTENTS (Cont.) TABLE OF CONTENTS (Cont.) 3.14.2 Solid Density Determinations ........................27 3.14.3 Improving the accuracy of the Result of Solid Density Determinations ............. 30 3.14.4 Liquid Density Determinations ........................30 3.15 Library ..............................
-
Page 7: Overview Of Controls
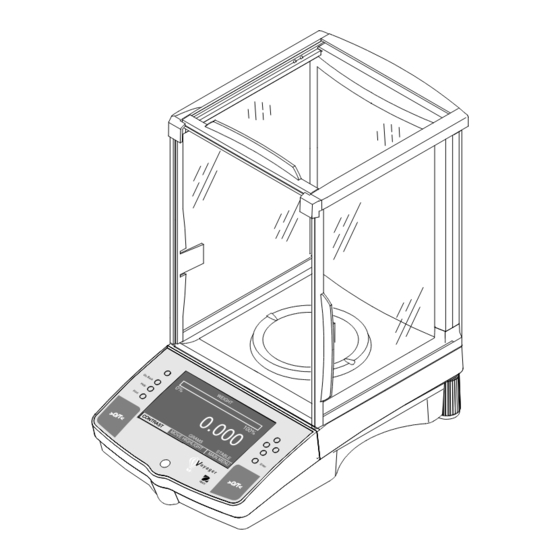
OVERVIEW OF CONTROLS WEIGHT 100% Go Back 0.00 Help Print Enter GRAMS STABLE CONTRAST CONTRAST MOVE HIGHLIGHT MAIN MENU Designation Function LCD display on off button. Go Back button Permits going back in menus. Help button Provides additional information on subject displayed in the current menu. Print button When pressed, prints data either on an external printer or computer. -
Page 8: Getting To Know Your Balance
Voyager Balance. 1.1 Introduction Thank you for deciding to purchase a Voyager Balance from Ohaus. Thanks to a new modular design, your Voyager Balance lets you adapt the balance to your changing needs. Remote displays, upgraded displays which can be table, wall or tower mounted are available as accessories. -
Page 9: Selecting The Location
2.2 Selecting the Location The balance should always be used in an environment which is free from excessive air currents, corrosives, vibration, and temperature or humidity extremes. These factors will affect displayed weight readings. DO NOT install the balance: • Next to open windows or doors causing drafts or rapid temperature changes. -
Page 10: Installing Cover Plate And Pan
2.4 Installing Cover Plate and Pan Balances in the range of 62g to 410g are shipped with the pan and the protective cover plate not installed. On balances equipped with a draft shield, slide open the side door and place the cover plate into position. Then, insert the pan into the center hole which is the measuring transducer. -
Page 11: Operating Your Balance
3. OPERATING YOUR BALANCE 3.1 Main Menu The Voyager balance has one main menu from which all selections are made. Shown below is the normal weighing display screen and the main menu screen. MAIN MENU WEIGHT Go Back 100% Go Back CHANGE MODE CHANGE UNITS SET BALANCE... -
Page 12: Turning On The Balance
3.2 Turning On the Balance The Voyager balance is ready to operate after the the installation procedures are performed. When the balance is first turned on and it completes its checks, and is calibrated, it can be used to weigh or tare materials without setting the menus. - Page 13 3.3.1 Auto Calibration (AutoCal On Voyager balances equipped with the AutoCal feature, calibration can be accomplished using an internal calibra- tion mass. Auto calibration can be performed at any time providing the balance has warmed up to operating tempera- ture. PROCEDURE WEIGHT •...
-
Page 14: Span Calibration
3.3.2 Span Calibration Span calibration normally requires that calibration be made using a mass equal to the full capacity of the balance, however, the Voyager balance can be calibrated using other lesser values as specified on the display. PROCEDURE WEIGHT •... -
Page 15: Linearity Calibration
3.3.3 Linearity Calibration Linearity calibration utilizes three calibration points, one at zero, center span and full span. This method minimizes deviation between actual and displayed weights within the balance's weighing range. Three weight values are used; zero, a weight value at midpoint of the balance's weighing range and a weight value at or near the specified capacity. PROCEDURE WEIGHT 100%... -
Page 16: User Calibration
3.3.4 User Calibration User calibration is used when it is desired to calibrate the balance using a mass of known value. To use this calibra- tion feature, proceed as follows: PROCEDURE WEIGHT 100% Go Back • Press arrow button to select MAIN MENU. 0.00 Help Print... -
Page 17: Calibration Test
3.3.5 Calibration test Calibration test feature allows a check of a known calibration mass against the last stored calibration information in the balance. The sample displays shown are for a 4.1 kilogram balance. PROCEDURE WEIGHT 100% Go Back • Press arrow button to select MAIN MENU. -
Page 18: Setting Measuring Unit
3.4 Setting Measuring Unit Before using the balance for the first time, the desired measuring unit should be set first. The following measuring units are available: MILLIGRAMS, GRAMS, KILOGRAMS, PENNY WEIGHTS, CARATS, OUNCES, TROY OUNCES, GRAINS, HONG KONG TAELS, SINGAPORE TAELS, ROC TAELS, POUNDS, NEWTONS, TICALS and CUSTOM UNITS. -
Page 19: Basic Weighing
3.5 Basic Weighing Voyager balances are shipped with grams enabled. When the balance is to be used with other Type Approved/Legal for Trade units of measure, the desired unit must be enabled. For weigh below applications, refer to section on density measurements. -
Page 20: Parts Counting
3.6 Parts Counting The Voyager balance can be set to either an Easy Count or Advanced Count parts counting method. Easy Count setting enables a simplified method for counting parts. When selected, Easy Count displays a screen which requires that the number of sample parts be entered. After this entry, putting a quantity of samples on the pan, the balance will display the actual number of samples. -
Page 21: Advanced Counting
3.6.2 Advanced Counting Advanced Count setting contains a number of entry screens which include assigning a library name, filling and sorting applications and statisical information which can be printed. Refer to screen 4 below which contains the following entries: LIBRARY NAME - A name up to 10 characters can be entered and stored to identify the item to be counted. A.P.W. -
Page 22: Filling
3.7 Filling Filling or Fill weighing permits you to enter a target weight, then view other loads as a percentage of the reference which has been set in the balance parameters. The load you place on the platform is displayed as a percentage of what was entered into the balance. -
Page 23: Animal Weighing
3.8 Animal Weighing Animal weighing permits you to weigh small animals directly on the balance. To compensate for active subjects, a setup menu permits you to enter a smoothing filter labeled Good, Better and Best which averages the subjects movements and displays an accurate weight. A single bar display indicates up to 100% of the capacity of the bal- ance. -
Page 24: Check Weighing
3.9 Check Weighing Check weighing mode permits you to weigh an item, set balance parmeters such as the nominal weight, over weight, under weight, type of display: normal shown with a bar graph and a numeric display or sign which spells out under, accept, over in large letters and assign a library name. -
Page 25: Differential Weighing
3.10 Differential Weighing Differential weighing stores tare and weight values so a sample can be dried and the difference calculated at a later time. Up to 100 samples can be stored. samples can be added to the applications library. Batch and individual samples can be accommodated.The features in the Voyager balance for differential weighing include: RECALL - When selected, brings up previously stored library names associated with each sample. - Page 26 3.10 Differential Weighing (Cont.) Procedure (Cont.) Initial Weighing First, the container is tared and stored, then the product DIFF WEIGHING - - NAME -- SAMPLE 1 is intially weighed in the container and stored for each 100% sample. A name is given to the samples which is stored TARE WT= 19.09 in the balance.
-
Page 27: Formulation
3.11 Formulation The Voyager balance can store between 200 minimum and 500 formulations limited only by the memory capacity of the resident library. Each formulation can be named and have up to 10 components specified and identified by name. Once the formulations are stored in the balance library, they may be recalled and used at any time. Each component of a given formulation can be specified as to its weight or percentage. - Page 28 3.11 Formulation (Cont.) Procedure (Cont.) FORMULATIONS BY WEIGHT (cont.) MAIN MENU CHANGE MODE • Press Enter button, a NAME menu appears with the FORMULATION BASIC WEIGHING FORMULA SETUP PARTS COUNTING SETUP value shaded. FILL CHANGE UNITS CHANGE MODE SET BALANCE LIBRARY NAME MAIN MENU CHANGE MODE...
- Page 29 3.11 Formulation (Cont.) Procedure FORMULATIONS BY PERCENTAGE Formulations can be done by using percentages instead of weight values. See page 21 and repeat procedure up to where screen choice for WEIGH TYPE is displayed, Then continue as follows: • Press arrow button and select WEIGH TYPE.
-
Page 30: Quick Check Weighing
3.12 Quick Check Weighing Quick check weighing permits you to place a reference sample or a sample weight on the balance pan which is used as a reference weight to measure against similar samples. A single bar display indicates up to 100% of the capacity of the balance, the difference in weight between the original sample and suceeding samples is displayed. -
Page 31: Statistics
3.13 Statistics Statistics is used when it is desired to compare a number of samples and examine the relative deviation of the samples along with other statistical data such as mean, sum, maximum and minimum and difference. A minimum of three samples is required in this program. -
Page 32: Density
3.14 Density Density determinations of solids and liquids can be made with the Voyager balance. A Density Determination Kit Part Number 470007-010 is specifically designed to be used with Ohaus Analytical Voyager balances. Illustrations in this ® procedure refer to the density kit, however, you may use whatever lab apparatus will suit the requirements for density measurements. -
Page 33: Solid Density Determinations
3.14 Density (Cont.) 3.14.2 Solid Density Determinations (Cont.) As previously mentioned, the balance contains built in density tables for water and and ethanol. In the the event that a different liquid is to be used, provisions are made to enter the density of the desired liquid and enter its name into a library. - Page 34 3.14 Density (Cont.) 3.14.2 Solid Density Determinations (Cont.) Procedure (Cont.) • Press Enter button, ENTER TEMPERATURE is displayed. • Using the arrow buttons, enter the temperature of the liquid in the beaker. • Press Enter button, the display DENSITY SOLID requests item to weighed, press the >O/T<...
- Page 35 3.14 Density (Cont.) 3.14.2 Solid Density Determinations (Cont.) For density determination of solids with a density less than 1 g/cm , the bottom of the Weigh Below Hook for solids must be used as it holds the solid body below the surface of the auxiliary liquid. If the buoyancy of the solid is greater than the weight of the Weigh Below Hook, the Weigh Below Hook must be weighted by placing an additional mass on the submerged part of the Weigh Below Hook as shown.
-
Page 36: Improving The Accuracy Of The Result Of Solid Density Determinations
3.14 Density (Cont.) 3.14.3 Improving the Accuracy of the Result of Solid Density Determinations The following tips should help you improve the accuracy of the results in the density determination of solids. Temperature Solids are generally so insensitive to temperature fluctuations that the corresponding density changes are of no consequence. -
Page 37: Library
3.15 Library The Voyager balance can store approximately 200 names in the library. Four functions in the balance have provisions for storing a library name, they are: Advanced Counting, Check Weighing, Differential Weighing and Formulation. When a library name is selected, the associated function is also displayed along with the percentage of memory used for the entry. -
Page 38: Printing Data
3.16 Printing Data Printing data to an external computer or printer requires that the communications parameters be set first. Refer to Section 4, Setting up Your Balance. Procedure WEIGHT • Press the Print button. Printing to an external printer or computer will occur each time the Print button is 100% Go Back 0.00... - Page 39 3.16 Printing Data (Cont.) SAMPLE PRINTOUTS Span Calibration Printout When performing a Span calibration, a printout is auto- - - - - - SPAN CAL - - - - - - matically made after the calibration mass is placed on 7/01/96 1:00:00 PM the pan and the Print button is pressed.
-
Page 40: Setting Up Your Balance
4. SETTING UP YOUR BALANCE The Voyager balance has nine menus under SET BALANCE which are listed as follows: AUTOCAL - Function can be set ON or OFF. READOUT - User menu is used to adapt the balance to PRINT CURRENT SETTINGS - When selected, print data to environmental conditions. -
Page 41: Interface
4.2 Interface The Interface menu enables you to set the balance communication parameters for an RS 232 interface. The baud rate, data bits, parity and stop bit can be set to match the communication requirements of external printers or computers. Procedure •... -
Page 42: Print Option
4.3 Print Option The Print Option menu contains various print features which can be set ON or OFF and include Auto Print, Stable Data only, Numeric Data only, Date, Time and Reference data. Procedure Auto Print WEIGHT When enabled, Auto Print causes the balance to auto- matically output display data in one of three ways: 100% Go Back... - Page 43 4.3 Print Option (Cont.) Procedure Numeric Data MAIN MENU When set ON, only numeric data will be output. SET BALANCE CHANGE MODE CHANGE UNITS MAIN MENU SETUP BALANCE • Press arrow button to select MAIN MENU. READOUT INTERFACE LIBRARY CUSTOM MENU PRINT OPTION CALIBRATION •...
- Page 44 4.3 Print Option (Cont.) Procedure Print Time MAIN MENU When Print Time is turned ON, current time will be output to the printer. CHANGE MODE CHANGE UNITS SET BALANCE MAIN MENU SETUP BALANCE READOUT INTERFACE • Press arrow button to select MAIN MENU. PRINT OPTION LIBRARY CUSTOM MENU...
-
Page 45: Setup Glp
4.4 Setup GLP Setup GLP (Good Laboratory Practices) menu allows the selection of Time, Balance Identification Number, WEIGHT Identification Number, Project Number, Calibration and Name data to be printed. The purpose of this menu is to 100% Go Back permit the printing of the above selected items. These 0.00 Help items are not displayed. -
Page 46: Set Time/Date
4.5 Set Time/Date Permits entering time and date into the balance. A battery backup is used for the memory, time and date information. The life of the battery is up to five years. Time and date information appears on printed data and to an external computer when connected to the balance. -
Page 47: Auto Calibration
4.6 Auto Calibration Automatic calibration of the balance can be accomplished when equipped with this option. On balances which do not contain AutoCal , the automatic calibration function is inoperative. On balances equipped with AutoCal , a second screen permits turning this function ON or OFF. Procedure •... -
Page 48: Print Current Settings
4.7 Print Current Settings When this function is selected, and the Enter button is pressed, all settings which were made in the balance are sent to an external printer or computer. This is a quick method of checking the balance settings. Procedure •... -
Page 49: Reset
4.8 Reset When this function is selected, and the Enter button is pressed, settings which were made in Readouts, RS232, Print Option and GLP Print Option can be reset to factory settings. Procedure • Press arrow button to select MAIN MENU. WEIGHT •... -
Page 50: Lock Out
4.9 Lock Out Lock Out when selected permits various measurement units, calibration methods, and balance functions to be selected and either turned on or off or locked out. Procedure • Press arrow button to select MAIN MENU, WEIGHT press Enter button. 100% Go Back •... -
Page 51: Custom Menu
4.10 Custom Menu Custom menu provides a convienent way of selecting one or more balance functions. By entering the Custom menu, you can quickly select your most used function and operate the balance. There are 16 items in the menu which parallel the menus in the CHANGE MODE and SET BALANCE menus and are listed with the associated paragraphs in the manual at the bottom of the page.. -
Page 52: Menu Lock-Out Protection
4.11 Menu Lock-Out Protection Access to the various menus can be disabled setting the Lockswitch located on the PC board inside the balance to OFF position. The Lockswitch locks out certain menus when Legal For Trade is turned ON. The default setting for the Lockswitch is OFF. -
Page 53: Legal For Trade (Lft)
4.12 Legal for Trade (LFT) Legal for trade (LFT) is a software controlled option which can be set Legal For Trade ON or OFF. When set ON, certain items in the Calibration and Set Balance menus are automatically preset and locked to permit the balance to operate in a legal for trade application and works in conjunction with a Lock Out switch. -
Page 54: Care And Maintenance
5. CARE AND MAINTENANCE To keep the balance operating properly, the housing and platform should be kept clean and free from foreign material. If necessary, a cloth dampened with a mild detergent may be used. Keep calibration masses in a safe dry place. 5.1 Troubleshooting PROBABLE CAUSE(S) SYMPTOM... -
Page 55: Rs232 Interface
5.2 RS232 Interface Voyager balances are equipped with a bi-directional RS232 Connection RS232 compatible interface for communication with printers and computers. When the balance is connected directly to a printer, displayed data can be output at any time by simply pressing PRINT. Connecting the balance to a computer enables you to operate the balance from the computer, as well as receive data such as displayed weight, weighing mode,... - Page 56 5.2 RS232 Interface ( Cont.) RS232 COMMAND TABLE (Cont.) Command Command Command Command Command Character Character Character Description Description Description Character Character Description Description Set 1 second print delay (set x = 0 for OFF, or x = 1 for ON) Print current function.
- Page 57 RS232 COMMAND TABLE (Cont.) Command Command Command Command Command Character Character Character Character Character Description Description Description Description Description Print current Parts Count Reference Weigh. # # # # # Print current Percent Reference Weigh. Set Auto Print feature, action CA - continuous printing, SA - print on stability, 0A - turns all selections off.
-
Page 58: Error Codes List
5.3 Error Codes List Error Codes List The following list describes the various error codes and which can appear on the display and the suggested remedy. Data Errors Transient error (hardware error, probably static discharge). If error persists, the balance must be serviced. -
Page 59: Service Information
If the Troubleshooting section does not resolve or describe your problem, you will need to contact an authorized Ohaus Service Agent. For Service assistance in the United States, please call Aftermarket, Ohaus Corporation toll- free at (800) 526-0659. An Ohaus Product Service Specialist will be available to help you. -
Page 60: Specifications
5.8 Specifications Analyticals Capacity (g) 100/210 * Readability (mg) 0.1/1 Weighing modes g, mg, oz , oz t, ct, dwt, taels (3), mommes, gn, ti, N, custom unit Functions Parts counting, differential weighing, quick check, statistics, formulation, filling, animal weighing, percent formulation, check weighing, density determination, SQC &... - Page 63 Ohaus. In lieu of a properly returned warranty registration card, the warranty period shall begin on the date of shipment to the authorized dealer.
- Page 64 Florham Park, NJ 07932, USA Tel: +44 (0) 1954 251343, Tel: (201) 377-9000, Fax: +44 (0) 1954 250205 Fax: (201) 593-0359 With offices in Germany, France, Spain, Italy, Canada, Mexico and Japan. P/N 400040-022 © Ohaus Corporation 1997, all rights reserved.
- Page 65 Operating instructions balances...
- Page 66 Ohaus Corporation, 29 Hanover Road, Florham Park, New Jersey, 07932, USA...
- Page 67 Notice Hinweise Remarques Notas Avvertenza...
- Page 68 Unauthorized changes or modifications to this equipment are not permitted. NOTICE:...
- Page 69 Contents GETTING TO KNOW YOUR VOYAGER BALANCE INSTALLATION THE MENU CALIBRATION...
- Page 70 WEIGHING MADE SIMPLE BALANCE MODES BALANCE SETTINGS...
- Page 71 RS232 INTERFACE/PRINTING DATA CARE AND MAINTENANCE APPENDIX SPECIAL APPLICATIONS...
- Page 72 Overview of controls Designation Function...
- Page 73 1. Getting to know your Voyager balance 1.1 Introduction 1.2 Overview of the Voyager balance GLP G SOP S...
- Page 74 What you should know about these instructions Safety is first...
- Page 75 2. Installation 2.1 Unpacking and checking the standard equipment Analytical Capacity...
- Page 76 2.2 Selecting the location DO NOT 2.3 Leveling the balance NOTE 2.4 Installing cover plate and pan...
- Page 77 2.5 Installing wind shield 2.6 Power supply Ensure that the AC adapter can never come into contact with liquids! Allow your balance to warm up for at least 30 minutes...
- Page 78 2.7 Switching the balance on and off switch the balance on switch the balance off 2.8 Weigh below preparation...
- Page 79 3. The menu 3.1 What is the menu? CHANGE MODE CHANGE UNITS SET BALANCE CUSTOM MENU LIBRARY CALIBRATION CONTRAST 1. Change mode 2. Change units: 3. Set balance: Readout: Interface: Print option: Setup GLP: Set time/date: Autocal enable: Print current settings: Reset: Lockout: Software version:...
- Page 80 3.2 Menu operation How to change from the weighing mode to the main menu Enter Enter How to select the menu options How to enter the menu option Enter Enter How to enter alpha numeric data Enter Enter Go Back Go Back...
- Page 81 How to save your settings and quit the menu Enter Enter Enter How to back out of a menu Go Back Go Back Go Back 3.3 Library Go Back From main menu Enter Accessing library function Enter entire...
- Page 82 4. Calibration Span - Linearity - User - Test - AutoCal AutoCal W/Delta Correction...
- Page 83 Calibration Menu Protection Calibration Masses CALIBRATION MASSES...
- Page 84 Span calibration From main menu Enter Enter Enter Enter Enter Enter...
- Page 85 4.2 Linearity calibration From main menu Enter Enter Enter Enter Enter Enter Enter...
- Page 86 4.3 User calibration From main menu Enter Enter Enter Enter Enter Enter Enter...
- Page 87 4.4 Calibration test From main menu Enter Enter Enter Enter Enter Enter...
- Page 88 4.5 Auto calibration (AutoCal From main menu Enter Enter Enter Enter...
- Page 89 4.6 AutoCal delta correction From main menu Enter Enter Enter Enter...
- Page 90 5. Weighing made simple 5.1 Selecting a weighing unit From main menu Enter Enter Display/Designation Comments...
- Page 91 5.2 Taring the balance ->O/T<- >O/T< STABLE 5.3 Performing a simple weighing Go Back...
- Page 92 5.4 Custom unit Leaves decimal point in normal position. From main menu Enter Enter Enter Enter...
- Page 93 Unit name Factor Decimal point Enter Enter Least significant digit Enter...
- Page 94 Enter Enter Enter Enter...
- Page 95 6. Balance modes 6.1 Parts counting 6.1.1 Easy count All parts must be reasonably uniform in weight. From main menu Enter Enter...
- Page 96 From main menu Enter Library name APW/Size Tare weight Auto optimization Function link Enter...
- Page 97 6.2 Filling From main menu Enter...
- Page 98 6.3 Animal weighing From main menu Enter Enter Enter Enter Enter...
- Page 99 6.4 Check weighing From main menu Enter Enter...
- Page 100 6.5 Differential weighing From main menu Enter Library name Enter Enter...
- Page 101 Automatic sampling Enter Difference result Enter Enter NAME WEIGHT OF SAMPLES CLEAR ALL DATA Enter number of samples Processing the samples No Tare - Initial weighing Enter...
- Page 102 No Tare - Final weighing Enter Enter Single Tare - Initial weighing (one container) Enter...
- Page 103 Enter Single Tare - Final weighing (one container) Enter...
- Page 104 Dual Tare - Initial weighing (two containers) Enter Enter Dual Tare - Final weighing (two containers) Enter...
- Page 105 From main menu Library name Enter Weigh type Enter Number of items...
- Page 106 Enter Specifying component names Specifying weight or percentage values Adding first component Enter Enter Adding remaining components Enter Enter Final results Enter...
- Page 107 6.7 Quick check weighing From main menu Setting reference weight ->O/T<- Adding samples Setting new reference weight Enter...
- Page 108 6.8 Statistics/Function link From main menu Enter Library name Turning statistics on or off Selecting a function link Running the program Statistical result display...
- Page 109 6.9 Density 6.9.1 Balance preparation with density kit...
- Page 110 6.9.2 Solid density determinations for items more dense than water •Q (P =A - B •Q A -B). From main menu Enter Library name Enter...
- Page 111 Selecting water as auxiliary liquid Enter Specify temperature Selecting an auxiliary liquid Enter Specify auxiliary liquid density Return to setup Enter Auto sample Enter Auto print Enter Testing the sample Enter...
- Page 112 >O/T< Enter Enter 6.9.3 Solid density determinations for items less dense than water...
- Page 113 6.9.4 Improving the accuracy of the result of solid density Temperature Air buoyancy + 0.001 Surface tension of the auxiliary liquid...
- Page 114 6.9.5 Liquid density determinations P = A-B) Select liquid density Enter sinker volume must not...
- Page 115 6.10 Statistical quality control (SQC) From main menu Enter Library name Tolerance Enter Defining tolerances Selecting tare...
- Page 116 Selecting type of tare Selecting auto sample/auto print Specifying sample size Specifying batch name Taking samples Sample # 1 Enter Enter...
- Page 117 Enter Remaining samples Batch history result Enter Analyzing data Go Back Viewing mean value trace Symbol Definitions...
- Page 118 Selecting batch history Go Back Enter Viewing batch history 6.10.1 Resuming a particular SQC setup From main menu Enter Enter library name Select resume Enter...
- Page 119 Select run Enter Adding additional samples 6.10.2 Specifying new SQC setup From main menu Enter Enter library name Select new setup Enter Completing new setup Enter...
- Page 120 6.10.3 Redoing or correcting a batch Exiting a sample set containing an error Go Back Entering current library name Select previous setup Enter Select run Enter Clearing previous data set...
- Page 121 6.11 Pipette calibration From main menu Enter Library name Test liquid Enter Selecting water as the test liquid Enter Enter Enter temperature of water Selecting other test liquid Enter...
- Page 122 Enter density of test liquid Enter Return to setup Enter Enter Enter barometric pressure Enter Enter Select unit of atmospheric pressure measurement Enter Specify barometric pressure Enter Select auto sampling Enter Enter Enter Select auto print on Enter Enter...
- Page 123 Set auto print on Enter Enter Select number of samples Enter Enter Enter sample size Enter Select pipette name Enter Enter Enter pipette name Enter Enter Enter pipette number Enter Select nominal Enter Enter Select nominal value unit Enter...
- Page 124 Enter nominal value Enter Select inaccuracy Enter Enter Enter inaccuracy value Enter Select imprecision Enter Enter Enter imprecision value Enter Taking samples Enter Enter...
- Page 125 Enter Enter...
- Page 126 7. Balance settings 7.1 Reset to factory settings From main menu Enter Enter Reset to factory settings Enter Enter Enter 7.2 Setting contrast and brightness of display Enter Enter Enter Back...
- Page 127 7.3 Setting the readout From main menu Enter Enter Enter Setting averaging level Enter Enter Setting stability level Enter Enter Setting auto-zero Enter Enter Setting legal for trade Enter...
- Page 128 7.4 Setting the interface From main menu Enter Enter Enter Setting baud rate Enter Setting data bits Enter Setting parity Enter Setting stop bits Enter...
- Page 129 7.5 Setting print option From main menu Enter Enter Enter Setting auto print Enter Setting stable data, numeric data, print date, print time, print reference Setting functions on or off Enter...
- Page 130 7.6 Setting GLP print options From main menu Enter Enter Enter Enter project name Enter Specify the project name Select user name Enter Specify the user name Enter Setting GLP print options Setting functions on or off Enter...
- Page 131 7.7 Setting time and date From main menu Enter Enter Enter Setting date type Enter Enter Setting date Enter Enter Setting time type Enter Enter Enter...
- Page 132 Enter set time Enter Enter Setting the time Setting am/pm Go Back 7.8 Setting auto calibration From main menu Enter Enter Enter Enter 7.9 Print current settings From main menu Enter Enter...
- Page 133 7.10 Lock out From main menu Enter Enter Enter...
- Page 134 7.11 Software version From main menu Enter Enter 7.12 Setting custom menu From main menu Enter Setting functions on or off Enter LIST OF CUSTOM MENU ITEMS Enter Enter...
- Page 135 7.13 Legal for trade (LFT) Lock Out From main menu Enter Enter Legal for trade default settings LFT DEFAULT TABLE LFT and Lockswitch Default Value...
- Page 136 7.14 Menu lockout protection Legal For Trade Type Approved/Legal for Trade Balance Sealing Sealing the balance — — Higher capacity balances with a 6" or 8" pan do not have a cover plate. — — — —...
- Page 137 8. RS232 interface/printing data 8.1 RS232 interface Hardware Output Formats RS232 Commands...
- Page 138 Command Character Description...
- Page 139 Command Character Description...
- Page 140 8.2 Printing data Print Time and date...
- Page 141 Span calibration printout Linearity calibration printout Calibration test printout...
- Page 142 Pipette test printout...
- Page 143 9. Care and maintenance 9.1 Troubleshooting >O/T<...
- Page 144 9.2 Error codes list Error Codes List Data Errors Tare Errors Calibration Errors RS232 Errors User Errors Over-Under Load Errors CheckSum Errors...
- Page 145 9.3 Information messages 9.4 Service information 9.5 Replacement parts 9.6 Accessories Calibration Masses - ASTM Class 1 Tolerance:...
- Page 146 9.7 Specifications Analyticals Capacity (g) 100/210 * Readability (mg) 0.1/1 Weighing modes mg, g, kg, dwt, ct, oz , oz t, gn, taels (3), mommes, lbs, N, ti, custom unit Functions Parts counting, differential weighing, quick check, statistics, formulation, filling, animal weighing, percent weighing, check weighing, density determination, SQC &...
- Page 147 A-1 Sieve analysis basic sample is weighed first with it’s container weight tared From main menu Enter Specify the library name Enter Tare setup Enter Enter Enter Auto sample Enter Enter Enter Diff result Enter Enter...
- Page 148 Enter total sample weight Enter Enter Enter number of samples Enter Specify the number of samples Enter Initial weighing of sieves Enter Enter Enter Enter Enter CONTINUE Enter...
- Page 149 Final weighing of sieves Enter Enter Enter Enter...
- Page 150 Porous material density determinations record its weight From main menu Enter Library name Enter Selecting water as auxiliary liquid Enter Specify temperature Specify porous material Enter Enter dry weight...
- Page 151 Enter oil density Auto sample Enter Auto print Enter Testing the sample Enter To determine wet density...
- Page 152 LIMITED WARRANTY...
- Page 154 Operating instructions balances...
- Page 155 ISO 9001 Registration for Ohaus Corporation. International, BVQI, and was awarded ISO 9001 registration. This certifies that Ohaus Corporation, USA, has a quality system that conforms with the international standards for quality management and quality assurance (ISO 9000 series). Repeat audits are carried out by BVQI at intervals to check that the quality system is operated in the proper manner.
- Page 156 Si el fondo está dividido y rayado, la balanza ha de ser verificada en el lugar de uso por el sevicio técnico Ohaus certificado. Si la duración de la validez de la verificación está limitada de acuerdo con las normas de los distintos países, el propio usuario de tal balanza es responsable de la verificación posterior a su debido tiempo.
- Page 157 V0RW62 V1RW65 V1D110 V0D110 V1D112 V0D112 V1D115 V1F110 V0F110 V1F112 V0F112 V1F115 V1H110 V0H110 V1H112 V0H112 V1H115 V16130 V06130 V16135 V1F120 V0F120 V1F122 V0F122 V1F125 Ted Xia President Ohaus Corporation, Pine Brook, NJ USAn New Jersey, 07058, 03, April. 02...
- Page 158 Contents Contents OVERVIEW OF CONTROLS ........................8 GETTING TO KNOW YOUR VOYAGER BALANCE ..................9 Introduction ............................9 Overview of the Voyager balance ......................9 What you should know about these instructions ................. 10 Safety is first ........................... 10 INSTALLATION ..........................11 Unpacking and checking the standard equipment ................
- Page 159 Contents WEIGHING MADE SIMPLE ....................... 26 Selecting a weighing unit........................26 Taring the balance ........................... 27 Performing a simple weighing ......................27 Custom unit ............................ 28 BALANCE MODES ........................... 31 Parts counting ..........................31 6.1.1 Easy count .......................... 31 6.1.2 Advanced counting ....................... 32 Filling .............................
- Page 160 Contents Setting GLP print options ........................66 Setting time and date ........................67 Setting auto calibration........................68 Print current settings ........................68 7.10 Lock out ............................69 7.11 Software version ..........................70 7.12 Setting custom menu ........................70 7.13 Legal for trade ..........................71 7.14 Menu lock-out protection ........................
- Page 161 Overview Overview of controls BASIC WEIGHING 100% Go Back 0.00 Help Print Enter GRAMS STABLE PRESS <ENTER> FOR MENU Designation Function LCD display on off button. Go Back button Permits going back in menus. Help button Non functional. Print button When pressed, prints data either on an external printer or computer.
- Page 162 1. Getting to know your Voyager balance This section provides you with detailed information on your Voyager balance. Please read through the section carefully even if you have experience with OHAUS balances and be sure to familiarize yourself with the safety notes. 1.1 Introduction Thank you for deciding to purchase a Voyager Balance from Ohaus.
- Page 163 Operate and use your Voyager balance only in accordance with these operating instructions. Use only optional equipment and peripherals supplied by OHAUS. Your Voyager balance is ruggedly constructed, but is still a precision instrument. Treat it with the...
- Page 164 • 4100g, 6100g and 8100g balances with internal calibration are equipped with 6” Pan and Windshield. • Remove packing material from the instrument. • Check the instrument for transport damage. Immediately inform your Ohaus dealer if you have complaints or parts are missing.
- Page 165 Installation 2.2 Selecting the location The balance should always be used in an environment which is free from excessive air currents, corrosives, vibration, and temperature or humidity extremes. These factors will affect displayed weight readings. DO NOT install the balance: •...
- Page 166 Check to ensure the voltage printed on the AC adapter matches your local line voltage. If this is not the case, on no account connect the AC adapter to the power supply, but contact your responsible OHAUS dealer. Ensure that the AC adapter can never come into contact with liquids! Connect the AC Adapter supplied to the three pin connector located at the rear of the balance.
- Page 167 Installation 2.7 Switching the balance on and off Your balance is on at all times when connected to a power source, the display is on initially and can be turned off. To switch the balance on, press the button. As soon as the weight BASIC WEIGHING display appears, your balance is ready.
- Page 168 The menu 3. The menu 3.1 What is the menu? The menu allows you to match your balance to your specific weighing needs. In the menu, you can change the settings of your balance and activate functions. The Main Menu contains 7 selections. CHANGE MODE CHANGE UNITS SET BALANCE...
- Page 169 The menu 3.2 Menu operation In this section you will learn how to work with the menu. Information regarding the individual menu options and available settings can be found in the following sections. BASIC WEIGHING How to change from the weighing mode to the main menu The balance is operating in the basic weighing mode.
- Page 170 The menu How to save your settings and quit the menu MAIN MENU Enter Certain menu options have ON and OFF settings. In these options, pressing SAVING the Enter button saves the setting after you make a selection. In options which offer various settings, after you have selected a setting, press the Enter button.
- Page 171 Calibration 4. Calibration Your balance can be calibrated with an internal mass (optional) or external masses. The balance can also be checked by a test with internal or external masses. If you have a printer attached to your balance, the data of the calibration and the results are printed out following GLP recommendations.
- Page 172 Calibration Calibration Menu Protection Calibration may be locked out to prevent unauthorized personnel from changing calibration under LFT (Legal for Trade) mode. If calibration has been locked out, you can only access Internal Weight Calibration and Calibration Test. To lock out calibration menu, after calibration, refer to paragraph 7.14 titled Menu Lock-Out Protection.
- Page 173 Calibration 4.1 Span calibration Span calibration normally requires that calibration be made using a mass equal to the full capacity of the balance, however, the Voyager balance can be calibrated using other lesser values as specified on the display. CALIBRATE From main menu Enter SPAN...
- Page 174 Calibration 4.2 Linearity calibration Linearity calibration utilizes three calibration points, one at zero, center span and full span. This method minimizes deviation between actual and displayed weights within the balance's weighing range. Three weight values are used; zero, a weight value at midpoint of the balance's weighing range and a weight value at or near the specified capacity. CALIBRATE From main menu Enter...
- Page 175 Calibration 4.3 User calibration User calibration is used when it is desired to calibrate the balance using a mass of known value. To use this calibration feature, proceed as follows: From main menu CALIBRATE Enter SPAN Scroll to CALIBRATION and press the Enter button. Display advances to LINEARITY USER CALIBRATE with SPAN highlighted.
- Page 176 Calibration 4.4 Calibration test Calibration test feature allows a check of a known calibration mass against the last stored calibration informa- tion in the balance. From main menu CALIBRATE Enter SPAN Scroll to CALIBRATION and press the Enter button. Display advances to LINEARITY USER CALIBRATE with SPAN highlighted.
- Page 177 Calibration 4.5 Auto calibration (AutoCal On balances equipped with the AutoCal feature, calibration can be accomplished using an internal calibration mass. Auto calibration can be performed at any time providing the balance has warmed up to operating temperature. From main menu CALIBRATE Enter SPAN...
- Page 178 Calibration 4.6 AutoCal delta correction Balances with AutoCal contain software which allows the internal calibration mass to be adjusted + 100 divisions at full scale capacity. This permits calibrating the balance using an external ASTM Class 1 mass which is traceable to a certified standard.
- Page 179 Weighing made simple 5. Weighing made simple In this section, you will learn how to select a weighing unit, tare the balance, perform simple weighings and enter a custom unit. 5.1 Selecting a weighing unit In this menu option you specify which weighing unit is to be displayed. There are a total of 15 measuring units and custom units which can be selected.
- Page 180 Weighing made simple 5.2 Taring the balance The weight of any container can be tared by the press of a button. The taring range covers the entire weighing range of your balance. To tare a container, place it on the weighing pan. ->O/T<- Close all draft shield doors (if draft shield is used).
- Page 181 Weighing made simple 5.4 Custom unit Custom unit allows the creation of your own custom weighing units. It permits entering a conversion factor which the balance will use to convert grams to the desired unit of measure. Custom Units are stored in the Library. Values for up to fifteen different custom units can be entered.
- Page 182 Weighing made simple Unit name UNIT NAME Enter a unit name. The name you enter and custom unit characteristics will UNIT1 be stored in the library when you complete all entries. Display returns to <LEFT> / <RIGHT> TO MOVE CURSOR <UP>...
- Page 183 Weighing made simple Select the least significant digit. Scroll to either LSD 0.5, LSD 1, LSD 2, LSD SELECT LSD 5 or LSD 10 and press Enter button. Display returns to CUSTOM UNIT SETUP with UNIT NAME highlighted. Scroll to RETURN, press Enter button. CUSTOM UNITS menu is displayed CUSTOM UNIT SETUP with GO TO LIBRARY highlighted.
- Page 184 Balance modes 6. Balance modes Your balance has 11 additional modes of operation in addition to basic weighing. These built-in modes expand the possibilities of your balance and facilitate your daily work. The following sections will acquaint you with these modes.
- Page 185 Balance modes 6.1.2 Advanced counting Advanced Count contains a number of entries which include assigning a library name, filling and sorting applications and statistical information which can be printed. Once a library name is assigned, this particular counting function can be recalled at any time. PARTS COUNTING From main menu Enter...
- Page 186 Balance modes 6.2 Filling Filling permits you to enter a target reference weight, then view other loads as a percentage of the reference which has been set in the balance parameters. The load placed on the pan is displayed as a percentage of what was entered into the balance.
- Page 187 Balance modes 6.3 Animal weighing This feature permits weighing small animals directly on the balance. If an animal cage is used, the balance can be tared (weight of cage is subtracted) and then the subject is placed in the cage and weighed. An averaging filter compensates for animal movements.
- Page 188 Balance modes 6.4 Check weighing Check weighing is used when items are checked against preset balance parameters. This feature permits you to weigh an item, assign a library name, set balance parameters such as the nominal weight, over weight and under weight.
- Page 189 Balance modes 6.5 Differential weighing Differential weighing stores tare and weight values so samples can be dried or processed and the difference in weight calculated at a later time. Up to 80 samples can be stored. The balance has the capability to work with one or two different containers or no container at all.
- Page 190 Balance modes Automatic sampling DIFF WEIGHING SETUP Enter LIBRARY NAME TARE SETUP Enter AUTO SAMPLE. Auto Sampling permits repetitive sampling AUTO SAMPLE DIFF RESULT WEIGHT automatically. Select ON or OFF. Display advances to DIFF RESULT. NUMBER OF SAMPLES VIEW RESULTS CLEAR ALL DATA DIFF WEIGHING SETUP Difference result...
- Page 191 Balance modes This sample display indicates 3 samples taken with no tare. TAREWT INIT WT TARE WT FINAL \VT 7.705 0.000 Four options are available at the bottom of the display. CONTINUE permits 7.702 0.000 7.701 0.000 continuing with the procedure. SAVE permits saving the data and returns the balance to a weighing mode.
- Page 192 Balance modes This sample display indicates 3 containers weighed. Four options are TAREWT INIT WT TARE WT FINAL \VT 8.739 0.000 0.000 available at the bottom of the display. CONTINUE permits continuing with the 8.744 O.O00 0.000 8.738 0.000 0.000 procedure.
- Page 193 Balance modes DIFF WEIGHING SETUP Dual Tare - Initial weighing (two containers) Enter LIBRARY NAME TARE SETUP This procedure is used when separate containers are used at the start of a AUTO SAMPLE DIFF RESULT WEIGHT process and the end of a process. After pressing the Enter button, the NUMBER OF SAMPLES VIEW RESULTS display indicates to PUT INITIAL CONTAINER #1 ON PAN.
- Page 194 Balance modes 6.6 Formulation Formulations can be named and have from 2 to 10 components specified. Names are limited to 8 characters. Once named, they may be recalled and used at any time. Each component of a given formulation can be specified as to its weight or percentage.
- Page 195 Balance modes Enter SETUP in the FORMULATION SETUP. Display advances to a split screen. FORMULATION SETUP Enter LIBRARY NAME FORM2 WEIGH TYPE WEIGHT NUMBER OF ITEMS SETUP Specifying component names FORMULATION SETUP Specify the name for the first component of the formula, then press Enter 0.000 0.000 button.
- Page 196 Balance modes 6.7 Quick check weighing Quick check weighing permits placing a reference sample on the balance pan which is used as a reference weight to measure against similar samples. A single bar display indicates up to 100% of the capacity of the balance. The difference in percentage is also shown along with the reference weight.
- Page 197 Balance modes 6.8 Statistics/Function link Statistics are used when it is desired to compare a number of samples and examine the relative deviation of the samples along with other statistical data. A minimum of three samples is required in this program. Statistics contains menu options which include standard deviation, mean, sum, maximum, minimum, difference, relative deviation, auto sample and sample size.
- Page 198 Four methods of density determinations can be made with the Voyager balance. These are: solids more dense than water, solids less dense than water, porous material (impregnated with oil), and liquid density. A Density Determina- tion Kit Part Number 470007-010 is specifically designed to be used with Ohaus Analytical Voyager balances.
- Page 199 Balance modes 6.9.2 Solid density determinations for items more dense than water The density Q is the quotient of the mass m and the volume V. Q = m Density determinations are performed by using Archimedes’ principle. This principle states that every solid body immersed in a fluid loses weight by an amount equal to that of the fluid it displaces.
- Page 200 Balance modes Selecting water as auxiliary liquid AUX LIQ & MODE Enter <-SELECTED Select H2O, and perform the next step. If you are using a different liquid, skip OTHER POROUS MATERIAL the next step and continue. DRY WEIGHT O.000 DENSITY OF OIL 0.0000 RETURN TO SETUP Specify temperature...
- Page 201 Balance modes START/SAMPLE is highlighted. Make sure a beaker with liquid is in position on the stand in the balance. Press the >O/T< button to zero the balance reading. Place solid on top of the bracket as shown and close the draft shield doors. Weigh the solid (weight A) and press the Enter button.
- Page 202 Balance modes 6.9.4 Improving the accuracy of the result of solid density The following tips should help you improve the accuracy of the results in the density determination of solids. Temperature Solids are generally so insensitive to temperature fluctuations that the corresponding density changes are of no consequence.
- Page 203 Balance modes 6.9.5 Liquid density determinations The density of a liquid can be made using a sinker of known volume. The sinker is weighed in air and then in the liquid whose density is to be determined, The density, Q, can be determined from the two weighings as follows: Q = Density of the liquid A = Weight of the sinker in air A - B...
- Page 204 Balance modes 6.10 Statistical quality control (SQC) The Statistical Quality Control (SQC) feature is extremely useful during various types of process filling operations when it is desired to monitor and control the process to eliminate under and over filling. Provisions are made in the balance to accommodate the weight of various packaging methods.
- Page 205 Balance modes Selecting type of tare TARE SELECTION NO TARE Four types of taring are available. NO TARE is self explanatory, MEAN TARE MEAN TARE INDIVIDUAL TARE is used to subtract the packaging weight automatically, INDIVIDUAL TARE is ADD. WITH MT RETURN TO SETUP for each sample with display prompts, ADD with MT is additive weighing with mean tare.
- Page 206 Balance modes Sample # 2 SQC - - SQC2 Remove the first sample from the pan and place the second sample on the 100% PUT SAMPLE #2 ON PAN 12.305 pan. When the balance stabilizes, press the Enter button. When AUTO SAMPLE is ON, you do not have to press Enter.
- Page 207 Balance modes SQC SETUP Selecting batch history Go Back AUTO SAMPLE To select the batch history, press the Go Back button to enter the SQC SETUP AUTO PRINT NUMBER OF SAMPLES screen and scroll down to VIEW BATCH HISTORY. Press the Enter button. VIEW MEAN VALUE TRACE VIEW BATCH HISTORY START SAMPLING: 05/24/99 08:26:28A...
- Page 208 Balance modes Select run SQC SETUP Enter AUTO SAMPLE With RUN selected, press Enter button. AUTO PRINT NUMBER OF SAMPLES BATCH NAME VIEW MEAN VALUE TRACE VIEW BATCH HISTORY Adding additional samples SQC - - SQI Display returns to the name of the SQC identified and is ready to run sample PUT SAMPLE # 1 ON PAN 0.000 # 1.
- Page 209 Balance modes 6.10.3 Redoing or correcting a batch If during the course of taking samples, an error has occurred and you want to rerun the set of samples you are currently working with, this procedure will allow you to start a new set without recording data from the set containing errors.
- Page 210 Balance modes 6.11 Pipette calibration Pipette calibration checks the accuracy and precision values of pipettes by weight analysis. An analytical balance is recommended for maximum accuracy. The balance is capable of recording data from 3 to 30 samples of each pipette tested.
- Page 211 Balance modes Enter density of test liquid Enter the density value for the test liquid. The standard density for water has ENTER LIQUID DENSITY IN CC been pre-entered. Enter the correct value for the liquid you are using, and 0.9971 0.9971 press Enter button.
- Page 212 Balance modes Set auto print on AUTO PRINT Enter When set ON, results are automatically printed. Press the Enter button. Display advances to PIPETTE SETUP with NUMBER OF SAMPLES highlighted. PIPETTE SETUP Select number of samples Enter LIBRARY NAME Press the Enter button. The display advances to NUMBER OF SAMPLES. TEST LIQUID(G/CC) 0.9971 BARO PRESSURE...
- Page 213 Balance modes Enter nominal value Enter the nominal value. Press the Enter button. The display advances to NOMINAL PIPETTE SETUP with INACCURACY highlighted. 0.0000 0.0000 Select inaccuracy PIPETTE SETUP Enter AUTO SAMPLE Select INACCURACY. Press Enter button. The display advances to INACCU- AUTO PRINT NUMBER OF SAMPLES RACY.
- Page 214 Balance modes When AUTO SAMPLE has been selected, it is not necessary to press the Enter button for each sample. If the balance fails to advance to the next sample, press the Enter button. Place the first sample from the pipette into the vessel and press Enter. The display indicates SAMPLE #1.
- Page 215 Balance settings 7. Balance settings 7.1 Reset to factory settings In this menu option you can reset selected functions or all menu settings to factory settings. From main menu CHANGE MODE Enter SET BALANCE Select SET BALANCE, display advances to SET BALANCE. Select RESET, press Enter button.
- Page 216 Balance settings 7.3 Setting the readout This menu option enables you to set the balance averaging level, stability level, auto zero, and legal for trade (LFT). From main menu SET BALANCE Enter READOUT Select SET BALANCE and press the Enter button. Display advances to SET BALANCE with READOUT highlighted.
- Page 217 Balance settings 7.4 Setting the interface This menu option enables you to set the balance communication parameters for the RS232 interface which include: baud rate, data bits, parity and stop bit. From main menu SET BALANCE Enter Select SET BALANCE and press the Enter button. Display advances to SET INTERACE BALANCE with READOUT highlighted.
- Page 218 Balance settings 7.5 Setting print option This menu option enables you to set various print features ON or OFF and include Auto Print, Data, Numeric Data, Print Date, Print Time and Print Reference. From main menu SET BALANCE Enter Select SET BALANCE and press the Enter button. Display advances to SET PRINT OPTION BALANCE with READOUT highlighted.
- Page 219 Balance settings 7.6 Setting GLP print options This menu GLP (Good Laboratory Practices) options allows the entering of a Project Name, User Name, and GLP Print Options which include: Date & Time, Balance ID, Project Name, User Name and Calibration all of which can be set ON or OFF.
- Page 220 Balance settings 7.7 Setting time and date This menu permits entering time and date. A battery backup is used for the memory. The battery has a life of 5 years. From main menu SET BALANCE Enter Select SET BALANCE and press the Enter button. Display advances to SET SET TIME/DATE BALANCE with READOUT highlighted.
- Page 221 Balance settings SETUP DATE/TIME Enter set time Enter Enter the SET TIME option. The previously entered time appears in the SET TIME 11:23:21AM display. Press the Enter button. Setting the time SETUP DATE/TIME SET TIME Enter the time in the format you have chosen above. After entering the time, the display advances to SELECT AM/PM display only if 12 hour time type was selected.
- Page 222 Balance settings 7.10 Lock out This software option works in conjunction with a hardware Lockswitch and LFT software. It permits various measure- ment units, calibration methods and balance functions to be selected and either turned ON or OFF. Before using this sofware function, check the status of the hardware lock switch and Legal for Trade software (see section 7.14).
- Page 223 Balance settings 7.11 Software version This option allows you to view the software version number, date installed and main board version number. These numbers are very important for servicing. To view software version, proceed as follows; From main menu SET BALANCE Enter Enter SET BALANCE.
- Page 224 Balance settings 7.13 Legal for trade (LFT) LFT is a software controlled option which can be set to Legal For Trade ON or OFF. When set ON, certain items in the CALIBRATION and SET BALANCE menus are automatically preset and locked to permit the balance to operate in a legal for trade application and works in conjunction with a Lock Out switch (see section 7.14).
- Page 225 Balance settings 7.14 Menu lockout protection Access to the various menus can be disabled by setting the Lock switch located on the PC board inside the balance to ON position. The Lock switch locks out certain menus when Legal For Trade is turned ON. The default setting for the Lock switch is OFF.
- Page 226 RS232 Interface/printing data 8. RS232 interface/printing data 8.1 RS232 interface The balance is equipped with a bi-directional RS232 compatible interface for communication with printers and computers. When the balance is connected directly to a printer, displayed data can be output at any time by simply pressing PRINT.
- Page 227 RS232 Interface/printing data RS232 COMMAND TABLE Command Character Description Field: Mode Stab Print current mode Length: blank if stable “ ? ” if unstable tael tical tael custm tael momme oz t nnn = 0 Turns feature OFF Set Auto Print feature to “nnnn” nnnn nnn = S Output on stability (see table)
- Page 228 RS232 Interface/printing data RS232 COMMAND TABLE (Cont.) Command Character Description Same effect as pressing O/T button. Print EPROM version Print balance ID (13 characters). Esc V Set Auto Zero to “x”,where x = 0 to 3 ). 0=Off, 1=0.5d, 2=1d, 3=5d.If LFT, programs Auto zero level from 0 to 1.
- Page 229 RS232 Interface/printing data 8.2 Printing data Printing data to an external computer or printer requires that the communications parameters be set first. Printing to an external printer or computer will occur each time the Print button is pressed unless the autoprint feature is turned on, in which case, printing can occur in a continuous fashion at specified intervals or each time a stable reading is achieved.
- Page 230 RS232 Interface/printing data Span calibration printout - - - - - SPAN CAL - - - - - - When performing a Span calibration with GLP turned ON, a printout is 12/01/99 1:00:00 PM automatically made after the calibration mass is placed on the pan. Bal Id 1234 Cal: 400.000g...
- Page 231 RS232 Interface/printing data Pipette test printout Pipette Results When performing a Pipette Test with GLP turned on, a printout is available. Library Name: WHEATON The following sample printout is shown. Pipette Name: WHEATON Pipette Number: 832 Water Temp(C): 25.0 Test Liquid Density(g/cc): 0.9971 Barometric Pressure: 1.00PSIA Nominal Value: 3.448ml INACCURACY...
- Page 232 Care and maintenance 9. Care and maintenance To keep the balance operating properly, the housing and platform should be kept clean and free from foreign material. If necessary, a cloth dampened with a mild detergent may be used. Keep calibration masses in a safe dry place. 9.1 Troubleshooting SYMPTOM REMEDY...
- Page 233 Care and maintenance 9.2 Error codes list Error Codes List The following list describes the various error codes and which can appear on the display and the suggested remedy. Data Errors 1.0 Transient error (hardware error, probably static discharge). If error persists, the balance must be serviced. 1.1 Balance temperature transducer hardware error.
- Page 234 SCALE UNSTABLE -Balance was unable to acquire stable data during calibration. The balance will try again. 9.4 Service information If the Troubleshooting section does not resolve or describe your problem, you will need to contact an authorized Ohaus Service Agent. For Service assistance in the United States, please call Aftermarket, Ohaus Corporation toll-free at (800) 526-0659.
- Page 235 Care and maintenance 9.7 Specifications Analyticals Capacity (g) 100/210 * Readability (mg) 0.1/1 Weighing units mg, g, kg, dwt, ct, oz , oz t, gn, taels (3), mommes, lbs, N, ti, custom unit Application modes Parts counting, differential weighing, quick check, statistics, formulation, filling, animal weighing, percent weighing, check weighing, density determination, SQC &...
- Page 236 Appendix A - special applications Admissible ambient conditions Use only in closed rooms Temperature range: 10 ºC to 40 ºC/50º to 104º F with internal calibration 10 ºC to 30 ºC/50º to 86º F without internal calibration Atmospheric humidity: 80% rh @ to 30 ºC Voltage fluctuations: –15% +10% Installation category:...
- Page 237 Appendix A - special applications Tare setup DIFF WEIGHING SETUP Enter LIBRARY NAME DIFF4 Press the Enter button, the display indicates a choice of NO TARE, SINGLE TARE SETUP NO TARE AUTO SAMPLE DIFF RESULT WEIGH TARE, DUAL TARE and RETURN. Select type of tare and press Enter button. NUMBER OF SAMPLES VIEW RESULTS Then scroll to RETURN and press Enter button.
- Page 238 Appendix A - special applications Initial weighing of sieves DIFF WEIGHING SETUP Enter LIBRARY NAME SIEVE 2 Press the Enter button, the display indicates to PUT EMPTY SIEVE #1 ON TARE SETUP AUTO SAMPLE DIFF RESULT % RETENTION PAN. NUMBER OF SAMPLES VIEW RESULTS CLEAR ALL DATA Place empty sieve #1 on the pan and press Enter button.
- Page 239 Appendix A - special applications Porous material density determinations The density of a porous (oil impregnated part) can be made with the balance. Weigh the part (dry) prior to oil impregnation and record its weight. You must also know the density value of the oil to be used in immersing the part before starting.
- Page 240 Ohaus. In lieu of a properly returned warranty registration card, the warranty period shall begin on the date of shipment to the authorized dealer.
- Page 241 Ohaus Corporation Ohaus UK Ltd. 19A Chapin Road, 64 Boston Road Pine Brook, NJ 07058-9878, USA Beaumont Leys Tel: (973) 377-9000, Leicester LE4 1AW Fax: (973) 593-0359 England With offices worldwide. www.ohaus.com P/N 11780297C © Ohaus Corporation 2002, all rights reserved.
- Page 242 Operating instructions balances...
- Page 244 Ohaus Corporation, USA, was examined and evaluated in 1994 by the Bureau Veritas Quality International, BVQI, and was awarded ISO 9001 registration. This certifies that Ohaus Corporation, USA, has a quality system that conforms with the interna- tional standards for quality management and quality assurance (ISO 9000 series). Repeat audits are carried out by BVQI at intervals to check that the quality system is operated in the proper manner.
- Page 246 Contents Contents OVERVIEW OF CONTROLS ........................8 GETTING TO KNOW YOUR VOYAGER BALANCE ..................9 Introduction ............................9 Overview of the Voyager balance ......................9 What you should know about these instructions ................. 10 Safety is first ........................... 10 INSTALLATION ..........................11 Unpacking and checking the standard equipment ................
- Page 247 Contents WEIGHING MADE SIMPLE ....................... 26 Selecting a weighing unit........................26 Taring the balance ........................... 27 Performing a simple weighing ......................27 Custom unit ............................ 28 BALANCE MODES ........................... 31 Parts counting ..........................31 6.1.1 Easy count .......................... 31 6.1.2 Advanced counting ....................... 32 Filling .............................
- Page 248 Contents Setting GLP print options ........................66 Setting time and date ........................67 Setting auto calibration ........................68 Print current settings ........................68 7.10 Lock out ............................69 7.11 Software version ..........................70 7.12 Setting custom menu ........................70 7.13 Legal for trade ..........................
- Page 249 Overview Overview of controls On/Off BASIC WEIGHING 100% Go Back 0.000 Help Print Enter GRAMS STABLE PRESS <ENTER> FOR MENU Designation Function LCD display on off button. Go Back button Permits going back in menus. Help button Non functional. Print button When pressed, prints data either on an external printer or computer.
- Page 250 1. Getting to know your Voyager balance This section provides you with detailed information on your Voyager balance. Please read through the section carefully even if you have experience with OHAUS balances and be sure to familiarize yourself with the safety notes. 1.1 Introduction Thank you for deciding to purchase a Voyager Balance from Ohaus.
- Page 251 Operate and use your Voyager balance only in accordance with these operating instructions. Use only optional equipment and peripherals supplied by OHAUS. Your Voyager balance is ruggedly constructed, but is still a precision instrument. Treat it with the...
- Page 252 • Remove packing material from the instrument. • Check the instrument for transport damage. Immediately inform your Ohaus dealer if you have complaints or parts are missing. • Store all parts of the packaging. This packaging guarantees the best possible protection for the transport of your...
- Page 253 Installation 2.2 Selecting the location The balance should always be used in an environment which is free from excessive air currents, corrosives, vibration, and temperature or humidity extremes. These factors will affect displayed weight readings. DO NOT install the balance: •...
- Page 254 Check to ensure the voltage printed on the AC adapter matches your local line voltage. If this is not the case, on no account connect the AC adapter to the power supply, but contact your responsible OHAUS dealer. Ensure that the AC adapter can never come into contact with liquids! Connect the AC Adapter supplied to the three pin connector located at the rear of the balance.
- Page 255 Installation 2.7 Switching the balance on and off Your balance is on at all times when connected to a power source, the display is on initially and can be turned off. To switch the balance on, press the button. As soon as the weight BASIC WEIGHING display appears, your balance is ready.
- Page 256 The menu 3. The menu 3.1 What is the menu? The menu allows you to match your balance to your specific weighing needs. In the menu, you can change the settings of your balance and activate functions. The Main Menu contains 7 selections. CHANGE MODE CHANGE UNITS SET BALANCE...
- Page 257 The menu 3.2 Menu operation In this section you will learn how to work with the menu. Information regarding the individual menu options and available settings can be found in the following sections. BASIC WEIGHING How to change from the weighing mode to the main menu The balance is operating in the basic weighing mode.
- Page 258 The menu How to save your settings and quit the menu Enter MAIN MENU Certain menu options have ON and OFF settings. In these options, pressing SAVING the Enter button saves the setting after you make a selection. In options which offer various settings, after you have selected a setting, press the Enter button.
- Page 259 Calibration 4. Calibration Your balance can be calibrated with an internal mass (optional) or external masses. The balance can also be checked by a test with internal or external masses. If you have a printer attached to your balance, the data of the calibration and the results are printed out following GLP recommendations.
- Page 260 Calibration Calibration Menu Protection Calibration may be locked out to prevent unauthorized personnel from changing calibration under LFT (Legal for Trade) mode. If calibration has been locked out, you can only access Internal Weight Calibration and Calibration Test. To lock out calibration menu, after calibration, refer to paragraph 7.14 titled Menu Lock-Out Protection.
- Page 261 Calibration 4.1 Span calibration Span calibration normally requires that calibration be made using a mass equal to the full capacity of the balance, however, the Voyager balance can be calibrated using other lesser values as specified on the display. From main menu CALIBRATE Enter SPAN...
- Page 262 Calibration 4.2 Linearity calibration Linearity calibration utilizes three calibration points, one at zero, center span and full span. This method minimizes deviation between actual and displayed weights within the balance's weighing range. Three weight values are used; zero, a weight value at midpoint of the balance's weighing range and a weight value at or near the specified capacity. From main menu CALIBRATE Enter...
- Page 263 Calibration 4.3 User calibration User calibration is used when it is desired to calibrate the balance using a mass of known value. To use this calibration feature, proceed as follows: From main menu CALIBRATE Enter SPAN Scroll to CALIBRATION and press the Enter button. Display advances to LINEARITY USER CALIBRATE with SPAN highlighted.
- Page 264 Calibration 4.4 Calibration test Calibration test feature allows a check of a known calibration mass against the last stored calibration informa- tion in the balance. From main menu CALIBRATE Enter SPAN Scroll to CALIBRATION and press the Enter button. Display advances to LINEARITY USER CALIBRATE with SPAN highlighted.
- Page 265 Calibration 4.5 Auto calibration (AutoCal On balances equipped with the AutoCal feature, calibration can be accomplished using an internal calibration mass. Auto calibration can be performed at any time providing the balance has warmed up to operating temperature. From main menu Enter CALIBRATE SPAN...
- Page 266 Calibration 4.6 AutoCal delta correction Balances with AutoCal contain software which allows the internal calibration mass to be adjusted + 100 divisions at full scale capacity. This permits calibrating the balance using an external ASTM Class 1 mass which is traceable to a certified standard.
- Page 267 Weighing made simple 5. Weighing made simple In this section, you will learn how to select a weighing unit, tare the balance, perform simple weighings and enter a custom unit. 5.1 Selecting a weighing unit In this menu option you specify which weighing unit is to be displayed. There are a total of 15 measuring units and custom units which can be selected.
- Page 268 Weighing made simple 5.2 Taring the balance The weight of any container can be tared by the press of a button. The taring range covers the entire weighing range of your balance. To tare a container, place it on the weighing pan. ->O/T<- Close all draft shield doors (if draft shield is used).
- Page 269 Weighing made simple 5.4 Custom unit Custom unit allows the creation of your own custom weighing units. It permits entering a conversion factor which the balance will use to convert grams to the desired unit of measure. Custom Units are stored in the Library. Values for up to fifteen different custom units can be entered.
- Page 270 Weighing made simple Unit name UNIT NAME Enter a unit name. The name you enter and custom unit characteristics will UNIT1 be stored in the library when you complete all entries. Display returns to <LEFT> / <RIGHT> TO MOVE CURSOR <UP>...
- Page 271 Weighing made simple Select the least significant digit. Scroll to either LSD 0.5, LSD 1, LSD 2, LSD SELECT LSD 5 or LSD 10 and press Enter button. Display returns to CUSTOM UNIT SETUP with UNIT NAME highlighted. Scroll to RETURN, press Enter button. CUSTOM UNITS menu is displayed CUSTOM UNIT SETUP with GO TO LIBRARY highlighted.
- Page 272 Balance modes 6. Balance modes Your balance has 11 additional modes of operation in addition to basic weighing. These built-in modes expand the possibilities of your balance and facilitate your daily work. The following sections will acquaint you with these modes.
- Page 273 Balance modes 6.1.2 Advanced counting Advanced Count contains a number of entries which include assigning a library name, filling and sorting applications and statistical information which can be printed. Once a library name is assigned, this particular counting function can be recalled at any time. From main menu PARTS COUNTING Enter...
- Page 274 Balance modes 6.2 Filling Filling permits you to enter a target reference weight, then view other loads as a percentage of the reference which has been set in the balance parameters. The load placed on the pan is displayed as a percentage of what was entered into the balance.
- Page 275 Balance modes 6.3 Animal weighing This feature permits weighing small animals directly on the balance. If an animal cage is used, the balance can be tared (weight of cage is subtracted) and then the subject is placed in the cage and weighed. An averaging filter compensates for animal movements.
- Page 276 Balance modes 6.4 Check weighing Check weighing is used when items are checked against preset balance parameters. This feature permits you to weigh an item, assign a library name, set balance parameters such as the nominal weight, over weight and under weight.
- Page 277 Balance modes 6.5 Differential weighing Differential weighing stores tare and weight values so samples can be dried or processed and the difference in weight calculated at a later time. Up to 80 samples can be stored. The balance has the capability to work with one or two different containers or no container at all.
- Page 278 Balance modes Automatic sampling DIFF WEIGHING SETUP Enter LIBRARY NAME TARE SETUP Enter AUTO SAMPLE. Auto Sampling permits repetitive sampling AUTO SAMPLE DIFF RESULT WEIGHT automatically. Select ON or OFF. Display advances to DIFF RESULT. NUMBER OF SAMPLES VIEW RESULTS CLEAR ALL DATA Difference result DIFF WEIGHING SETUP...
- Page 279 Balance modes This sample display indicates 3 samples taken with no tare. TAREWT INIT WT TARE WT FINAL \VT 7.705 0.000 Four options are available at the bottom of the display. CONTINUE permits 7.702 0.000 7.701 0.000 continuing with the procedure. SAVE permits saving the data and returns the balance to a weighing mode.
- Page 280 Balance modes This sample display indicates 3 containers weighed. Four options are TAREWT INIT WT TARE WT FINAL \VT 8.739 0.000 0.000 available at the bottom of the display. CONTINUE permits continuing with the 8.744 O.O00 0.000 8.738 0.000 0.000 procedure.
- Page 281 Balance modes Dual Tare - Initial weighing (two containers) DIFF WEIGHING SETUP Enter LIBRARY NAME TARE SETUP This procedure is used when separate containers are used at the start of a AUTO SAMPLE DIFF RESULT WEIGHT process and the end of a process. After pressing the Enter button, the NUMBER OF SAMPLES VIEW RESULTS display indicates to PUT INITIAL CONTAINER #1 ON PAN.
- Page 282 Balance modes 6.6 Formulation Formulations can be named and have from 2 to 10 components specified. Names are limited to 8 characters. Once named, they may be recalled and used at any time. Each component of a given formulation can be specified as to its weight or percentage.
- Page 283 Balance modes Enter SETUP in the FORMULATION SETUP. Display advances to a split screen. FORMULATION SETUP Enter LIBRARY NAME FORM2 WEIGH TYPE WEIGHT NUMBER OF ITEMS SETUP Specifying component names FORMULATION SETUP 0.000 Specify the name for the first component of the formula, then press Enter 0.000 button.
- Page 284 Balance modes 6.7 Quick check weighing Quick check weighing permits placing a reference sample on the balance pan which is used as a reference weight to measure against similar samples. A single bar display indicates up to 100% of the capacity of the balance. The difference in percentage is also shown along with the reference weight.
- Page 285 Balance modes 6.8 Statistics/Function link Statistics are used when it is desired to compare a number of samples and examine the relative deviation of the samples along with other statistical data. A minimum of three samples is required in this program. Statistics contains menu options which include standard deviation, mean, sum, maximum, minimum, difference, relative deviation, auto sample and sample size.
- Page 286 Four methods of density determinations can be made with the Voyager balance. These are: solids more dense than water, solids less dense than water, porous material (impregnated with oil), and liquid density. A Density Determina- tion Kit Part Number 470007-010 is specifically designed to be used with Ohaus ®...
- Page 287 Balance modes 6.9.2 Solid density determinations for items more dense than water The density Q is the quotient of the mass m and the volume V. Density determinations are performed by using Archimedes’ principle. This principle states that every solid body immersed in a fluid loses weight by an amount equal to that of the fluid it displaces.
- Page 288 Balance modes Selecting water as auxiliary liquid AUX LIQ & MODE Enter <-SELECTED Select H2O, and perform the next step. If you are using a different liquid, skip OTHER POROUS MATERIAL DRY WEIGHT O.000 the next step and continue. DENSITY OF OIL 0.0000 RETURN TO SETUP Specify temperature...
- Page 289 Balance modes START/SAMPLE is highlighted. Make sure a beaker with liquid is in position on the stand in the balance. Press the >O/T< button to zero the balance reading. Place solid on top of the bracket as shown and close the draft shield doors. Weigh the solid (weight A) and press the Enter button.
- Page 290 Balance modes 6.9.4 Improving the accuracy of the result of solid density The following tips should help you improve the accuracy of the results in the density determination of solids. Temperature Solids are generally so insensitive to temperature fluctuations that the corresponding density changes are of no consequence.
- Page 291 Balance modes 6.9.5 Liquid density determinations The density of a liquid can be made using a sinker of known volume. The sinker is weighed in air and then in the liquid whose density is to be determined, The density, Q, can be determined from the two weighings as follows: Q = Density of the liquid A = Weight of the sinker in air A - B...
- Page 292 Balance modes 6.10 Statistical quality control (SQC) The Statistical Quality Control (SQC) feature is extremely useful during various types of process filling operations when it is desired to monitor and control the process to eliminate under and over filling. Provisions are made in the balance to accommodate the weight of various packaging methods.
- Page 293 Balance modes Selecting type of tare TARE SELECTION NO TARE Four types of taring are available. NO TARE is self explanatory, MEAN TARE MEAN TARE INDIVIDUAL TARE is used to subtract the packaging weight automatically, INDIVIDUAL TARE is ADD. WITH MT RETURN TO SETUP for each sample with display prompts, ADD with MT is additive weighing with mean tare.
- Page 294 Balance modes Sample # 2 SQC - - SQC2 Remove the first sample from the pan and place the second sample on the 100% PUT SAMPLE #2 ON PAN 12.305 pan. When the balance stabilizes, press the Enter button. When AUTO SAMPLE is ON, you do not have to press Enter.
- Page 295 Balance modes Selecting batch history SQC SETUP Go Back AUTO SAMPLE To select the batch history, press the Go Back button to enter the SQC SETUP AUTO PRINT NUMBER OF SAMPLES VIEW MEAN VALUE TRACE screen and scroll down to VIEW BATCH HISTORY. Press the Enter button. VIEW BATCH HISTORY Viewing batch history START SAMPLING: 05/24/99 08:26:28A...
- Page 296 Balance modes Select run SQC SETUP Enter AUTO SAMPLE With RUN selected, press Enter button. AUTO PRINT NUMBER OF SAMPLES BATCH NAME VIEW MEAN VALUE TRACE VIEW BATCH HISTORY Adding additional samples SQC - - SQI Display returns to the name of the SQC identified and is ready to run sample PUT SAMPLE # 1 ON PAN 0.000 # 1.
- Page 297 Balance modes 6.10.3 Redoing or correcting a batch If during the course of taking samples, an error has occurred and you want to rerun the set of samples you are currently working with, this procedure will allow you to start a new set without recording data from the set containing errors.
- Page 298 Balance modes 6.11 Pipette calibration Pipette calibration checks the accuracy and precision values of pipettes by weight analysis. An analytical balance is recommended for maximum accuracy. The balance is capable of recording data from 3 to 30 samples of each pipette tested.
- Page 299 Balance modes Enter density of test liquid Enter the density value for the test liquid. The standard density for water has ENTER LIQUID DENSITY IN CC been pre-entered. Enter the correct value for the liquid you are using, and 0.9971 0.9971 press Enter button.
- Page 300 Balance modes Set auto print on AUTO PRINT Enter When set ON, results are automatically printed. Press the Enter button. Display advances to PIPETTE SETUP with NUMBER OF SAMPLES highlighted. Select number of samples PIPETTE SETUP Enter LIBRARY NAME Press the Enter button. The display advances to NUMBER OF SAMPLES. TEST LIQUID(G/CC) 0.9971 BARO PRESSURE...
- Page 301 Balance modes Enter nominal value Enter the nominal value. Press the Enter button. The display advances to NOMINAL PIPETTE SETUP with INACCURACY highlighted. 0.0000 0.0000 Select inaccuracy PIPETTE SETUP Enter AUTO SAMPLE Select INACCURACY. Press Enter button. The display advances to INACCU- AUTO PRINT NUMBER OF SAMPLES RACY.
- Page 302 Balance modes When AUTO SAMPLE has been selected, it is not necessary to press the Enter button for each sample. If the balance fails to advance to the next sample, press the Enter button. Place the first sample from the pipette into the vessel and press Enter. The display indicates SAMPLE #1.
- Page 303 Balance settings 7. Balance settings 7.1 Reset to factory settings In this menu option you can reset selected functions or all menu settings to factory settings. From main menu CHANGE MODE Enter SET BALANCE Select SET BALANCE, display advances to SET BALANCE. Select RESET, press Enter button.
- Page 304 Balance settings 7.3 Setting the readout This menu option enables you to set the balance averaging level, stability level, auto zero, and legal for trade (LFT). From main menu SET BALANCE Enter READOUT Select SET BALANCE and press the Enter button. Display advances to SET BALANCE with READOUT highlighted.
- Page 305 Balance settings 7.4 Setting the interface This menu option enables you to set the balance communication parameters for the RS232 interface which include: baud rate, data bits, parity and stop bit. From main menu SET BALANCE Enter Select SET BALANCE and press the Enter button. Display advances to SET INTERACE BALANCE with READOUT highlighted.
- Page 306 Balance settings 7.5 Setting print option This menu option enables you to set various print features ON or OFF and include Auto Print, Data, Numeric Data, Print Date, Print Time and Print Reference. From main menu SET BALANCE Enter Select SET BALANCE and press the Enter button. Display advances to SET PRINT OPTION BALANCE with READOUT highlighted.
- Page 307 Balance settings 7.6 Setting GLP print options This menu GLP (Good Laboratory Practices) options allows the entering of a Project Name, User Name, and GLP Print Options which include: Date & Time, Balance ID, Project Name, User Name and Calibration all of which can be set ON or OFF.
- Page 308 Balance settings 7.7 Setting time and date This menu permits entering time and date. A battery backup is used for the memory. The battery has a life of 5 years. From main menu SET BALANCE Enter Select SET BALANCE and press the Enter button. Display advances to SET SET TIME/DATE BALANCE with READOUT highlighted.
- Page 309 Balance settings Enter set time SETUP DATE/TIME Enter Enter the SET TIME option. The previously entered time appears in the SET TIME 11:23:21AM display. Press the Enter button. Setting the time SETUP DATE/TIME SET TIME Enter the time in the format you have chosen above. After entering the time, the display advances to SELECT AM/PM display only if 12 hour time type was selected.
- Page 310 Balance settings 7.10 Lock out This software option works in conjunction with a hardware Lockswitch and LFT software. It permits various measure- ment units, calibration methods and balance functions to be selected and either turned ON or OFF. Before using this sofware function, check the status of the hardware lock switch and Legal for Trade software (see section 7.14).
- Page 311 Balance settings 7.11 Software version This option allows you to view the software version number, date installed and main board version number. These numbers are very important for servicing. To view software version, proceed as follows; From main menu Enter SET BALANCE Enter SET BALANCE.
- Page 312 Balance settings 7.13 Legal for trade (LFT) LFT is a software controlled option which can be set to Legal For Trade ON or OFF. When set ON, certain items in the CALIBRATION and SET BALANCE menus are automatically preset and locked to permit the balance to operate in a legal for trade application and works in conjunction with a Lock Out switch (see section 7.14).
- Page 313 Balance settings 7.14 Menu lockout protection Access to the various menus can be disabled by setting the Lock switch located on the PC board inside the balance to ON position. The Lock switch locks out certain menus when Legal For Trade is turned ON. The default setting for the Lock switch is OFF.
- Page 314 RS232 Interface/printing data 8. RS232 interface/printing data 8.1 RS232 interface The balance is equipped with a bi-directional RS232 compatible interface for communication with printers and computers. When the balance is connected directly to a printer, displayed data can be output at any time by simply pressing PRINT.
- Page 315 RS232 Interface/printing data RS232 COMMAND TABLE Command Character Description Field: Mode Stab Print current mode Length: blank if stable “ ? ” if unstable tael tical tael custm tael momme oz t nnnn Set Auto Print feature to “nnnn” nnn = 0 Turns feature OFF nnn = S Output on stability (see table) nnn = C Output is continuous...
- Page 316 RS232 Interface/printing data RS232 COMMAND TABLE (Cont.) Command Character Description Same effect as pressing O/T button. Print EPROM version Esc V Print balance ID (13 characters). Set Auto Zero to “x”,where x = 0 to 3 ). 0=Off, 1=0.5d, 2=1d, 3=5d.If LFT, programs Auto zero level from 0 to 1.
- Page 317 RS232 Interface/printing data 8.2 Printing data Printing data to an external computer or printer requires that the communications parameters be set first. Printing to an external printer or computer will occur each time the Print button is pressed unless the autoprint feature is turned on, in which case, printing can occur in a continuous fashion at specified intervals or each time a stable reading is achieved.
- Page 318 RS232 Interface/printing data Span calibration printout - - - - - SPAN CAL - - - - - - When performing a Span calibration with GLP turned ON, a printout is 12/01/99 1:00:00 PM automatically made after the calibration mass is placed on the pan. Bal Id 1234 Cal: 400.000g...
- Page 319 RS232 Interface/printing data Pipette test printout Pipette Results When performing a Pipette Test with GLP turned on, a printout is available. Library Name: WHEATON The following sample printout is shown. Pipette Name: WHEATON Pipette Number: 832 Water Temp(C): 25.0 Test Liquid Density(g/cc): 0.9971 Barometric Pressure: 1.00PSIA Nominal Value: 3.448ml INACCURACY...
- Page 320 Care and maintenance 9. Care and maintenance To keep the balance operating properly, the housing and platform should be kept clean and free from foreign material. If necessary, a cloth dampened with a mild detergent may be used. Keep calibration masses in a safe dry place. 9.1 Troubleshooting SYMPTOM REMEDY...
- Page 321 Care and maintenance 9.2 Error codes list Error Codes List The following list describes the various error codes and which can appear on the display and the suggested remedy. Data Errors 1.0 Transient error (hardware error, probably static discharge). If error persists, the balance must be serviced. 1.1 Balance temperature transducer hardware error.
- Page 322 SCALE UNSTABLE -Balance was unable to acquire stable data during calibration. The balance will try again. 9.4 Service information If the Troubleshooting section does not resolve or describe your problem, you will need to contact an authorized Ohaus Service Agent. For Service assistance in the United States, please call Aftermarket, Ohaus Corporation toll-free at (800) 526-0659.
- Page 323 Care and maintenance 9.7 Specifications Admissible Ambient Conditions Use only in closed rooms Ambient Temperature range: 5 ºC to 40 ºC Atmospheric humidity: 80% rh @ to 30 ºC Voltage fluctuations: –15% +10% Installation category: Pollution degree: Power supply voltage: 12 VAC, 50/60 Hz or 12 VDC, 1A Analytical Balances Capacity (g)
- Page 324 Appendix A - special applications Precision Balances Capacity (g) 210 410 510 610 100/410* 610 1500 2100 4100 6100 1000/4100* 4100** 6100** 8100** Readability (g) 0.001 0.001/0.01 0.01 0.01/0.1 Repeatability (Std. dev.) (g) 0.0005 0.0015 0.0005/0.005 0.005 0.01 0.01/0.05 0.05 Linearity (g) (+)0.002 (+)0.02...
- Page 325 Appendix A - special applications Tare setup DIFF WEIGHING SETUP Enter LIBRARY NAME DIFF4 TARE SETUP NO TARE Press the Enter button, the display indicates a choice of NO TARE, SINGLE AUTO SAMPLE DIFF RESULT WEIGH TARE, DUAL TARE and RETURN. Select type of tare and press Enter button. NUMBER OF SAMPLES VIEW RESULTS Then scroll to RETURN and press Enter button.
- Page 326 Appendix A - special applications Initial weighing of sieves DIFF WEIGHING SETUP Enter LIBRARY NAME SIEVE 2 TARE SETUP Press the Enter button, the display indicates to PUT EMPTY SIEVE #1 ON AUTO SAMPLE DIFF RESULT % RETENTION PAN. NUMBER OF SAMPLES VIEW RESULTS CLEAR ALL DATA Place empty sieve #1 on the pan and press Enter button.
- Page 327 Appendix A - special applications Porous material density determinations The density of a porous (oil impregnated part) can be made with the balance. Weigh the part (dry) prior to oil impregnation and record its weight. You must also know the density value of the oil to be used in immersing the part before starting.
- Page 328 Ohaus. In lieu of a properly returned warranty registration card, the warranty period shall begin on the date of shipment to the authorized dealer.
- Page 329 Ohaus Corporation 19A Chapin Road, P.O. Box 2033 Pine Brook, NJ 07058, USA Tel: (973) 377-9000, Fax: (973) 593-0359 With offices worldwide. www.ohaus.com *11780297* P/N 11780297D © Ohaus Corporation 2002, 2003, all rights reserved.
Need help?
Do you have a question about the Voyager V10640 and is the answer not in the manual?
Questions and answers