
Related Manuals for LaMotte pH 5 Plus


Summary of Contents for LaMotte pH 5 Plus
- Page 1 lobalScientificSupply GLOBAL SCIENTIFIC SUPPLY info@GlobalScientificSupp .com The Laboratory Supply Company!
- Page 2 lobalScientificSupply GLOBAL SCIENTIFIC SUPPLY info@GlobalScientificSupp .com The Laboratory Supply Company!
- Page 3 PREFACE This manual serves to explain the use of the pH 5 PLUS meter. This manual functions in two ways: fi rst as a step by step guide to operating the meter; second, as a handy reference guide. This manual is written to cover as many anticipated applications of the meter as possible.
- Page 4 TABLE OF CONTENTS 1. INTRODUCTION 2. GETTING STARTED Description of Keypad Functions Description of LCD Annunciators Inserting & Removing the Rubber Boot/Stand Inserting New Batteries Battery Replacement Connecting the Electrode and Temperature Sensor Conditioning the pH Electrode Switching the Meter On CALIBRATION pH Calibration 3.1.1 pH Calibration Procedure...
-
Page 5: Introduction
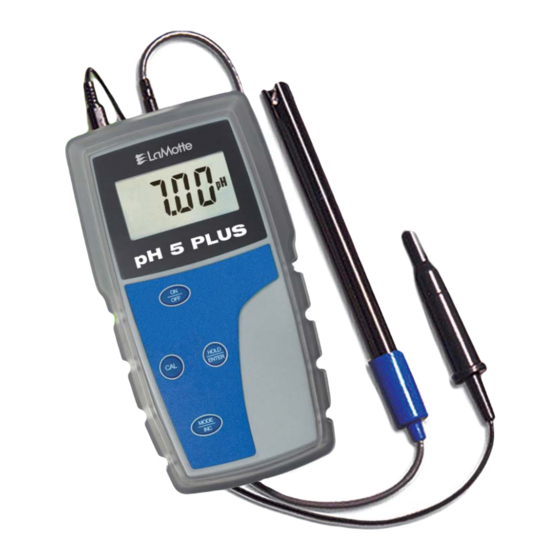
The pH 5 PLUS microprocessor-based handheld meter is economical and easy to use. It has a large custom LCD (Liquid Crystal Display) for clear and easy reading. The pH 5 PLUS measures pH and temperature (°C). Meters include 4 alkaline “AAA” batteries, a rubber boot /stand, instruction manual, and warranty card. -
Page 6: Getting Started
2. GETTING STARTED 2.1 Description of Keypad Functions The pH 5 PLUS has four keys on the splash-proof keypad: ON/OFF, HOLD/ENTER, CAL and MODE/INC. ON/OFF Powers meter on and off. Meter starts up in the mode that was last used. -
Page 7: Description Of Lcd Annunciators
2.2 Description of LCD Annunciators The large custom LCD consists of 3½-digit segments which uses annunciators for pH or °C (Temperature). Other annunciators include “HO” (when HOLD function is activated) and “LO” (low battery condition). 2.3 Inserting & Removing the Rubber Boot/Stand 1. -
Page 8: Inserting New Batteries
2.4 Inserting New Batteries The battery compartment is found at the back of the instrument. To open the battery compartment, push the cover in the direction of the arrow and lift up. Note the polarity of the batteries before inserting them into position. -
Page 9: Connecting The Electrode And Temperature Sensor
2.6 Connecting the Electrode and Temperature Sensor To connect the probe to the meter, align the BNC connector slots with the posts of the meter socket and rotate the connector clockwise until it locks. Do not force the connector. To remove the probe, rotate the connector in a counter-clockwise direction until it unlocks, and slide the connector off the socket. -
Page 10: Switching The Meter On
2.8 Switching the Meter On 1. Press the ON/OFF key. All LCD segments will display momentarily as the meter performs a self-diagnostic test. The meter will display “- - -“ if the meter has not been calibrated or if the meter has been reset. 2. -
Page 11: Ph Calibration Procedure
For a 1-point calibration, the calibration should be performed with a pH buffer value closest to the expected sample value being measured. The meter has automatic buffer recognition that identifi es the correct pH buffer values during the calibration. The meter will accept calibration values that are within ±1.0 pH units of the expected value, otherwise the DISPLAY will fl... -
Page 12: Changing The Ph Buffer Group
5. Allow the reading to stabilize. Press the ENTER key to confi rm the calibration. “CO” will be displayed momentarily before reverting to the pH measurement mode. 6. For the greatest accuracy, perform a multiple-point calibration. Repeat step 1 with additional pH buffer calibration standard solutions. -
Page 13: Resetting User Calibrated Values
3.1.3 Resetting User Calibrated Values The calibrated pH values can be reset to the factory default using the procedure below. The temperature offset will not be reset using this procedure. To abort the reset, press CAL to revert to the measurement mode. -
Page 14: Without Temperature Probe (No Atc)
4. Press INC key until the display shows the desired temperature. The meter will allow an adjustable maximum value of ±5 °C from the factory default. 5. To cancel or abort this operation, press the CAL key. To confi rm the calibration, press the ENTER key. -
Page 15: Measurement
4. MEASUREMENT 4.1 Taking Measurements 1. Before measurement, rinse the pH probe and temperature probe with clean water to remove any impurities. 2. Power on the meter using the ON/OFF key. Press the MODE key to select the desired mode of operation (pH or Temperature). 3. -
Page 16: Electrode Care And Maintenance
5. ELECTRODE CARE AND MAINTENANCE For best results, store the pH probe bulb wet. Store the pH glass bulb in pH probe storage solution. NEVER use deionized water for storage. Wash probes with clean water after each use. pH probes are susceptible to contamination and dirt. Clean them as needed using mild detergent and warm water. -
Page 17: Specifications
7. SPECIFICATIONS pH Range 0.00 to 14.00 pH Resolution 0.01 pH Accuracy ±0.01 pH pH Slope Range 80 to 120% No. of Calibration Pts 1 to 3 points (push-button) Buffer Options pH 4.01, 7.00, 10.01 (USA) pH 4.01, 6.86, 9.18 (NIST) pH 4.10, 6.97 (Pb) Temperature Range 0.0 to 100.0 oC... -
Page 18: Replacement Parts And Accessories
3985A-H 9. WARRANTY LaMotte Company warrants this instrument to be free of defects in parts and workmanship for 3 years from the date of shipment and the probe to be free of defects in parts and workmanship for 6 months from the date of shipment. -
Page 19: Return Of Items
Should it be necessary to return the meter for repair or servicing, pack the meter carefully in a suitable container with adequate packing material. A return authorization number must be obtained from LaMotte Company by calling 800-344-3100 (US only) or 410-778-3100, faxing 410-778-6394, or emailing tech@lamotte.com. - Page 20 lobalScientificSupply GLOBAL SCIENTIFIC SUPPLY info@GlobalScientificSupp .com The Laboratory Supply Company!
Need help?
Do you have a question about the pH 5 Plus and is the answer not in the manual?
Questions and answers