
Subscribe to Our Youtube Channel
Related Manuals for Rockwell RK4248K


Summary of Contents for Rockwell RK4248K
- Page 1 RANDOM ORBIT SANDER PAGE 5 ENG LIJADORA ROTO ORBITAL PAGE 10 ESP PONCEUSE ORBITALE PAGE 16 FRE RK4248K...
- Page 2 ® Gracias por su compra de un producto ROCKWELL . Estamos seguros de que apreciará la calidad del producto y de que estará completamente satisfecho con su compra. Lea cuidadosamente las instrucciones de seguridad y de operación para obtener mayor información...
- Page 3 RK4248K...
- Page 4 RK4248K...
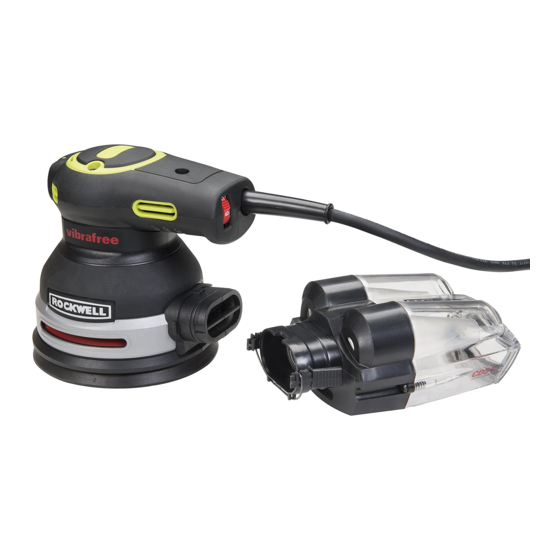
- Page 5 RANDOM ORBIT SANDER COMPONENT LIST ON/OFF SWITCH SOFT GRIP VARIABLE SPEED CONTROL CYCLONIC DUST/AIR SEPARATOR LATCHING LEVER DUST EXTRACTION OUTLET OUTER PAD INNER PAD MOTOR HOUSING A: INNER SANDING PAPER*(See Fig. A) B: OUTER SANDING PAPER*(See Fig. A) DUST EXTRACTION ADAPTER (See Fig. D) * Not all the accessories illustrated or described are included in standard delivery.
- Page 6 RANDOM ORBIT SANDER a) Stay alert, watch what you are doing and use or serious injury. common sense when operating a power tool. Do not use a power tool while you are tired Save all warnings and instructions for future or under the influence of drugs, alcohol or reference.
- Page 7 RANDOM ORBIT SANDER SYMBOLS starting the power tool accidentally. d) Store idle power tools out of the reach of children and do not allow persons unfamiliar with the power tool or these instructions To reduce the risk of injury, user to operate the power tool.
-
Page 8: Technical Data
RANDOM ORBIT SANDER TECHNICAL DATA the adapter onto the outlet piece and take care that the latching levers engage. Then connect the hose of a Rated voltage 120 V~60 Hz vacuum cleaner. Turn on the vacuum cleaner, and then Rated current 3.3 A turn on the sander. -
Page 9: Troubleshooting
RANDOM ORBIT SANDER the unwanted marks before going on to a finer grit and Do not start sanding without having the sandpaper fitted. finishing the job. Do not allow the sandpaper to wear away, it will damage the NOTE: Do not use the same sanding sheet for wood and base-plate. - Page 10 LIJADORA ROTO ORBITAL LISTA DE PARTE INTERRUPTOR DE ENCENDIDO-APAGADO EMPUÑADURA LLAVE DE VELOCIDAD VARIABLE CAJA CYCLONE PALANCA DEL SEGURO BOCA DE SALIDA DE POLVO PLACA BASE EXTERNA PLACA BASE INTERNA TAPA DEL MOTOR A: PAPEL DE LIJA INTERNO* (VER FIG. A) B: PAPEL DE LIJA EXTERNO*(VER FIG. A) ADAPTADOR DE EXTRACCIÓN DE POLVOS (VER FIG.
- Page 11 LIJADORA ROTO ORBITAL ADVERTENCIAS DE SEGURIDAD de agua en una herramienta eléctrica aumenta el riesgo de que se produzcan descargas eléctricas. GENERALES PARA LA d) No abuse del cable. Nunca use el cable para HERRAMIENTA MOTORIZADA transportar las herramientas ni para sacar el ¡ADVERTENCIA! Lea y comprenda todas enchufe de un tomacorriente.
- Page 12 LIJADORA ROTO ORBITAL los pies y el equilibrio adecuados permiten un más fáciles de controlar. mejor control de la herramienta en situaciones g) Utilice la herramienta eléctrica, accesorios, inesperadas. brocas de la herramienta, etc. de acuerdo con estas instrucciones y de la manera adecuada f) Vístase apropiadamente.
- Page 13 LIJADORA ROTO ORBITAL DATOS TÉCNICOS SÍMBOLOS Voltios 120 V~60 Hz Para reducir el riesgo de lesiones, Corriente nominal 3.3 A el usuario deberá leer el manual Velocidad sin carga 6000-13500/min de instrucciones Tamaño de la base 5 pulg.(125 mm) Diámetro orbital 1/8 pulg.(3 mm) Clase de protección Advertencia...
- Page 14 LIJADORA ROTO ORBITAL 3. ADAPTADOR DE EXTRACCIÓN DE POLVOS (Ver Fig. D) de la pieza del material con el fin de determinar el grosor Su lijadora está equipada con un adaptador de óptimo de la hoja de lija para un trabajo en particular. •...
- Page 15 LIJADORA ROTO ORBITAL CONSEJOS DE TRABAJO PARA Si es necesario el reemplazo del cable de suministro, esto debe ser realizado por el fabricante o su agente para SU LIJADORA DE CORREA evitar un riesgo de seguridad. Si su herramienta eléctrica se recalienta demasiado, hágala funcionar sin carga durante 2-3 minutos para SOLUCIÓN DE PROBLEMAS enfriar el motor.
- Page 16 PONCEUSE ORBITALE LISTE DES ÉLÉMENTS INTERRUPTEUR MARCHE/ARRÊT ZONE DE PRISE CONTRÔLE VARIABLE DE LA VITESSE PAPIER ABRASIF LEVIER D’ENCLENCHEMENT SORTIE D’ÉJECTION DE BRAN DE SCIE PLAQUE DE BASE EXTÉRIEURE PLAQUE DE BASE INTÉRIEURE CAISSON MOTEUR A: PAPIER ABRASIF INTÉRIEUR*(Voir Fig. A) B: PAPIER ABRASIF EXTÉRIEUR*(VoiR Fig. A) ADAPTATEUR DE DÉPOUSSIÉRAGE (Voir Fig.
- Page 17 PONCEUSE ORBITALE AVERTISSEMENTS GENERAUX d) Ne maltraitez pas le cordon. Ne transportez jamais l’outil par son cordon et ne débranchez CONCERNANT LA SECURITE DES jamais la fiche en tirant sur le cordon. OUTILS ELECTRIQUES N’exposez pas le cordon à la chaleur, à des huiles, à...
- Page 18 PONCEUSE ORBITALE g) Utilisez l’outil électrique, les accessoires réagir à une situation inattendue. et les forets etc., en conformité avec ces f) Habillez-vous convenablement. Ne portez instructions et de la manière conçue pour ni vêtements flottants ni bijoux. Gardez les le type particulier d’outil électrique, prend cheveux, les vêtements et les gants éloignés en compte les conditions de travail et le...
- Page 19 PONCEUSE ORBITALE SYMBOLES DONNÉES TECHNIQUES Tension 120 V~60 Hz Afin de réduire les risques de Ampérage nominal 3.3 A blessure, l’utilisateur doit lire ce Vitesse à vide 6000-13500 tr/min mode d’emploi. Taille de la semelle 125 mm(5 po) Diamètre de l’orbite 3 mm(1/8 po) Classe de protection Avertissement...
- Page 20 PONCEUSE ORBITALE et assurez-vous bien que le levier d’enclenchement • Si vous voyez encore des marques sur la pièce alors que vous l’avez poncée, essayez un grain plus gros et a bien été engagé. Connectez ensuite le tuyau de poncez à nouveau sur les marques avant de reprendre l’aspirateur.
- Page 21 PONCEUSE ORBITALE DÉPANNAGE fermement maintenue ou fixée afin de l’empêcher de bouger. Tout mouvement du matériau pourrait affecter la 1. Si votre outil électrique ne fonctionne pas, vérifiez qualité du ponçage de finition. l’alimentation au secteur. Démarrer la ponceuse avant de commencer à poncer 2.
Need help?
Do you have a question about the RK4248K and is the answer not in the manual?
Questions and answers