Table of Contents
Advertisement
Advertisement
Table of Contents

Related Manuals for Projecta BM320


Summary of Contents for Projecta BM320
- Page 1 BATTERY METER SMART BATTERY GUAGE P/No. BM320...
-
Page 2: Important Safety Information
IMPORTANT SAFETY INFORMATION Please read this instruction thoroughly before installing the product. WARNINGS • Risk of explosive gas. Working in the vicinity of a lead-acid battery can be dangerous • Batteries might release explosive gases during normal operation and charging •... - Page 3 It is Ideal for camper trailer and caravan interiors as it is housed in a modern and simple to install enclosure. The BM320 comes with all the necessary components to connect to your battery system.
- Page 4 Plug in the supplied four pin connector to the recipicale at the back of the battery monitor. Feed the cable through the pre drilled hole and slide the left hand side of the battery monitor into the bracket tab. Close the battery monitor onto the clip until you hear the “click” sound. Make sure that the cable assembly has been fed into the hole correctly.
- Page 5 Disconnect the battery and turn off all devices before beginning the installation. Mount the shunt in a secure location with adequate protection from damage. The BM320 is designed for 12V applications only. NOTE: There should only be one cable connected to the battery negative terminal.
- Page 6 BATTERY CABLE SELECTION CHART Nearest Nominal Nominal B&S Area Rating O.D. (mm²) (40°C) (mm) 7.71 13.5 20.26 26.45 10.2 32.07 11.3 39.55 12.1 12.7 64.15 14.5 83.19 16.4 ALTERNATIVE CONNECTION METHOD NOTE: USE ONLY ONE CONNECTTION METHOD. To connect using your own wiring harness use the supplied terminal block. The terminal block is labelled, ensure you follow the wiring diagram and follow the colour coded connection sequence.
-
Page 7: Quick Start
6. For most accurate results – Charge the battery to full with any multi-stage battery charger 7. Disconnect the battery charger when the battery is full 8. Unit is ready to use SPECIFICATIONS Part No. BM320 Battery Fuel Gauge Input consumption current 12V/1.5 mAdc (backlight off ) Input Voltage Range 6.0--17.0 Vdc... - Page 8 BATTERY GUAGE USER INTERFACE Main Menu To enter into the main menu press the menu button on the display screen. To move through the menu press the up and down buttons. Press the Enter button to change the settings. MENU Battery Settings Alarm Settings Display On Time Settings...
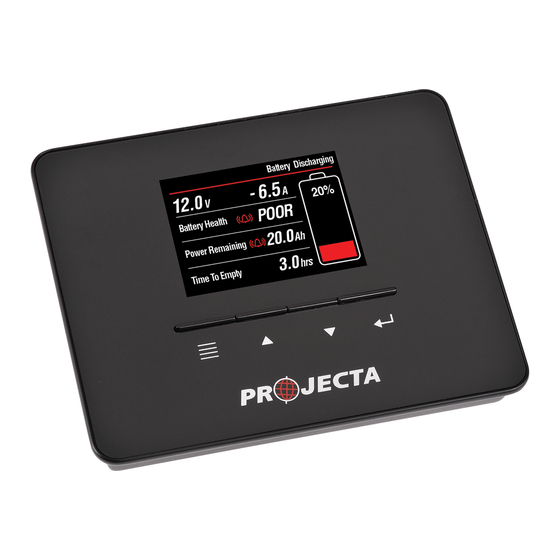
- Page 9 ADVANCED SCREEN Battery Current “+” for Charging and “–“ for Discharging Battery Voltage Battery State: 5:30 Battery Charging Charging, 12.5 12.5 + 6.5 Discharging Battery Health has 100% 4 levels: Ideal, Good, GOOD GOOD Battery Health Battery Health Fair and Poor Battery State of 100.0 100.0...
-
Page 10: Alarm Settings
Use Up and Down buttons to change the value of battery capacity which is marked on the battery case. Press ENTER button to apply the changes. The default value is 100Ah. ALARM SETTINGS LOW BATTERY CAPACITY Use Up and Down buttons to change the value of low battery capacity alarm. Reduce the value to 0 to disable the alarm. - Page 11 BATTERY STATE OF HEALTH Use Up and Down buttons to change the value of battery state of health alarm. Reduce the value to 0 to disable the alarm. Press ENTER button to apply the changes. The default value is 30%. The battery state of health diminishes to the set level, an audio alarm is activated.
- Page 12 BRIGHTNESS Use Up and Down buttons to change the brightness of LCD display. Press ENTER button to apply the changes. The default value is 50%. BATTERY HEALTH It is an indicator to show if the battery requires rejuvenation or replacement. Indication Description Ideal or Good...
-
Page 13: Frequently Asked Questions
A. It is expressed as a percentage of the ratio of predicted full charge capacity over the design capacity. The BM320 uses 4 levels to represent the battery health: Ideal, Good, Fair and Poor. Please look at the battery health section for more detail. - Page 14 NOTES...
- Page 15 NOTES...
- Page 16 WARRANTY STATEMENT APPLICABLE ONLY TO PRODUCT SOLD IN AUSTRALIA Brown & Watson International Pty Ltd of 1500 Ferntree Gully Road, Knoxfield, Vic., telephone (03) 9730 6000, fax (03) 9730 6050, warrants that all products described in its current catalogue (save and except for all bulbs and lenses whether made of glass or some other substance) will under normal use and service be free of failures in material and workmanship for a period of one (1) year (unless this period has been extended as indicated elsewhere) from the date of the original purchase by the consumer as marked on the invoice.
Need help?
Do you have a question about the BM320 and is the answer not in the manual?
Questions and answers