Advertisement
A V E R Y D E N N I S O N ® M O N A R C H ® 9 4 1 7 +
Q U I C K R E F E R E N C E G U I D E
See our W ebsite, www.rbis.averydennison.com, for more
information. Review the Safety Sheet provided with your printer.
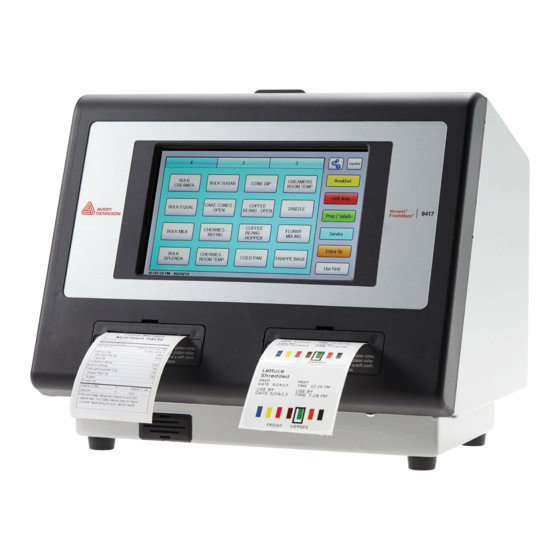
1.
Cover
2.
Display
3.
Left Printer
4.
Right Printe r
5.
Speaker
U s i n g t h e P r i n t e r
Avery Dennison® and Monarch® are registered trademarks of
Avery Dennison Corporation.
TC9417PQR Rev. AA 6/16
6.
Power Cor d Con nection
7.
Ethernet Port
8.
USB (Type B) Po rt
9.
USB (Type A) Po rt
10.
Power Button
©2016 Avery Dennison Corp. All Rights Reserved.
Advertisement
Table of Contents

Subscribe to Our Youtube Channel
Related Manuals for Avery Dennison MONARCH 9417+


Summary of Contents for Avery Dennison MONARCH 9417+
- Page 1 Speaker Power Button U s i n g t h e P r i n t e r Avery Dennison® and Monarch® are registered trademarks of Avery Dennison Corporation. TC9417PQR Rev. AA 6/16 ©2016 Avery Dennison Corp. All Rights Reserved.
- Page 2 Setting the Time and Date Press the Tools button then select Admin. Enter the Admin password and press Enter. The default password is 1234. Press Set Time/Date. Change the time and date as needed then press OK. Printing Labels Turn on the printer. Press the product button of the label to print.
- Page 3 L o a d i n g L a b e l s – L e f t P r i n t e r Turn on the printer then open the cover. Pull on the supply tab. Unlock the supply guide and remove it. Place a roll of labels (label side up) on the supply holder.
- Page 4 Lock the supply guide. Put the supply tab back. Guide the labels along the inside edge and into the slot. The printer feeds the supply. Slide the supply lever next to the supply. Close the supply lever. Close the cover. 4-EN...
- Page 5 L o a d i n g L a b e l s – R i g h t P r i n t e r Turn on the printer then open the cover. Pull on the supply tab. Unlock the outer supply guide and remove it. Place a roll of labels (label side up) on the supply holder.
- Page 6 Put the supply tab back. Guide the labels along the outside edge and into the slot. The printer feeds the supply. Slide the supply lever next to the supply and close it. 10. Close the cover. 6-EN...
Need help?
Do you have a question about the MONARCH 9417+ and is the answer not in the manual?
Questions and answers