Table of Contents
Advertisement
Quick Links
Table of contents
Preface 5
Declaration of conformity 6
Important Health and Safety
Information 8
SAFETY ICONS 8
Handling your Toshiba phone 23
Emergency Calls and GPS 23
BLUETOOTH AND WIRELESS LAN
FUNCTIONS 24
Attention 27
Disposal 28
FCC Notice 30
FCC RF exposure information 31
Disclaimers 32
Important Legal Information 33
Disclaimers 33
Copyright Notice 35
Care and maintenance 36
LCD Panel 36
Restarting your Toshiba phone 36
Resetting your Toshiba phone 37
Reinitialising your Toshiba phone 37
Getting started 38
Unpacking 38
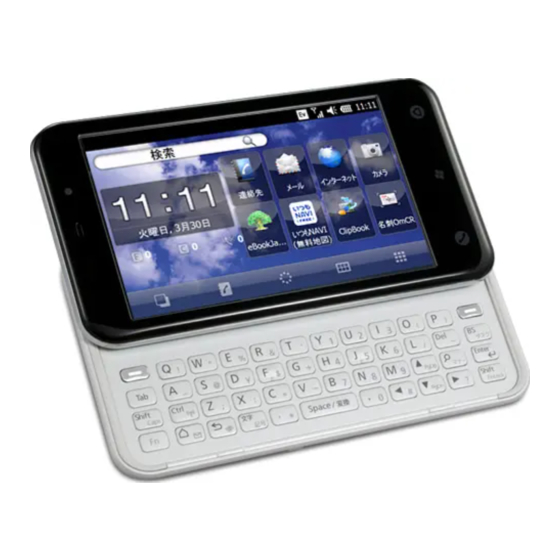
Phone layout and functions 39
Installing the SIM card, microSD card
and battery 42
Charging the battery 46
Switching the power on and off 47
Touch user interface 48
Operator Settings 57
Synchronising your Toshiba phone
with a PC 57
1
Advertisement
Table of Contents

Related Manuals for Toshiba T-01B


Summary of Contents for Toshiba T-01B
- Page 1 Copyright Notice 35 Declaration of conformity 6 Care and maintenance 36 LCD Panel 36 Important Health and Safety Restarting your Toshiba phone 36 Information 8 Resetting your Toshiba phone 37 SAFETY ICONS 8 Reinitialising your Toshiba phone 37 Handling your Toshiba phone 23...
- Page 2 Table of contents Call functions 60 CorePlayer 85 File Explorer 85 Receiving a call 60 Games 85 Ending a call 60 Getting Started 85 Making a call 61 Internet Explorer 86 Speed Dial 62 Java 88 In-call options 64 Marketplace 89 Multiple and multiparty calls 65 Microsoft My Phone 90 Call History 67...
- Page 3 Table of contents Connectivity 98 Encryption 109 Error Reporting 110 Beam 98 External GPS 110 Bluetooth 99 Internal GPS 111 Domain Enroll 101 Location Request 111 Internet connections 102 Managed Programs 111 Internet Sharing 102 Master Clear 111 USB Mode 103 Memory 112 Wi-Fi 103 Motion Sensor Settings 113...
- Page 4 Input methods 135 Toshiba Corporation 160 Input Panel 135 Writing and drawing on the screen 136 End User License Agreements (EULAs) 162 Annex 2 - Navigating your Toshiba phone 138 Licenses 168 Phone screen 138 Index 170 Annex 3 - Common status...
-
Page 5: Preface
We hope you enjoy using your new Toshiba phone. To use your Toshiba phone, you must have service from a wireless service provider. Many of the features in your Toshiba phone depend on features in the wireless network to function. These network services may not be available on all networks, or you may have to make specific arrangements with your service provider before you can utilise network services. -
Page 6: Declaration Of Conformity
We, Toshiba Information Systems UK (Ltd), Mobile Communications Division, of Declaration of conformity Toshiba Court, Weybridge Business Park, Addlestone Road, Weybridge, KT15 2UL declare under our sole responsibility that this product (T-01A, Type (Model) Name RQ5-J01) is in conformity with the following standards and/or other normative documents: EN301511 v9.0.2, 2003-03, EN301908-1 v3.2.1, 2007, EN301908-2 v3.2.1, 2007-05, EN60950-1 2006,... - Page 7 Declaration of conformity This equipment may be operated in:...
-
Page 8: Important Health And Safety Information
Important Health and Safety Information SAFETY ICONS Important Health and Safety Information This manual contains safety instructions that must be observed to avoid potential hazards that could result in personal injuries, damage to your equipment, or loss of data. These safety cautions have been classified according to the seriousness of the risk, and icons highlight these instructions as follows: WARNING... - Page 9 Important Health and Safety Information RECOMMENDATIONS FOR SAFE USE OF YOUR DEVICE (PHONE, BATTERY, ADAPTOR/CHARGER, CABLE AND OTHER ACCESSORIES) WARNING • Never allow your Device to become wet or exposed to moisture or humidity. Contact with liquids may cause overheating, electric shock, fire, malfunction, or serious injury. The warranty for your Device does not apply if the water exposure detection sticker shows water exposure or tests determine that corrosion has occurred due to water exposure, condensation, or perspiration.
- Page 10 Important Health and Safety Information WARNING • Never disassemble, modify or repair the Device. Doing so may cause overheating, cracks, electrical shock, fire, damage to the equipment, or serious injury. For repair, contact your service provider. • Never deposit fluids or insert objects such as pieces of metal or flammable materials into the microSD card slot.
- Page 11 Important Health and Safety Information KEEP DEVICE OUT OF REACH OF CHILDREN WARNING • Always keep cables away from babies and children. The cable, battery pack and other product parts may create a choking or swallowing hazard. CAUTION • If you see lightning or hear thunder while using your Device outdoors, immediately turn off the power and take shelter in a safe place.
-
Page 12: Battery Pack
Important Health and Safety Information BATTERY PACK WARNING Failure to observe these instructions and avoidance of these hazards could cause the battery pack to leak acid, explode, overheat, smoke and / or ignite, and could result in serious bodily injury. •... - Page 13 Always use the AC Adaptor or USB Cable with your Toshiba phone to charge the battery pack. Failure to do so could result in an extremely high current and voltage being generated.
- Page 14 • Never use the adaptor/charger or cable if the power cord is damaged. Doing so may cause electric shock, overheating or fire. • Always charge your Toshiba phone on a stable surface and avoid excessive dust and vibration when charging.
- Page 15 Important Health and Safety Information WARNING • Always grasp the plug when unplugging the adaptor/charger from the power supply. Do not pull the cord itself. Pulling the cord may damage it and cause electric shock or fire. • Always unplug the adaptor/charger from the power outlet before cleaning and when the adaptor/charger will be left unused for an extended period.
- Page 16 When hands-free operation is not available pull off the road to a safe location before making or answering a call. • Never use the video function of your Toshiba phone when driving a motor vehicle or other mode of transportation.
- Page 17 In addition to the above, follow these instructions to avoid interference problems: Aircraft: Use of your Toshiba phone may be prohibited while in the aircraft, whether on the ground or in flight. Always follow the instructions of flight crew, pilots and/or others responsible for the safety of the aircraft and passengers concerning the permitted and prohibited use of your Toshiba phone.
- Page 18 RF energy. Health Care Facilities: Always turn your Toshiba phone off in health care facilities when regulations posted in these areas instruct you to do so. Hospitals and other health care facilities may use...
- Page 19 Important Health and Safety Information Blasting Area: Always turn your Toshiba phone off when in a “blasting area” or in areas with a notification to “Turn off Two-way radios”. Other Posted Facilities: Always turn off your Toshiba phone in any facility or other location where required by posted notice.
- Page 20 As a result, you may experience occasional discomfort in your hands, wrists, arms, shoulders, neck, or other parts of your body. Take short/ periodical rest breaks to avoid strain. If you continue to have discomfort during or after such use, stop using your Toshiba phone and consult your doctor.
- Page 21 Important Health and Safety Information METAL ALLERGIES If you have any metal allergies, contact with certain components of your Toshiba phone could cause itchiness, rashes or sores. If this occurs, stop using your Toshiba phone immediately and consult a doctor.
- Page 22 To safeguard your privacy, you should erase important data before selling or disposing of your Toshiba phone. IF YOUR DATA IS ALTERED OR LOST DUE TO ANY TROUBLE, FAILURE OR MALFUNCTION OF THE DEVICE AND DATA CANNOT BE RECOVERED, TOSHIBA SHALL NOT BE LIABLE FOR ANY DAMAGE OR LOSS OF DATA, OR ANY OTHER DAMAGES RESULTING THEREFROM.
-
Page 23: Emergency Calls And Gps
CAUTION NOTICE: Never rely solely upon your Toshiba phone for • Do not turn off your Toshiba phone when essential communications (e.g. medical using the microSD card. Doing so may cause emergencies) since a wireless phone requires a data loss or malfunction. -
Page 24: Bluetooth And Wireless Lan Functions
In the event your Toshiba phone causes harmful • Precaution when using a 2.4 GHz device radio wave interference with other equipment within the frequency band used by wireless... - Page 25 The availability of public Wireless LAN • Bluetooth wireless technology is a new access points may be limited. The innovative technology, and Toshiba does not transmission speed may also vary depending guarantee compatibility of its Bluetooth on the surrounding electromagnetic...
- Page 26 Important Health and Safety Information • Bluetooth wireless technology is a new transmission speed may vary depending on innovative technology, and Toshiba does not the surrounding electromagnetic guarantee the compatibility of its Bluetooth environment, obstacles, access point design, equipment/function all headsets and/or other...
-
Page 27: Attention
Attention THIRD PARTY SERVICES AND ACCESSORIES CAUTION • Certain features of your Toshiba phone require a separately purchased subscription • Please be aware that your service provider is service from your service provider. The not responsible when the data stored cannot... -
Page 28: Disposal
Important Health and Safety Information • Before connecting your Toshiba phone to an Disposal accessory or other device, read the The following information is only valid for EU- supporting documentation to confirm that the member states. other device is compatible. - Page 29 Important Health and Safety Information products and batteries, you will help to assure If the battery or accumulator contains more than the proper disposal of products and thus help to the specified values of lead (Pb), mercury (Hg), prevent potential negative consequences for and/or cadmium (Cd) defined in the Battery the environment and human health.
-
Page 30: Fcc Notice
Important Health and Safety Information interference to radio or television reception, FCC Notice which can be determined by turning the This Device complies with part 15 of the FCC equipment off and on, the user is encouraged Rules. Operation is subject to the following two to try to correct the interference by one or conditions: (1) This Device may not cause more of the following measures:... -
Page 31: Fcc Rf Exposure Information
0.798 W/kg and when worn on the body, as FCC RF exposure described in this user guide, is 0.483 W/kg. information Your Toshiba phone is a radio transmitter and Body-worn operation receiver. It is designed and manufactured not to This phone was tested for typical body-worn... -
Page 32: Disclaimers
To avoid any risk of lost data, always make backup copies of data by periodically storing it on an external storage medium. Use your Toshiba phone only under recommended conditions. -
Page 33: Important Legal Information
SATISFACTORY QUALITY OR FITNESS FOR including the following: PARTICULAR PURPOSE WITH REGARD TO ANY OF THE FOREGOING. TOSHIBA 1. The use of certain multimedia, computer ASSUMES NO LIABILITY FOR ANY generated graphics or video applications, DAMAGES INCURRED DIRECTLY OR 2. - Page 34 Third-party Services Toshiba makes no warranties, representations, or assurances about the availability or functionality of third-party services. Such services are provided by third parties, and the...
-
Page 35: Copyright Notice
Copyright Notice Your Device contains works of which the paper money, coins, and securities in circulation Copyright Notice copyright is owned by Toshiba or third parties is strictly prohibited. (“Copyrighted Works”). Laws preserved for Toshiba and the third parties certain exclusive rights for the Copyrighted Works. -
Page 36: Care And Maintenance
• Never use alcohol, thinner, benzene, Power key to switch your phone on. ammonia, window cleaners, household If, after you have restarted your Toshiba phone, cleaners, aerosol sprays, solvents, abrasives the problem remains: or detergents to clean your phone. Doing so 1. -
Page 37: Resetting Your Toshiba Phone
To reset your Toshiba phone: Press and hold the Power key for approximately 15 seconds. NOTICE: If you attempt to reset your Toshiba phone just after installation of any of your own programs or changing settings, you will be unable to do so. In such case, you should install... -
Page 38: Getting Started
NOTE: If any of the items listed are Unpacking Getting started missing, contact the retailer where you Please ensure that the contents of your sales purchased your Toshiba phone. pack include: • Your Toshiba phone • Battery • AC charger •... -
Page 39: Phone Layout And Functions
Getting started Phone layout and functions 1. Earpiece 2. LED indicator - indicates various states of the phone. Red - phone is charging. Blue (flashing) - a call, message or notification has been received. Green (flashing) - phone is in sleep mode. 3. - Page 40 Getting started 8. Camera lens 9. microSD card slot 10.Battery cover 11.Speaker 12.SIM card slot...
- Page 41 Getting started 13.Cable, phone charging and headset connector (Micro-USB) 14.Camera key - long press to launch the Camera application. If Camera application is already running, press to capture a photo or begin/stop recording a video clip. 15.Volume Down key - press to decrease the volume.
-
Page 42: Installing The Sim Card, Microsd Card And Battery
Getting started Installing the SIM card, microSD card and battery IMPORTANT: The SIM card is easily damaged by scratching and bending, so take care when handling it. IMPORTANT: Keep SIM card away from static, dust and water. IMPORTANT: Power off the phone and disconnect the charger before inserting or removing the SIM card. - Page 43 Getting started 4. With the gold connectors facing 5. With the gold connectors facing downwards, align the SIM card the correct downwards, align the microSD card the way, as shown in the diagram below. Push correct way, as shown in the diagram down lightly while sliding the SIM card into below.
- Page 44 It will automatically eject. microSD card while the phone is reading data from, or writing data to, the card. TIP: Your Toshiba T-01B supports microSDHC™ memory cards. When transferring a memory card from your Toshiba phone to another device, please check with the device manufacturer that SDHC cards are fully supported.
- Page 45 Getting started 6. Insert the battery into the battery 7. Gently slide the battery cover upward into compartment with the gold connectors place. facing towards the top of the phone. The battery is shaped so that it can only be inserted this way.
-
Page 46: Charging The Battery
NOTE: It is recommended that you save the data in your phone memory to a PC or • connect your Toshiba phone to a PC with the storage card. The manufacturer is not USB cable. responsible for data lost or altered due to IMPORTANT: Do not remove the battery battery discharge. -
Page 47: Low Battery
WARNING: The PIN code activates the battery icon are displayed. services in your Toshiba phone and If the battery charge level runs too low for normal should be provided in the documentation operation, your Toshiba phone will supplied by your service provider. -
Page 48: Touch User Interface
Home and Lifestyle Home. Spb Lifestyle Home navigation between different applications. is set as a default for your Toshiba phone. You Innovative gesture operations also make it easy can fully customise the Home layout by adding... - Page 49 Spb Menu contains all your Toshiba phone programs, 2. View button - tap to access the Spb Mobile settings, and tools well-organised in Shell pages in the selected view style categories.
- Page 50 Getting started 5. Status indicators - See Annex 3 - Common 12.Voicemails - icon is highlighted with the status icons for further information. number of new voicemails. Tap to dial the voicemail. For details of setting up voice 6. Operator Name - displays the operator mail, see Setting up voice mail in Settings.
- Page 51 Getting started Basic Controls Scrolling The controls on the Toshiba phone touch user To scroll up or down: interface change dynamically depending on the Drag up or down by your finger. On some task you are performing. screens such as web pages, you can also scroll from side to side.
-
Page 52: Magnifying Glass
Getting started To scroll up or down quickly: Magnifying Glass Flick by your finger. You can wait for the The Magnifying Glass enables you to magnify a scrolling to come to a stop, or tap or touch portion of the displayed screen. anywhere on the screen to stop it immediately. - Page 53 Getting started Drag the Magnifying Glass to where you want Changing the display magnification power to magnify by tapping and holding its frame. The To change the display magnification power: items displayed within the glass are magnified. Tap the magnification power icon on the right of the Magnifying Glass to toggle between x1.5, x2, and x2.5.
-
Page 54: Motion Sensor
Getting started Motion Sensor Toolbox The Motion Sensor in your Toshiba phone The Toolbox enables you to start the following enables you to quickly and easily carry out a functions: variety of operations. • Toshiba Free Pad You can set up your phone to carry out specific •... - Page 55 5. OK/Close button in Settings. Operates as the OK or X button is displayed To close the Toshiba Free Pad, drag it out of at the bottom right of the screen. the touch screen or tap X. 6. Switching pad button...
-
Page 56: Task Switcher
Getting started Free Cursor Pad Task Switcher Right-handed use Left-handed use The Task Switcher displays the icons of the current active applications. Tap the required icon to change the screen display to the application. To start the Task Switcher: Start the Toolbox, and then tap 1. -
Page 57: Operator Settings
1. Tap > Settings > Connections > Microsoft Windows-powered PC and your Operator Settings. Toshiba phone. It allows you to synchronise 2. If the required settings are available from Microsoft Outlook information, Microsoft Office the U/SIM, tap the button showing your documents, pictures, music, videos and mobile service provider name. - Page 58 Getting started Once the software has been installed and your Changing ActiveSync settings Toshiba phone is connected to your PC, the Once you have set up synchronisation using the ActiveSync Setup Wizard is started. Simply ActiveSync Setup Wizard on the PC, you can follow the on-screen instructions.
- Page 59 Getting started Windows Mobile Device Center (for PCs running Windows Vista) The Windows Mobile Device Center: • Combines an efficient synchronisation platform with a compelling user experience. • Enables you to set up new partnerships, synchronise content and manage music, pictures and video with Windows Mobile powered devices (Windows Mobile 2003 or later).
-
Page 60: Call Functions
Call functions TIP: When you have the headset Receiving a call Call functions connected to your Toshiba phone, you Answering or ignoring a call can do the following: • To answer an incoming call, tap • Answer an incoming call by pressing •... -
Page 61: Making A Call
Making a call Making a call from Contacts To make a call from Contacts: Before making a call, ensure that your Toshiba 1. Access Contacts. phone is switched on, that there is a valid SIM card installed, and that the signal is sufficiently 2. -
Page 62: Speed Dial
Call functions Speed Dial Making an international call To make an international call: Creating a speed dial 1. Access the Phone screen. To create a speed dial: 2. Tap and hold 0 on the keypad until the + 1. Access the Phone screen. sign is displayed. - Page 63 Call functions TIP: To create a speed dial from Making a call using speed dial Contacts: To make a call using speed dial: 1. Access Contacts. 1. Access the Phone screen. 2. Tap the required contact. 2. Tap Speed Dial. 3.
-
Page 64: Putting A Call On Hold
Press the Volume Up key to increase the TIP: When you have the headset volume, and the Volume Down key to connected to your Toshiba phone, you decrease the volume. can place a call on hold by pressing the headset button. -
Page 65: Multiple And Multiparty Calls
Call functions Multiple and multiparty calls Making a second call To make a second call while already in a call: Answering or ignoring a second 1. Tap , Hold, or > Hold to put the first call call on hold. •... - Page 66 To create a conference call: To have a private conversation with a With two calls active on your Toshiba phone, conference call party, you need to split the one active and the other on hold, tap conference call.
-
Page 67: Call History
Call functions 3. Tap Yes to confirm the deletion. Call History NOTE: Deleting all calls from the Call Call History displays a list of calls that you have History does not reset the Call Timers. missed, received and dialled recently. These need to be reset separately (see Resetting Call Timers). -
Page 68: Receiving Text Messages
Windows Live Messenger connected to the network. and to access Hotmail. Your Toshiba phone will alert you when a new text message arrives. Text messages When you have an ongoing conversation using... -
Page 69: Replying To A Text Message
Messaging Replying to a text message Forwarding a text message To reply to a text message: To forward a text message: 1. Access Text Messages. 1. Access Text Messages. 2. Tap the required message in the Inbox, or 2. Scroll to the required message in the Inbox scroll to the required message in the Inbox to be highlighted, and tap >... - Page 70 Messaging • With the cursor in the To: field, enter the first To save a message as a draft, tap > Save to few letters of a name stored in Contacts, Drafts. then tap > Check Names. If several To check spelling before sending the message, matches are displayed, select the required >...
-
Page 71: Mms Messages
Contacts..., From Call History..., or From Receiving MMS messages Sent History..., then tap a recipient. Your Toshiba phone will alert you when a new • Tap , then tap a recipient from the list of MMS message arrives. Depending on your contacts. - Page 72 Messaging when you have finished. Inserting a picture or video , and tap a recipient from sent history. To insert a picture or video in the message: , and tap a recipient from call history. 1. Tap > Insert > Picture/ Tap Done when you have finished.
- Page 73 Messaging Inserting text Inserting file To insert text in the message: To insert file in the message: 1. Tap notepad or > Insert > Text..1. Tap , or > Attachment..2. Enter text. To insert predefined text, tap 2. Tap , or to add vCard, vCalendar, or tap...
-
Page 74: E-Mail
Before you can send or receive e-mails, you one. need to set up an e-mail account. Your Toshiba • Enter e-mail address(es) in the To: field. phone supports the following types of e-mail Use a semicolon to separate multiple accounts: recipients. - Page 75 2. Tap the required e-mail account. TIP: Scroll up to view the Cc: and Bcc: 3. Tap > Send/Receive. Your Toshiba fields. phone connects to your Internet e-mail server and sends and receives your You can enter a subject for the e-mail in the messages.
-
Page 76: Windows Live Messenger
Messaging Windows Live Messenger Downloading and viewing an e-mail attachment Windows Live Messenger enables you to: To download and view an e-mail attachment: • send instant messages or join group chats. From an open message with an attachment, tap • set your status and see the presence of the attachment. -
Page 77: Nimbuzz
Messaging NOTE: The limited version of Nimbuzz Nimbuzz preinstalled on your Toshiba phone Nimbuzz enables you to use your favourite includes instant messaging and dial-in instant messaging features to connect with all calling, but does not include free VoIP your Yahoo! Messenger, AIM, Facebook, calling. -
Page 78: Applications And Multimedia
3. Tap the contact to invite. You can display reminders on your Toshiba phone, as well as synchronising your phone 4. Add more contacts if required. with Outlook on your PC. 5. Tap OK when you have finished You can also schedule meetings via e-mail with adding attendees. -
Page 79: Sending An Appointment
Send. Camera Changing the default reminder time Your Toshiba phone is equipped with a digital By default, the reminder time is set to 15 camera that can be used to capture minutes before an appointment. photographs and video clips. -
Page 80: Capturing A Photo
Applications and multimedia Main Camera screen Capturing a photo The following options are available from the To capture a photo: main Camera screen: 1. Start the Camera. • - to access the Camera menu items. 2. Aim the camera at the subject, then press •... -
Page 81: Capturing A Video
By default, all photographs and videos taken Task Manager. with the Camera are saved in the My Pictures To capture a video: or My Videos folder on your Toshiba phone. 1. Start the Camera. To save photographs and videos on a storage 2. Tap >... -
Page 82: Creating A New Contact
TIP: You can customise Outlook contacts If you use Microsoft Outlook on a PC, you can by adding a picture or a ring tone to synchronise contacts between your Toshiba uniquely identify the person calling you. phone and the PC. - Page 83 Applications and multimedia To copy all phone contacts to the SIM card: Finding a contact 1. Access SIM Manager. To find a contact by name: 2. Tap the picture of the phone. 1. Access Contacts. 3. Tap Menu > Select All. 2.
- Page 84 Applications and multimedia To delete all contacts from the SIM card: Deleting contacts 1. Access SIM Manager. To delete a contact: 2. Tap the picture of the SIM card. 1. Access Contacts. 3. Tap Menu > Select All. 2. Tap the required contact. 4.
-
Page 85: File Explorer
To send contact information in an MMS File Explorer message: File Explorer enables you to view and manage 1. Access Contacts. files saved in your Toshiba phone, or on a 2. Select the required contact to be storage card. highlighted. 3. Tap >... -
Page 86: Internet Explorer
Applications and multimedia Internet Explorer Changing the text size of web pages Internet Explorer Mobile gives quick and easy To change the text size of a web page: access to searching using Bing and web pages 1. From a web page, tap >... - Page 87 Changing the home page Clearing temporary files, cookies and History To change the home page: When you use the Internet, your Toshiba phone 1. From a web page, tap > Tools > stores data that uses up some of the storage Options.
-
Page 88: Installing A Java Application
A new message is created Your phone supports Java 2 Edition, J2ME. with the web page address in the body of The Java application on your Toshiba phone the message. enables you to download, install and manage 3. -
Page 89: Running A Java Application
OK. 1. Access Java. • To install an application stored on your 2. Tap the required application. Toshiba phone, tap Local Files. All uninstalled Java applications stored on the Marketplace phone and the storage card are displayed. -
Page 90: Microsoft My Phone
This is especially useful when you Web account. My Phone also allows you to don’t have a pen and paper to hand. share the photos on your Toshiba phone with For further details of Notes, see Writing and your family and friends. -
Page 91: Office Mobile
See the Microsoft website for details. NOTE: Some data and formatting may be lost when you save a workbook created on a PC to your Toshiba phone. See the Microsoft website for details. OneNote Mobile With OneNote Mobile, you can gather notes and information in one place. -
Page 92: Powerpoint Mobile
PhotoBase is a full-featured image, presentations created on your PC can be management, editing and sharing application opened and viewed on your Toshiba phone. that enables you to manage and quickly preview images stored on your Toshiba phone. NOTE: PowerPoint Mobile does not fully support some features. -
Page 93: Search Phone
SIM Toolkit You can search for files and other items stored When you install a SIM card that has on your Toshiba phone in the My Documents applications loaded on it, you can run the folder or on a storage card. -
Page 94: Streaming Player
Tasks Streaming Player enables you to play live and With the Tasks application, you can create one- recorded streaming media on your Toshiba off tasks or recurring tasks. You can also set phone. reminders for your tasks, and organise them by category. -
Page 95: Video Editor
Applications and multimedia TIP: You can synchronise tasks on your Video Editor Toshiba phone with your PC. This will Video Editor enables you to easily edit videos. keep tasks up to date in both locations. You can also create video clips by combining... -
Page 96: Windows Media
It also includes an item to play digital audio and video files that are that enables you to switch to the Now stored on your Toshiba phone, a storage card or Playing screen. on the Internet. To switch to the Playback screen from the Library screen, tap OK. - Page 97 2. From the Library screen, tap Menu > Open phone or storage card. URL..To play an item stored on your Toshiba phone: 3. Enter the URL of the file or select a URL 1. Access Windows Media. from the History: field, then tap OK.
-
Page 98: Beaming An Item
2. Tick the Receive all incoming beams. and Pictures & Videos items, and other files checkbox, then tap OK. stored on your Toshiba phone, to other devices. NOTE: Bluetooth must be set to On or Visible to send beamed items. -
Page 99: Bluetooth
3. To set Bluetooth to Off mode, untick the using Bluetooth. Turn on Bluetooth checkbox. In On mode, your Toshiba phone can search for To set Bluetooth to On mode, tick the Turn and connect to other devices. However, your on Bluetooth checkbox. -
Page 100: Pairing Devices
10 metres of each other. Toshiba phone, then it will need to be entered on the other device. • Bluetooth on your Toshiba phone is set to On or Visible. 7. To edit the settings for the device, tap Advanced. -
Page 101: Connecting A Bluetooth Headset
If you are using a stereo Bluetooth Toshiba phone, ensure that: headset, also make sure that the Wireless • Bluetooth on your Toshiba phone is set to Stereo checkbox is ticked. On or Visible. 10.Tap Save when you have finished. -
Page 102: Internet Connections
You can set up connections to the Internet or to Sharing: a corporate network to browse the Internet, and 1. Connect your Toshiba phone to a PC using exchange e-mail or instant messages. the USB cable or Bluetooth. If your Toshiba phone has not been 2. -
Page 103: Usb Mode
When a PIN is selected: Before connecting to a Wi-Fi network, ensure Access the access point via the registrar such that Wi-Fi on your Toshiba phone is on. as PC, then enter the PIN displayed on the NOTE: The Wi-Fi on your Toshiba phone phone screen. -
Page 104: Wireless Manager
7. Name the connection and enter it in the and loss or destruction of data. Connection name: field if required. You should set up your Toshiba phone to use 8. Tap OK and wait until the phone completes the authentication and encryption features in the connection process. - Page 105 Connectivity Switching radio transmission on/ You can switch the telephony radio transmission of your Toshiba phone on and off. When the radio transmission is off, it is in 'Flight Mode'. In this mode, you will not be able to make or receive calls, send or receive messages, or access the Internet.
-
Page 106: Settings
2. Hold the phone horizontal to the ground and 3. Enter a new name for your Toshiba phone in rotate it as shown in the figures on the touch the Device name: field. You can also add a screen. -
Page 107: Adjust Motion Sensor
To change the backlight settings: operating correctly, you can adjust it as follows: 1. Access Backlight. 1. Place your Toshiba phone on a stable, level 2. On the Battery Power screen, you can surface, with the touch screen facing select when to turn off the backlight when upwards. -
Page 108: Browser Settings
To view certificate details: NOTE: These settings are only lost if you Access Certificates. On each screen, the reset your Toshiba phone. Your settings certificate names, along with their issuing are saved if you power off the phone, or if authority and expiry date, are displayed. -
Page 109: Customer Feedback
5. Tap < Description > field to label this alarm only be accessible when the card is installed in if required. your Toshiba phone. If the card is lost or stolen, 6. Select the days when the alarm is required. the information remains secure. The contents of the storage card cannot be accessed by anyone 7. -
Page 110: Error Reporting
Windows Mobile software. 2. On the Programs screen, select the port If a program error occurs, Error Reporting that your Toshiba phone will use to obtain starts automatically. The information Microsoft GPS data. receives is used by programming groups at 3. -
Page 111: Internal Gps
Also verify that the program is designed to Managed Programs be run on your Toshiba phone by comparing the Managed Programs lists applications that requirements to the information provided with have been installed remotely by your company your phone. -
Page 112: Memory
Settings To reinitialise your Toshiba phone if there are Memory problems in accessing the Master Clear To ensure optimum performance of your application: Toshiba phone, it is necessary to maintain 1. Press and hold the Power key, the Volume sufficient memory. -
Page 113: Motion Sensor Settings
Owner Information enables you to enter your the motion sensor is activated when you tilt, tap identification such as address, telephone, e- or shake your Toshiba phone. mail, and notes for your reference. To set up the Motion Sensor: Phone 1. -
Page 114: Call Barring
Settings 3. Tap OK. Call Barring Call Barring enables you to block certain TIP: You can use custom sounds as ring categories of incoming and outgoing calls (for tones. You can copy the files to your example, international calls). phone from your PC using ActiveSync, or download them from the Internet. - Page 115 Settings Caller ID Call Forwarding Caller ID allows selected call recipients to view Call Forwarding enables you to forward your name and phone number information on incoming calls to another number. their phone when you call them. NOTE: Call Forwarding is only available To configure Caller ID: if it is supported by your service provider.
-
Page 116: Call Waiting
4. Select whether or not you wish to be notified Fixed Dialing restricts the numbers that you of waiting calls. can call from your Toshiba phone. When Fixed 5. Tap OK. Dialing is activated, you can only call predefined numbers or area codes. These numbers are stored in a list that you can set up and edit using your Toshiba phone. - Page 117 Get Settings... button. Automatic or Manual as required. 4. Tick the Enable fixed dialing checkbox. 4. If you select Automatic, your Toshiba 5. Tap Menu > Add. phone will register to the default network. 6. In the Name: and Number: field, This network is defined by your SIM card.
-
Page 118: Connecting To A Network
3. Tap Find Network. You will need to wait for selection type, following any failure in the phone to search for all available connection to your home network, your Toshiba networks. phone will attempt to connect to the first network When the list of networks is displayed, tap in the list of Preferred networks. -
Page 119: Power Saving Settings
NOTE: Changing the network mode Power settings may limit the ability of your The Power settings enable you to check the Toshiba phone to connect to the wireless battery status and configure settings to prolong network, and may result in signal failure. battery power. -
Page 120: Regional Settings
NOTE: Programs that were pre-installed To change Regional Settings: on your Toshiba phone cannot be 1. Access Regional Settings. removed in this way. 2. On the Region screen, select your region in To remove a program: the drop-down list. -
Page 121: Screen
5. Tap OK when you have finished. Security It is advisable to apply certain security features in case your Toshiba phone is lost or stolen. You can apply the following security to prevent unauthorised use: • Device lock - when this feature is activated, you will need to unlock the phone before you can use it. -
Page 122: Device Lock
Settings lock to prevent unauthorised use of your Enabling a password for the Toshiba phone. You can also set a time after device lock which the device lock will be activated if the To enable a password for the device lock: phone is left idle. - Page 123 Settings Disabling the device lock Deactivating the device lock password The device lock will be activated when returning To disable the device lock password: from the sleep mode. 1. Access Lock. To deactivate the device lock: 2. Enter your current password, then tap If the device lock password is enabled, Unlock.
- Page 124 Settings 3. Tick the Require PIN when phone is used Activating SIM Lock checkbox. To activate SIM Lock: 4. Enter the SIM PIN, then tap Enter. 1. Access SIM Lock. 5. Tap OK. 2. Tick the Lock phone to use current SIM card only checkbox.
-
Page 125: Sleep Mode Indicator
Screen taps or pressing Hardware This setting enables you to set the LED indicator buttons. You can also specify the level of to be on when your Toshiba phone is in sleep the sounds. mode. 3. On the Notifications screen, select the specific sound required for each event, and Sounds &... -
Page 126: Task Manager
Enabling or disabling Toolbox To enable/disable the Toolbox: 1. Access Toolbox Settings. 2. Tick or untick the Use Toolbox checkbox as required. 3. Tap OK. NOTE: By disabling the Toolbox, the Toshiba Free Pad, Magnifying Glass, and Task Switcher are also disabled. -
Page 127: Volume Control
Setting up Toshiba Free Pad for left or right-handed use You can access the phone sound volume and To set up Toshiba Free Pad for left or right- ringer/call volume settings by tapping the ringer handed use: icon on the status indicators. -
Page 128: Specifications
Specifications Specifications System Information ® Processor Qualcomm Snapdragon™ QSD8250, Scorpion™ at 1 GHz Memory RAM : 256 MB ROM : 512 MB ® Operating System Windows Mobile 6.5 Professional UMTS/HSDPA/HSUPA GSM/GPRS/EDGE Frequency Range Within 3G (UMTS) 2100 1920 - 2170 MHz Within 3G (UMTS) 900 880 - 960 MHz Within GSM 850... - Page 129 Specifications Maximum Output Within 3G (UMTS) 2100 Class 3 0.25 W Within 3G (UMTS) 900 Class 3 0.25 W Within GSM 850 Class 4 2 W Within GSM 900 Class 4 2 W Within DCS 1800 Class 1 1 W Within PCS 1900 Class 1 1 W Dimensions (H ×...
- Page 130 Specifications Audio/Video codecs Audio AAC, AAC+, eAAC+, AMRNB, MP3, WMA Video ASF, H.263, H.264, MPEG-4, WMV Connectivity Bluetooth Bluetooth™ ver2.0 + EDR (Power Class 2) Advanced Audio Distribution Profile (A2DP) Audio/Video Remote Control Profile (AVRCP) Generic Access Profile (GAP) Hands-Free Profile (HFP) Headset Profile (HSP) Personal Area Networking Profile (PAN) Phone Book Access Profile (PBAP)
-
Page 131: Troubleshooting
Troubleshooting Troubleshooting Problem Possible cause Possible solution Cannot switch Battery out of power. Charge the battery (see page 46). phone on. Battery not installed correctly. Ensure that the battery is inserted correctly (see page 45). Phone switches Battery out of power. Charge the battery (see page 46). - Page 132 Troubleshooting Problem Possible cause Possible solution Network not SIM card not installed Ensure that the SIM card is inserted displayed. correctly. correctly (see page 43). Contacts between SIM card Gently clean the contacts of the SIM card and phone are dirty. and phone.
- Page 133 Troubleshooting Problem Possible cause Possible solution Poor call quality. Network signal is weak. Move clear of any obstructions that may block the signal. Network signal is changing Wait until signal strength is consistently high frequently, e.g. when travelling before making or answering a call. on a train.
- Page 134 Troubleshooting Problem Possible cause Possible solution Storage memory Too many items stored on the Delete any unwanted messages, clear the is low. phone. Internet history, and delete any unwanted files. Storage card is Storage card not installed Ensure that the storage card is inserted not recognised.
-
Page 135: Input Methods
• Typing - using the Input Panel. Your Toshiba phone will learn words as you use • Writing - using your finger, writing directly on them. They will then be used as suggested the screen. -
Page 136: Writing And Drawing On The Screen
Annex 1 - Text input Writing and drawing on the Toshiba Keyboard With Toshiba Keyboard, you use your finger to screen tap on the keyboard to enter characters. With your Toshiba phone, you can draw directly Toshiba Keyboard consists of the following... - Page 137 Annex 1 - Text input To hand write a note: TIP: To select a drawing (for example, to copy or delete it), tap and hold the drawing 1. Access Notes. briefly. When you lift your finger, the 2. Tap drawing is selected. 3.
-
Page 138: Phone Screen
This section gives information about some of You can access the Phone screen in the Annex 2 - Navigating your Toshiba phone the main screens on your Toshiba phone. It also following ways: gives an overview of the menu structure of your •... - Page 139 Annex 2 - Navigating your Toshiba phone Connections Windows Mobile Start Screen Beam Structure Connections Start Domain Enrollment Today GPRS Settings Phone Mail Settings Text Messages Operator Settings Messaging USB Mode Text Messages Wi-Fi Outlook E-mail Wireless Manager Setup E-mail...
- Page 140 Annex 2 - Navigating your Toshiba phone Encryption Windows Live Messenger Error Reporting Microsoft My Phone GPS Settings MSN Weather Internal GPS Setting Windows Live Location Request MSN Money Managed Programs Calculator Master Clear Games Memory Solitaire Motion Sensor Settings...
- Page 141 Annex 2 - Navigating your Toshiba phone Contacts Backup Java Nimbuzz PhotoBase SIM Manager Streaming Player Video Editor Spb Mobile Shell Spb Home CorePlayer...
-
Page 142: Annex 3 - Common Status Icons
Annex 3 - Common status icons Annex 3 - Common status icons Type Icon Description Radio signal icons Signal strength No signal No radio service. The phone has not yet connected to a network. Radio signal lost. The phone is searching for a signal. Phone set to Off. - Page 143 Annex 3 - Common status icons Type Icon Description Connectivity icons Pairing request received from another device. Incoming beam. Wi-Fi set to On. Wi-Fi network(s) in range. Animated - connecting to a Wi-Fi network. Static - connected to a Wi-Fi network. Call icons Call in progress Data call in progress...
- Page 144 Annex 3 - Common status icons Type Icon Description Notification icons Multiple notifications. This icon is displayed when there are multiple occurrences that would normally each display an icon, for example, when there is a missed call and a message received. This icon is displayed automatically after the last notification icon has been displayed briefly.
-
Page 145: Configuring Mms Settings
Configuring MMS settings Annex 4 - Configuring SMS, MMS and e-mail service centre If your Toshiba phone has not been preconfigured, you will need to manually enter To set up the text messages service centre: the details of the MMS account. These details 1. -
Page 146: Setting Up E-Mail Accounts
5. Tick the Save password checkbox if you wish to save your password to your Toshiba phone. This will mean that you do not need to enter it each time you connect to your e- mail server. - Page 147 5. Tick the Save password checkbox if you and then lose your Toshiba phone, you wish to save your password to your Toshiba run the risk of someone else being able to phone. This will mean that you do not need access your e-mail account.
- Page 148 5. Tick the Save password checkbox if you address hosted by a different provider than wish to save your password to your Toshiba indicated by the domain. For example, your e- phone. This will mean that you do not need mail address may be “user@mycompany.com”,...
- Page 149 12.Enter a unique name for this account in the 5. Tick the Save password checkbox if you Account display name: field, then tap wish to save your password to your Toshiba Next. phone. This will mean that you do not need...
- Page 150 Annex 4 - Configuring SMS, MMS and e-mail 15.Enter the user name assigned to you by IMPORTANT: SSL connection enables your ISP in the User name: field. This is you to send and/or receive personal usually the first part of your e-mail address, information more securely.
- Page 151 Exchange server 26.Select the download preferences for before you can receive e-mails from this attachments in IMAP4 e-mails in the account on your Toshiba phone. Contact Download attachments: field. the administrator of the Exchange server 27.Tap Finish.
- Page 152 14.Make sure that the user name and 5. Tick the Save password checkbox if you password information is correct. wish to save your password to your Toshiba 15.Enter the Exchange server domain in the phone. This will mean that you do not need Domain: field, then tap Next.
-
Page 153: General Messaging Options
Annex 4 - Configuring SMS, MMS and e-mail select which ones to use for e-mail address General messaging options checking. You can customise the options for your • Storage screen - enables you to check the Messaging accounts, message options, memory space of your phone, storage card addressing, and message storage. - Page 154 Annex 4 - Configuring SMS, MMS and e-mail not ticked, the signature is inserted in new messages only. 7. Enter the signature. 8. Tap OK twice.
-
Page 155: Annex 5 - Configuring Internet Settings
Annex 5 - Configuring internet settings NOTE: Before setting up a GPRS NOTE: Before you begin, you will need to Annex 5 - Configuring internet settings connection, you will need to obtain the obtain the following information: required settings from your service •... -
Page 156: Annex 5 - Configuring Internet Settings
Annex 5 - Configuring internet settings • IP Address - select Use server-assigned • PAP - use Password Authentication IP address to automatically configure the Protocol. IP address. Otherwise, select Use specific Tap OK. IP address and manually enter the IP 9. -
Page 157: Setting Up A Vpn Connection
Annex 5 - Configuring internet settings 5. Enter the required information. See Setting 4. Enter the following information: up a GPRS connection for details. • Name: - name for the connection. • Host name/ IP: - name of the VPN 6. -
Page 158: Annex 5 - Configuring Internet Settings
6. If you need to specify extra settings, tap the configuration, you may need to add a proxy Advanced... button and edit the settings as connection to allow your Toshiba phone to required. access the Internet or WAP services. Tap OK when you have finished. -
Page 159: Connecting To Intranet Urls
Annex 5 - Configuring internet settings Connecting to intranet URLs Some URLs for corporate intranet pages may use ‘.’ characters, for example: intranet.companyname.com. To view these pages, you need to set up a URL exception. To set up a URL exception: 1. -
Page 160: Toshiba Corporation
(as the user) and TOSHIBA CORPORATION law and only if those actions are taken in accordance with such ("Toshiba") with regard to the copyrighted software installed in a applicable law. Any failure to comply with the above or any other Toshiba 3G mobile phone supplied to you (the "Phone"). - Page 161 Third Party Beneficiary. You agree that certain suppliers of the TOSHIBA'S AFFILIATES OR THEIR SUPPLIERS BE LIABLE TO Software to Toshiba have a right as a third party beneficiary to YOU FOR ANY DAMAGES FOR (A) LOST BUSINESS OR enforce the terms of this EULA against you as a user.
- Page 162 Operator"), or if the Mobile Operator's network is not driving task at a critical time. TOSHIBA and Microsoft make no operating or configured to operate with the device.
- Page 163 You agreement; may choose not to use this feature. TOSHIBA and/or your • publish the software for others to copy; Mobile Operator may not support this feature or an update for •...
- Page 164 End User License Agreements (EULAs) WITH THE MPEG 4 VISUAL STANDARD IS PROHIBITED, device, or included on or in TOSHIBA's software packaging. If EXCEPT FOR USE DIRECTLY RELATED TO (A) DATA OR you receive the label separately, it is not valid. You should keep...
- Page 165 End User License Agreements (EULAs) This limitation applies to: End User License Agreement for • anything related to the software, services, content ArcSoft Software (including code) on third party internet sites, or third The following is a legal software license agreement between you, the party programs, and software end user, and ArcSoft, Inc.
- Page 166 End User License Agreements (EULAs) Ownership. Title, ownership rights, and all intellectual property loss) which results from an inability to use this Software, even if rights in and to the Software and any accompanying ArcSoft, Inc. has been advised of the possibility of such documentation, and any copy of the foregoing, shall remain the damages.
- Page 167 End User License Agreements (EULAs) Termination. Your rights with respect to the Software may be terminated, either immediately or after a notice period not exceeding thirty (30) days, upon unauthorized copying of the Software or failure to comply with the restrictions contained in this license agreement.
-
Page 168: Licenses
Licenses Snapdragon™ is a trademark of Qualcomm The Bluetooth™ word mark and logos are Licenses Incorporated. trademarks owned by Bluetooth SIG, Inc. Microsoft, Windows, Windows Mobile, CorePlayer® is a registered trademark of Windows Live, Hotmail, Windows Media, CoreCodec, Inc. ActiveSync, Internet Explorer, Outlook, Excel, PowerPoint and Word are either registered trademarks or trademarks of Microsoft Corporation in the United States and/or other... - Page 169 Licenses microSD™ and the microSD™ logo are trademarks. Nimbuzz and the Nimbuzz logo trademarks of Nimbuzz. The Wi-Fi CERTIFIED Logo is a certification mark of the Wi-Fi Alliance.
-
Page 170: Index
Index Index About 106 Calendar 78 AC charger 131 Call Barring 114, 132 Adjust Geomagnetic Sensor 106 Call barring password 114 Alarm 109 Call Forwarding 115, 132 Attachments 75, 76 Call History 67 Authentication 156 Call Timers 67 Call Waiting 116 Caller ID 115 Backlight 107, 131 Camera 79... - Page 171 Index Creating an MMS message 71 Ending applications 126 Error Reporting 110 Custom domain e-mail 148 Customer Feedback 109 Excel Mobile 91 Exchange server 74, 151 External GPS 110 Date 108 Device lock 122 Device name 106 FCC Notice 30 Dial-up connection 156 File Explorer 85 Disposal 28...
- Page 172 Index Hands-free 64 Keyboard 135 Holding a call 64 Keypad tones 114 HSDPA 118 Location Request 111 Input Panel 135 Internal GPS 111 Magnifying Glass 52 International calls 62 Making a call 61 Internet 133 Managed Programs 111 Internet connections 102 Marketplace 89 Internet e-mail 74, 148 Master Clear 111...
- Page 173 Index Pictures 92 Pictures & Videos 92 Network mode 118 Power 119, 131 Nimbuzz 77 PowerPoint Mobile 92 Notes 90 Preferred networks 118 Proxy connection 158 Office Mobile 91 OneNote Mobile 91 Receiving a call 60 Operator Settings 57 Receiving MMS messages 71 Outlook e-mail 151 Regional Settings 120 Owner Information 113...
- Page 174 Text messages service centre 145 Setting up e-mail 146 Time 108 Signatures 153 Toolbox 54, 126 SIM card 42, 43, 132 Toshiba Free Pad 55 SIM Lock 124 Toshiba Keyboard 136 SIM Toolkit 93 Touch user interface 48 Sleep Mode Indicator 125...
- Page 175 Index Voice mail 116 Volume 64 Volume control 127 VPN connection 157 Wi-Fi 103 Wi-Fi security 104 Windows Live 95 Windows Live Messenger 76 Windows Media Player 96 Wireless Manager 104 Word Mobile 92 T-01A-EN-V1.0...
Need help?
Do you have a question about the T-01B and is the answer not in the manual?
Questions and answers