Table of Contents
Advertisement
Quick Links
Advertisement
Table of Contents

Related Manuals for Alecto WS-4800


Summary of Contents for Alecto WS-4800
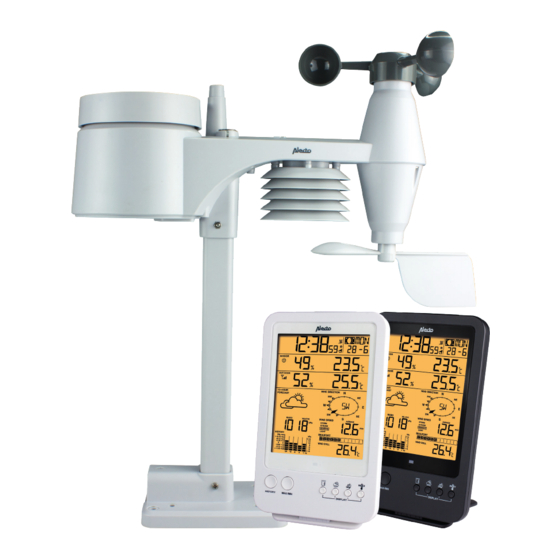
- Page 1 User Guide WS-4800 Weather station with wireless outdoor sensor...
-
Page 2: Indoor Unit
Alecto customer service via internet: www.alecto.nl WARRANTY For the Alecto WS-4800 you have a warranty of 24 months from the date of purchase. During this period, we guarantee the free repair of defects caused by material and workmanship errors. All this subjected to the final assessment of the importer. - Page 3 1. INDEX OVERVIEW 2.1 Indoor unit ............................4 2.2 Outdoor unit............................5 INSTALLATION 3.1 Power supply ............................. 5 3.2 Pairing the indoor unit/outdoor unit ....................6 3.3 Positioning ............................6 3.4 Clock ..............................7 3.5 To reset measurement data ......................7 OPERATION 4.1 Basic functions ..........................
-
Page 4: Indoor Unit
2. OVERVIEW 2.1 Indoor unit: 15 16 1. SNOOZE/LIGHT button: button: clock setup button snooze button in alarm mode, also for button: alarm clock setup button activating the display lighting button: alarm setup button button: down button 2. Display button: up button (the following pages will explain what 15. -
Page 5: Outdoor Unit
For that reason, we advise you to use Lithium batteries for the outdoor unit that are designed to function well within a temperature range of -20°C to 60°C. These batteries can be ordered via the service department of Alecto via telephone number 073 6411 355 (Netherlands) or 03 238 5666 (Belgium) or via internet: www.alecto.info... -
Page 6: Pairing The Indoor Unit/Outdoor Unit
Indoor unit: Slide down the battery cover at the rear of the unit and insert 3 AA 1.5V batteries according to the markings inside the battery compartment. Slide the battery cover back onto the indoor unit. (Batteries are not included) The indoor unit will now start a 1 minute scan to search for the outdoor unit. -
Page 7: Clock
After several seconds or minutes the WS-4800 will start showing the correct time. In extreme cases, it can take over a day before the DCF time is shown. Manually:... -
Page 8: Operation 4.1 Basic Functions
4. OPERATION 4.1 Basic functions: The display shows the following basic functions/data: 1. illuminates when the battery of the indoor unit is running low 2. display of the actual time 3. illuminates when the alarm clock is set to ice alert (see chapter 5) 4. -
Page 9: Indoor Temperature And Humidity
4.2 Indoor temperature and humidity: 1. relative indoor air humidity comfortable 2. illuminates when the max or min alarm is set comfort not OK (too cold/too dry) 3. indoor temperature comfort not OK (too warm/too humid) 4. comfort icon, this is a combination of temperature there’s no comfort indication at temperatures and humidity (*3) <0°C (32°F) or >60°C (140°F) -
Page 10: Barometer (Air Pressure)
4.5 Barometer (air pressure): If this window is not visible, please first press the button actual air pressure indicates whether the relative or absolute (*5) air pressure is displayed indicates whether the air pressure is shown in hPa (hecto Pascals), in inHg (inches of mercury) or in mmHg (millimetres of mercury) (*6) 4+5. -
Page 11: Wind (Direction + Speed)
4.7 Wind (direction + speed): 1. actual wind direction 2. measured wind directions (max 6) of the last 5 minutes 3. wind direction 4. indicates whether the displayed wind speed is an average speed or a wind gust (*9) 5. Wind speed 6. -
Page 12: Alarm Clock 5.1 Introduction
6. HISTORY 6.1 Introduction: The indoor unit of the WS-4800 automatically saves all measurement data of the past 24 hours, allowing you to check the trend of the last 24 hours at any time 6.2 To view the history: 1. -
Page 13: To Set Hi-Lo Limits
7.2 To set Hi-Lo limits: 1. repeatedly press the button until the desired display is flashing with the indication ‘HI AL’ or ‘LO AL’ next to it (if applicable) 2. use / to set the limit 3. briefly press the button again to save the value 4. -
Page 14: Rain Meter
10. MAINTENANCE 10.1 Rain meter: You can disassemble the rain meter as follows to remove any spiders or other insects: 1. Rotate the upper ring of the rain collector 30° anti-clockwise, making sure that the star sign in the bottom of the funnel is in the “Unlock” position. You can now remove this ring and look at the interior of the rain meter. - Page 15 Indoor humidity: display range: 20% to 90% (‘LO’ at <20%: ‘Hi’ at >90%) (at temperatures between 0°C and 60°C) functional range: 20% to 90% relative humidity resolution: accuracy: +/-5% at 25°C (77°F) memory display: history of the past 24 hours, MIN/MAX humidity with time and date alarm: HI/LO alarm Outdoor humidity:...
- Page 16 Service Help WWW.ALECTO.NL SERVICE@ALECTO.NL Hesdo, Australiëlaan 1 5232 BB, ‘s-Hertogenbosch The Netherlands Service WWW.ALECTO.NL SERVICE@ALECTO.NL Help Hesdo, Australiëlaan 1, 5232 BB, The Netherlands ‘s-Hertogenbosch, V1.5...
Need help?
Do you have a question about the WS-4800 and is the answer not in the manual?
Questions and answers