Table of Contents
Advertisement
Advertisement
Table of Contents

Related Manuals for Cook's Companion CCPC46L


Summary of Contents for Cook's Companion CCPC46L
- Page 1 6.3QT PRESSURE COOKER INSTRUCTION MANUAL & RECIPES MODEL CCPC46L...
- Page 2 WHAT’S INCLUDED Pressure Cooker, Inner Pot, Power Cord, Rice Measuring Cup, Rice Spoon, Condensa8on Cup *Please locate all parts before discarding the box...
- Page 3 IMPORTANT SAFEGUARDS When using electrical appliances, basic safety precauFons should be followed as follows: • Read all the instruc8ons. • Intended for household use only. • Do not use the appliance for anything other than intended use. • Do not operate this unit in the presence of explosives and/or flammable fumes. • Remove the unit and the instruc8on manual from the box and remove all packing materials. • The inner pot should be washed before first use. • Do not touch the lid or any of the stainless steel surfaces when in use, as these surfaces will become very hot during opera8on. Use the lid handle to adjust and remove the lid. • When handling and liLing the pressure cooker, use the side handles and pot holders. • Do not liL the pressure cooker by the lid handle. • Do not leave the appliance unaMended during opera8on. Close supervision is necessary when any appliance is used by or near children to avoid injury to themselves or others. • Do not operate any appliance with a damaged cord or plug, or aLer the appliance malfunc8ons or has been damaged in any manner.
- Page 4 • Once you have started the cooking cycle you can NOT remove the lid un8l all the pressure has been released. It is recommended that you follow the safe method for the pressure to release, which depends upon the contents or liquids inside. • Do not place the unit on or near gas or electric cooktops or in a heated oven to avoid damage. • Keep the pressure cooker away from flammable and explosive ar8cles. • Use only replacement parts provided by the manufacturer. • To protect against electrical shock, do not immerse power cord, plugs, or the whole unit in water or any other liquid. • A short power cord is provided to minimize the risks resul8ng from becoming entangled in or tripping over a longer cord. • Never unplug directly from the unit when turning off, always unplug from the wall outlet first. • The use of an extension cord is not recommended. • Place the unit on a level surface away from walls and cupboards. Do not let the cord hang over the edge of a table or counter, or come into contact with hot surfaces. • Always plug the cord into the appliance first, then plug the cord into a grounded three-prong wall outlet. To disconnect, make sure the unit is turned off, then unplug from the wall outlet. • Unplug the pressure cooker when not in use and before cleaning. Allow to cool before cleaning or taking off parts. • Make sure the unit is unplugged before moving the unit.
- Page 5 • Extreme cau8on must be used when moving an appliance containing oil or other hot liquids. Do not move the appliance during cooking. • Always place ingredients in the inner pot of the pressure cooker to avoid damage to the hea8ng element. • Never use the pressure cooker without the inner pot provided. • Do not place the inner pot of the pressure cooker onto a gas or electric burner. • Do not use a damaged or cracked inner pot. • Never operate the pressure cooker without food or liquid in the inner pot. • If you are using plas8c utensils, do not leave them inside the appliance when hot. • Do not place the inner pot when hot on any surface that may be affected by heat. • Do not place inner pot when hot into cold water or freezer. • Do not place anything, other than the lid, on top of the pressure cooker when assembled, when in use and when stored. • Make sure when filling the inner pot, do not fill past the 2/3 mark on the inner pot. When cooking foods that expand such as rice or dried vegetables, do not fill the unit over the 1/2 mark on the inner pot. Over filling may cause a risk of clogging the exhaust pipe. • This unit cooks under pressure. Improper use may result in a scalding injury, make sure the unit is properly closed before opera8ng.
- Page 6 • Do not use the pressure cooker near or under surfaces that are heat sensi8ve or those that may be damaged by steam. • To avoid scalding from escaping steam, carefully liL the lid angled away from yourself. • Never forcefully open the lid as the contents are under pressure, extremely hot, and could cause burns. Turn the dial to KEEP WARM on the control panel to stop opera8on, then wait un8l sufficient heat and pressure have subsided and the lid is unlocked to open the lid. • If you use the quick release method by using the pressure release buMon steam and liquids will be released through the pressure relief valve. Use cau8on, as the steam and liquids will be very hot. Do not aMempt to force open the lid as the contents are under pressure and extremely hot and could cause burns. • Do not use outdoors. • SAVE THESE INSTRUCTIONS.
- Page 7 PARTS IDENTIFICATION CondensaFon Cup Please note this does not come aMached and will be located with the rice spoon and rice measuring cup. The condensa8on cup aMaches to the outside of the pressure cooker to collect condensa8on while the unit is under pressure. The condensa8on cup needs to be installed before use. Please empty and clean aLer each use with a non abrasive liquid and sponge then place back on the unit.
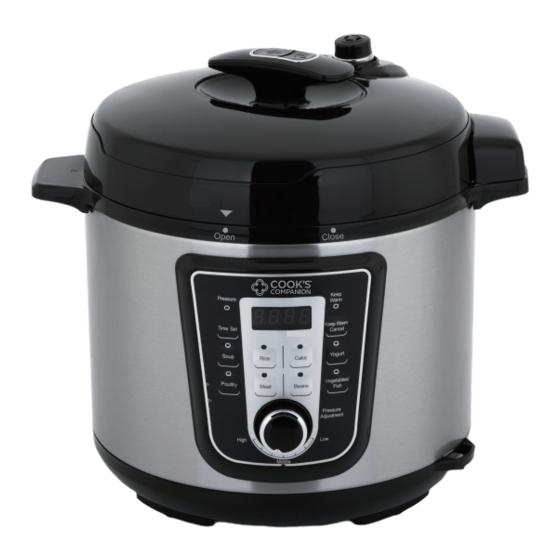
- Page 8 CONTROL PANEL Pressure: This light will illuminate once the unit is under pressure. Keep Warm: This light will illuminate when the unit is in the Keep Warm mode.The unit will automa8cally go into keep warm aLer the cooking 8me has completed. The unit will display “bb” when in the keep warm mode. Time Set: Press this buMon to select desired 8me aLer selec8ng cooking func8on. Keep Warm Cancel: If just keep warm is desired, press keep warm cancel and the unit will display “bb” and stay in keep warm for up to 9 hours. Press this buMon to cancel the keep warm mode aLer cooking 8me is complete. Pressure Adjustment: Turn this knob to adjust the level of pressure while cooking. The range is 40KPA-75KPA. Note: This will affect the temperature but will not effect the cooking 8me. The adjustment is there to adjust the texture of the food. It is suggested to start by cooking foods all set at high and then lower the pressure if desired texture is not achieved.
- Page 9 Cooking SeOngs SETTING DEFAULT TIME TIME RANGE Soup 30 minutes 5 mins.-45 mins. Rice 10 minutes 1 min.-20 mins. Cake 30 minutes 10 mins.-50 mins. Yogurt 8 hours 4 hours- 8 hours Poultry 20 minutes 5 mins.-35 mins. Meat 1 hour 1 min.- 2 hours Beans 25 minutes 5 mins.-1 hour Vegetables/Fish 5 minutes 1 min.-30 mins. BEFORE FIRST USE 1. Remove all packaging materials. Please locate the power cord before throwing away packaging materials. 2. Clean the inner pot and lid with hot water, dishwashing liquid, and a non-abrasive sponge. 3. Wipe the inside and outside of the appliance with a cloth.
- Page 10 USING THE APPLIANCE 1. Plug the cord in. Then plug the cord into a wall outlet. The display will show “- - : - -”. • WARNING: Always plug the cord into the unit first. Always unplug the cord from the wall outlet first. 2. Open the lid with the control panel facing you, grasp the lid handle and turn the lid clockwise un8l the arrow aligns with open posi8on located on the unit. LiL up the lid. Note: The lid is able to be stood up. See figure below. 3. Following a recipe provided, add food and liquid into the cooking pot, while following the guidelines below. • Food and liquid cannot exceed 2/3 of the cooking pot height. • For food that expands easily in water, the liquid level can not exceed 1/2 of the cooking pot height.
- Page 11 4. Close the lid by lowering it onto the pressure cooker. With the arrow in the open posi8on, grasp the lid handle and turn it counterclockwise un8l the arrow aligns with the close posi8on on the unit. See figures below. • WARNING: Never aMempt to open the lid while pressure cooking. In the event the lid is not closed properly the unit will not build pressure, air will be leaking from the lid, if this happens unplug the unit, allow the unit to cool completely and release any pressure from the unit (this could take up to 30 minutes).
- Page 12 5. In order to cook under pressure, the lid must be on the unit. CAUTION • When the unit is under pressure keep hands and face away from the unit as it is extremely hot. 6. Press the desired func8on. The default 8mes and ranges are listed on page 9. The preset 8me will be displayed, to change the 8me press Time Set to get to desired 8me. Once desired 8me is reached set the pressure knob to desired pressure level. Note: When moving the pressure knob, this will not affect the cooking 8me only the texture of the food. 7. When the correct pressure has been reached the unit will beep and the 8mer will begin to countdown. Note: During the ini8al cooking cycle it is normal for air to come out of the float valve for 10 to 20 seconds. ALer the cold air is expelled, the remaining interior air temperature increases and the float valve will close. 8. ALer pressure cooking is complete the unit will go into the keep warm mode and display “bb”. The unit will take 10-30 minutes to gradually release pressure. The keep warm light will be illuminated.
- Page 13 9. The pressure can be released manually using the pressure release buMon or on its own. 10. If a recipe states that the pressure needs to be released on its own, unplug the cooker and let the unit sit for 10-30 minutes depending upon the contents inside the unit. WARNING: Do not release steam manually with recipes containing liquid such as soups or stews, as food and liquid will spurt from the exhaust pipe. 11. If the recipe notes to release pressure manually unplug the cooker and press the pressure release buMon un8l pressure is released then press the pressure cancel buMon. Use cau8on when manually releasing pressure as hot steam will be released. 12. Press the pressure release buMon located on the handle to ensure that the pressure is completely released. Once all the pressure has been released press down on the pressure cancel buMon. When you no longer hear steam escape out of the exhaust valve the lid will open freely. See image below. Pressure Release BuMon Pressure Cancel BuMon...
- Page 14 13. Remove the lid by grasping the handle and twis8ng the lid clockwise to the open posi8on. The lid will rest on the unit as the image below shows. To completely remove the lid slide it out toward the back of the unit. As noted, the lid will not open unless all the pressure is released. Never force open the lid if it does not open freely, the unit is s8ll under pressure. Note: The unit will con8nue to cook food while in the keep warm func8on so it is important to turn off the unit if the food is completely cooked and there is no need to keep the food warm.
- Page 15 CLEANING Clean aLer every use. 1. Before cleaning unplug the unit and allow to cool completely. 2. Wash inner pot, condensa8on cup and lid in hot water with dish liquid. Rinse and dry thoroughly. To clean the condensa8on cup, remove from the side of the unit, once cleaning is finished click the condensa8on back onto the side. 3. Wipe the external surface of the pressure cooker with a soL damp cloth and dry surfaces with soL dry cloth. Do not use detergent or abrasives as these may scratch the coa8ng. Note: Never immerse the pressure cooker housing in water.
- Page 16 COOKING TIPS • It is very important to have a liquid such as water, stock, juice, or wine in the pressure cooker in order to create steam. At least 1 to 2 cups are necessary to create adequate steam. Thicker sauces such as barbecue or tomato sauce will not create steam. • When cooking a rice, bean, or pasta dish, do not fill the inner pot more than the 1/2 way mark. When cooking soup or stocks, do not exceed the 2/3 mark. • If you live in higher al8tudes, you may need to increase the cooking 8mes slightly. It is suggested to extend the cooking 8me by 5% for every 1,000 feet above sea level. • All the recipes were tested by weight, so if you wish to cook a larger piece of meat, you will need to increase the cooking 8me. Add 10 minutes to the suggested cooking 8me for every addi8onal pound of meat. • If your meat is not as tender as you would like it, simply add 1/2 cup of liquid and increase the cook 8me by 10 minutes. • If you ever complete a recipe and the cooking liquid is thinner than you would like, simply reduce with the lid off un8l the desired consistency is achieved.
- Page 17 COOKING CHART INGREDIENT INGREDIENT AMOUNT TIME LIQUID SUGGESTED (CUPS) (MINUTES) Vegetables Artichokes, trimmed 3 Medium Beans, Black 1 cup Beans, Navy 1 cup 2- 2 1/2 Beans, Pinto 1 cup Beans, Red Kidney 1 cup 3 1/2 Beans, String 1 lb. Beets 6 medium Cabbage Head,...
- Page 18 INGREDIENT AMOUNT TIME LIQUID SUGGESTED (CUPS) (MINUTES) Chicken, legs Chicken, quartered 3 lbs. Chicken, whole 3 lbs. Chuck Roast 3 lbs. Corned Beef 3 lbs. Baby Back Ribs 2 slabs Lamb Shanks 2-3 lbs. Pork Chops (8-10oz. each) Short Ribs 3 lbs.
- Page 19 TROUBLE SHOOTING Problem Reason Solution It is difficult to close the The sealing ring is out of Place the sealing circle lid. place. properly. The float valve is stuck in Push the rod in place. the push rod. It is difficult to open the After releasing, the float Press the float valve lid.
- Page 20 RECIPES Brown Rice Pilaf with Len8ls Serves 4 to 6 Ingredients 1 cup brown basma8 rice, uncooked 2 cup water 1 teaspoon salt 1 tablespoon extra-virgin olive oil 1 cup len8ls 2 garlic cloves, minced 2 carrots, peeled and diced 1 medium onion, diced 1 cup tomatoes, diced 2 cups vegetable stock 1 tablespoon parsley, chopped ¼ teaspoon dried thyme 2 ribs celery, diced Prepara8on Place rice, water, salt and oil in pressure cooker; secure lid. Select the rice func8on; press the 8me set buMon un8l 15 is illuminated in the display and set pressure knob to high. When cooking is complete and pressure is fully released open the lid, use cau8on when opening the lid. Add remaining ingredients to pressure cooker, except parsley; secure lid. Select the vegetable func8on When cooking is complete and pressure is fully released, use cau8on opening lid. S8r well top with parsley and serve.
- Page 21 Cajun Chicken Pasta Serves 6 Ingredients 3 boneless, skinless, chicken breasts 1 teaspoon olive oil 3 teaspoons Cajun seasoning 1 pound rigatoni pasta (uncooked) 3 cups chicken stock 1 small red onion sliced thin 1 red bell pepper cut julienne 1 green pepper cut julienne 3 cloves garlic, minced 1/2 cup diced ripe tomatoes 2 sprigs thyme 4 ounces whipped cream cheese ½ cup heavy cream 1/4 cup grated parmesan Prepara8on With the lid open on the pressure cooker select the rice func8on and set the pressure knob to high. Note: The 8mer will not count backwards 8ll pressure is achieved so it works to brown things well with the lid open. Dice the chicken into 1-inch cubes. Add the oil to the pressure cooker and let it heat for 2 minutes. Add the chicken to the hot oil and s8r. S8r in the Cajun seasoning and brown the chicken pieces for several minutes to develop a nice golden brown color. Now add all the ingredients to the pressure cooker insert, except the cream cheese, heavy cream and parmesan. S8r all the ingredients, then close and secure the pressure lid. When the cook 8me is complete, press the steam release buMon to release pressure. Once lid is opened s8r in the cream cheese, heavy cream and parmesan. Discard thyme sprig before serving.
- Page 22 Chicken Piccata Serves 4 Ingredients 1 tablespoon olive oil 4 boneless, skinless chicken breasts 1/2 teaspoon garlic salt 1/2 teaspoon freshly ground pepper 1 shallot minced 1 lemon, juice and zest from 1/2 cup white wine ½ chicken stock 1 tablespoon fresh parsley, chopped 1 tablespoon green olives, sliced 1 tablespoon of capers 1 tablespoon parsley, chopped 1 teaspoon of corn starch dissolved Prepara8on Open the pressure cooker lid and select the poultry func8on hold the 8me set buMon un8l 10 is displayed and set the pressure knob to high. Allow the pressure cooker to preheat for 1 minute then add the oil and let heat for 2 minutes. Add the chicken breasts a couple at a 8me to brown well. Pour off the oil and season the chicken with garlic salt and pepper. Add the shallot, lemon juice and zest and white wine and stock to the pressure cooker. Secure the pressure cooker lid. When cooking is complete and pressure is fully released open the lid, use cau8on when opening the lid. Transfer chicken to plaMer, with the lid open, select the 8me set buMon for 2 minutes, s8r in the dissolved corn starch and s8r to thicken sauce. Add the olives capers and parsley. Pour over the chicken and serve hot.
- Page 23 Chicken Soup Serves 6 Ingredients 1 - 4-pound chicken 1 medium onion, quartered 6 cups water 1 tablespoon kosher sea salt 6 whole peppercorns 2 celery stalks, diced 2 carrots, peeled and sliced 1 fresh bay leaf 1 sprig thyme 2 cups cooked wide egg noodles 1 tablespoon fresh parsley, chopped Prepara8on Place chicken, onions, water, salt and peppercorns into pressure cooker, and secure lid. Select the soup func8on, press the 8me set buMon un8l 45 minutes is displayed and set the pressure knob to high. When cooking is complete and pressure is fully released open the lid, use cau8on when opening the lid. Strain the stock, and set aside. Remove chicken meat from bones and place meat back into pressure cooker. Add strained stock, celery, carrots, bay leaf and thyme to pressure cooker, secure lid. Select the vegetable func8on. When cooking is complete and pressure is fully released, use cau8on opening lid. Discard the bay leaf and thyme. S8r in the cooked egg noodles. Sprinkle soup with parsley, and serve.
- Page 24 Mediterranean Chicken with Spinach and Ar8chokes Serves 4 Ingredients 4 chicken thighs 1 tablespoon extra-virgin olive oil ¼ teaspoon salt ¼ teaspoon freshly ground pepper 1 can (14 1/2 ounces) Ar8chokes, rinsed and drained 1 medium onion, sliced 1 large carrot, cut into 1-inch pieces 2 cloves garlic, minced 8-ounces baby spinach ½ cup chicken stock Prepara8on With the pressure cooker lid open, select the poultry func8on press the 8me set buMon un8l 15 is displayed and set the pressure knob to high. Add the oil to the pressure cooker and let it heat for 1 minute. Season chicken with salt and pepper add to pressure cooker. Brown on both sides, about 5 minutes per side. Add ar8chokes, onions, carrots and garlic to the pressure cooker, cook for 5 minutes. Add spinach and cook for an addi8onal minute. Add broth and chicken to the pressure cooker; secure lid. When cook 8me is complete and pressure is fully released, open lid with cau8on. Serve immediately.
- Page 25 Chocolate Cake Serves 12 Ingredients ¾ cup unsweetened cocoa powder 1 teaspoon salt 1 ½ teaspoon baking powder 1 ½ teaspoon baking soda 1 ¾ cups all-purpose flour 2 cups sugar ½ cup melted buMer 2 large eggs 2 teaspoons vanilla extract 1 cup milk 1 cup boiling water. Prepara8on In a large bowl, siL together the cocoa powder, salt, baking powder, baking soda, flour and sugar. Add the buMer, eggs, extract and milk; beat on medium with a mixer for 2 minutes. S8r in the boiling water. Spray the pressure cooker insert with nons8ck spray, scrape the cake baMer into the pressure cooker insert. Secure the pressure cooker lid. Select the cake func8on and set the pressure to high. When cook 8me is complete, remove the insert from the pressure cooker and invert the cake onto a plate. Let the cake cool completely before fros8ng.
- Page 26 Corned Beef and Cabbage Serves 4 to 6 Ingredients 3 pounds corned beef, trimmed 1 large onion, quartered 1/2 cup beef stock 1 boMle (12 ounces) dark beer 1/2 teaspoon mustard seeds 1/2 teaspoon whole peppercorns 2 allspice berries 1 bay leaf 1 teaspoon mustard powder 3 garlic cloves, minced 6 small onions, peeled 6 small bliss potatoes, halved 12 baby carrots 1 head cabbage, cut into 6 wedges Prepara8on Place all ingredients, except small onions, potatoes, carrots and cabbage into pressure cooker; secure lid. Select the meat func8on hold the 8me set buMon un8l 80 is displayed and the pressure knob to high. When cooking is complete and pressure is fully released open the lid, use cau8on when opening the lid. Remove bay leaf and add remaining ingredients; secure lid. Select the vegetable func8on; press the 8me set buMon un8l 10 is displayed. When cooking is complete and pressure is fully released open the lid, use cau8on when opening the lid. Serve immediately.
- Page 27 Black Beans Serves 4 to 6 Ingredients 12 ounce bag dried black beans 4 cups beef stock 1 medium onion, diced 2 cloves garlic, minced 1 red bell pepper, diced 2 tablespoon fresh cilantro, chopped 1 teaspoon salt 1/2 teaspoon freshly ground pepper 1 teaspoon cumin 1 can (14 1/2 ounce) pe8te dices tomatoes with olive oil. Prepara8on Place all ingredients in pressure cooker; secure lid. Select the bean func8on and press the 8me set buMon un8l 50 is illuminated in the display and set the pressure knob to high. When cooking is complete and pressure is fully released open the lid, use cau8on when opening the lid. Serve immediately.
- Page 28 Gluten-free banana bread Makes 6 to 8 servings Ingredients 3 ripe bananas 1/3 cup unsalted buMer, melted ¾ cup agave nectar 2 cups gluten-free baking mix 2 teaspoons baking powder ½ teaspoon salt ½ teaspoon ground nutmeg 1 teaspoon banana extract 1 teaspoon orange zest 2 large eggs beaten ½ cup buMermilk ¼ cup flax seeds 1 cup dried cranberries Prepara8on Spray the pressure cooker insert with nons8ck spray. In a large bowl mash, the bananas using a fork or potato masher. S8r in the buMer and the agave. In a medium bowl add the gluten free baking mix, baking powder, salt, and nutmeg. Add the extract, and orange zest to the banana mixture, s8r in the eggs and flaxseeds. S8r in the buMermilk. Add the dry ingredients and the dried cranberries and mix. Do not over mix this baMer should be lumpy. Pour baMer into prepared pressure cooker insert. Secure the lid and select the cake func8on and set the pressure knob to high. When the cook 8me is complete check if it is done by inser8ng a toothpick in the center and it should come out clean. Remove the insert from the pressure cooker and invert on a plate. This is delicious warm!
- Page 29 Homemade Yogurt Makes 6 cups Ingredients 6 cups milk, whole, 2%, skim ¾ cup plain high-quality yogurt (I use Greek) Instant read thermometer Cheese cloth for straining (op8onal) Prepara8on With the pressure cooker lid open press the 8me set buMon un8l 2 is displayed. Add the milk to the pressure cooker and bring to a simmer (180°F.) When the 180°F is achieved, press the cancel buMon. Let the milk cool to 140°F. Approximately 20 minutes. When the milk is 140°F whisk in the yogurt starter. Secure the pressure cooker lid, select the yogurt func8on and set the pressure knob to high. The yogurt process takes 8 hours. Cover a strainer with cheesecloth, dump the yogurt into the strainer. Store the yogurt in air8ght containers in the refrigerator up to a week. Hummus Serves 6 to 8 Ingredients 1 cup dried garbanzo beans 1 teaspoon baking soda 1 lemon, juice and zest 2 garlic cloves, minced 1 teaspoon cumin 2 teaspoons salt 1/2 teaspoon cayenne pepper 5 cups water 2 tablespoons Tahini paste 1 cup extra-virgin olive oil Prepara8on In a bowl, cover garbanzo beans with water and baking soda, let soak for an hour. Rinse beans and transfer to pressure cooker. Add lemon juice, zest, garlic, cumin, salt, cayenne pepper and 5 cups of water to pressure cooker; secure lid. Select the bean func8on, hold the 8me set buMon un8l 30 minutes is displayed and set the pressure knob to high. When cooking is complete and pressure is fully released, use cau8on opening lid. Drain beans, then transfer beans to food processor, fiMed with a metal chopping blade and add Tahini paste. Process beans and slowly add oil to create emulsion.
- Page 30 Len8ls with Italian Sausage Serves 4 Ingredients 1-pound sweet Italian sausage, cut into 1-inch pieces 1 medium onion, diced 2 garlic cloves, sliced 1 large carrot, peeled and thinly sliced 1 celery stalk, thinly sliced 1 cup len8ls 2 cups chicken stock 1 can (14 ½ ounces) diced tomatoes with garlic and olive oil 1 bay leaf ½ teaspoon crushed red pepper flakes (op8onal) Prepara8on Place all ingredients into the pressure cooker; secure lid. Select the bean func8on. Press the 8me set buMon un8l 10 is displayed and set the pressure knob to high. When cook 8me is complete and pressure is fully released, open lid with cau8on. Remove and bay leaf and serve.
- Page 31 Pasta with Beans, Chard, and Rosemary Serves 4-6 Ingredients 1 tablespoons extra-virgin olive oil 3 -ounces panceMa, diced 1 medium onion, diced 12- ounces Swiss chard, leaves chopped coarse, stems chopped fine 1 teaspoons rosemary, minced 1 clove garlic, minced ¼ teaspoon dried thyme ¼ teaspoons red pepper flakes 1 (15 ounce) can cannellini beans, undrained 1 ½ cups vegetable stock 1/2 cup freshly grated Parmesan 8- ounces (2 ½ cups) fusilli pasta Prepara8on With the pressure cooker lid open, select the vegetable func8on and set the pressure knob to high. Add the oil to the pressure cook and let heat for several minutes. Add panceMa and sauté un8l brown. S8r in onion, chard and cook, s8r occasionally un8l slightly soLened. Add thyme, rosemary, garlic and pepper flakes and cook 1 minute. Add beans with their liquid, pasta and stock; secure lid. When cook 8me is complete and pressure is fully released, open lid with cau8on. Sprinkle with cheese. Serve immediately.
- Page 32 Ar8chokes in Lemon Serves 3-6 Ingredients 3 whole ar8chokes 1/2 cup white wine ½ cup chicken stock Juice and zest from 1 lemon 1 sprig thyme 3 whole peppercorns Prepara8on Wash the ar8chokes under cold water. Using a sharp knife cut the stems off close to the base. Cut off the top inch of the ar8choke, trim the thorny 8ps of the petals. Put the wine, chicken stock lemon juice and zest in the pressure cooker. Place the ar8chokes stem-side down. Add remaining ingredients and secure the pressure lid. Select the vegetable func8on, hold the 8me set buMon un8l 20 minutes is displayed and set the pressure knob to high. When the cook 8me is complete, and pressure has been released. Cau8ously open the lid. Serve hot or cold, you could serve the ar8chokes hot with drawn buMer or mayonnaise. Tip: To make a bake stuffed ar8choke, do the steps above, pressure cooking for only 15 minutes, when cool enough to handle, using the 8ps of your fingers, gently spread apart the leaves to reveal the inner core. Then using a spoon dig out the fuzzy choke. Now fill with your favorite stuffing and place in the oven for 10 to 15 minutes. This will give you such a juicy flavorful ar8choke and the contrast of the crunchy filling from roas8ng will be delighwul.
- Page 33 Stuffed Cabbage Rolls Serves 6 Ingredients 2 quarts boiling water 1 teaspoon salt 1 head cabbage 3 pounds 1 tablespoon olive oil 1 large onion, chopped 1 clove garlic minced 1 cup cooked rice 1 pound ground sirloin 1 teaspoon salt ½ teaspoon pepper ½ teaspoon garlic powder ½ teaspoon onion salt 1 cup beef stock 2 cups crushed tomatoes 2 tablespoons of buMer ½ cup sour cream Prepara8on Remove the center core of the cabbage using a paring knife, Add the cabbage head to the stock pot of boiling water with the teaspoon of salt. Cover and cook cabbage for 2 minutes. Remove the cabbage from the water and trim off all the outer leaves that will come off and set aside. Place the head of cabbage back in the boiling water and cook two minutes longer. Do this 8ll all the cabbage leaves have been removed, trim the vein from the boMom of each leaf. Heat olive oil in a skillet over medium heat. Add the onion and cook 8ll tender. When onion is star8ng to become tender add in the garlic and cook for 2 minutes longer. In a large bowl, add the raw ground beef, cooked rice, sautéed onion, salt pepper, garlic powder and onion salt. Using your hands combine the ingredients. To the center of each cabbage leaf add 1/3 of a cup of meat filling. Fold sides of cabbage over filling, and, star8ng with the stem end, roll the cabbage up. Repeat with the remaining leaves and filling. Add the beef stock to the pressure cooker, add unused cabbage to the pressure cooker and then add in the rolls. Pour the tomatoes over the rolls. Secure the pressure cooker lid. Select the soup func8on and set the pressure knob to high. When cook 8me is complete, carefully open the lid, and using tongs remove the cabbage rolls to a plaMer. Set the pressure cooker to the vegetable func8on, with the lid open let the sauce simmer for 5 minutes to reduce the liquid. S8r in 1 tablespoon of buMer at a 8me aLer five minutes. S8r in the sour cream. Pour sauce over cabbage rolls and serve.
- Page 34 Cherry Pepper Pork Chops Serves 4 Ingredients 2 tablespoons extra-virgin olive oil 4 pork chops, boneless 1 ½ cups jasmine rice 1 jar (6 ounces) sweet cherry peppers, with juice 1 cup chicken stock 1 tablespoon salt ¼ teaspoon freshly ground pepper Prepara8on With the pressure cooker lid open, select the meat func8on hold the 8me set buMon un8l 15 minutes is displayed and set the pressure knob to high. Add the oil to the pressure cooker insert and let it heat for a few minutes (keep in mind the 8mer will not begin 8ll pressure is achieved so you may brown well with the lid open.) Add pork chops to pressure cooker and cook on both sides 8ll golden brown. Add rice and remaining ingredients to pressure cooker; secure lid. When cook 8me is complete and pressure is fully released, open lid with cau8on. Serve immediately.
- Page 35 Sweet Potato Casserole Serves 4 to 6 Ingredients 4 sweet potatoes, peeled and quartered 1/2 cup chicken stock 1/2 cup orange juice 1 teaspoon salt 1/2 teaspoon freshly ground pepper 1/2 teaspoon cinnamon 2 tablespoons buMer, more for the baking dish Marshmallows Prepara8on Place all ingredients except buMer, marshmallows into the pressure cooker; secure lid. Select the vegetable func8on and select the 8me set buMon un8l 10 minutes reads in the display and set the pressure knob to high. When cooking is complete and pressure is fully released, use cau8on opening lid. Drain potatoes, add buMer and mash potatoes using potato masher. Set oven to broil. Rub baking dish with buMer, place potatoes into the baking dish; top with marshmallows. Place baking dish on center rack in the oven and cook for 2 minutes or un8l marshmallows are lightly toasted. Remove potatoes from oven and serve.
- Page 36 LIMITED ONE YEAR WARRANTY This warranty covers all defects in workmanship or materials in the electrical parts arising under normal use and care in this product for a period of one year from the date of purchase provided you are able to present a valid proof-of-purchase. A valid proof-of- purchase is a receipt specifying item, date purchased, and cost of item. A giL receipt showing item and date of purchase is an acceptable proof-of-purchase. Product is intended for household use only. Any commercial use voids the warranty. This warranty covers the original retail purchaser or giL recipient. During the applicable warranty period within normal household use, we will repair or replace, at our discre8on, any mechanical or electrical part which proves defec8ve, or replace unit with a comparable model. Shipping and handling costs are not included for warranty replacements and are the responsibility of the customer. To obtain service under the terms of this warranty, call our customer care department at 312-526-3760 (Monday- Friday 10:00AM-6:00PM CST), or send an email to customercare@alliedrich.net. Please provide the model number listed on the boMom of this page when contac8ng us. THIS LIMITED WARRANTY COVERS UNITS PURCHASED AND USED WITHIN THE UNITED STATES AND DOES NOT COVER: • Damages from improper installa8on. • Damages in transit. • Defects other than manufacturing defects. • Damages from misuse, abuse, accident, altera8on, lack of proper care and maintenance, or incorrect current or voltage. • Damage from service by other than authorized dealer or service center. • Shipping and handling costs. • This warranty gives you special legal rights and you may also have other rights to which you are en8tled which may vary from state to state. Manufacturer does not assume responsibility for loss or damage for return shipment. We recommend that you keep your original packaging should you require repair service. Before returning product please contact our customer care department for return authoriza8on. When returning product for repair please include your full name, return address, and day8me phone number. Also include a brief descrip8on of the problem you are experiencing and a copy of your sales receipt or other proof of purchase in order to validate warranty status.
Need help?
Do you have a question about the CCPC46L and is the answer not in the manual?
Questions and answers