
Related Manuals for Symbol PPT 4300 Series


Summary of Contents for Symbol PPT 4300 Series
- Page 1 RS 2200/3200 Series PPT 4300 Series Quick Reference...
- Page 2 © 1997 SYMBOL TECHNOLOGIES, INC. All rights reserved. Symbol reserves the right to make changes to any product to improve reliability, function, or design. Symbol does not assume any product liability arising out of, or in connection with, the application or use of any product, circuit, or application described herein.
- Page 3 Symbol’s RF products are designed to be compliant with the rules and regulations in the locations into which they are sold and will be labeled as required. The majority of Symbol’s RF devices are type approved and do not require the user to obtain license or authorization before using the equipment.
-
Page 4: About This Guide
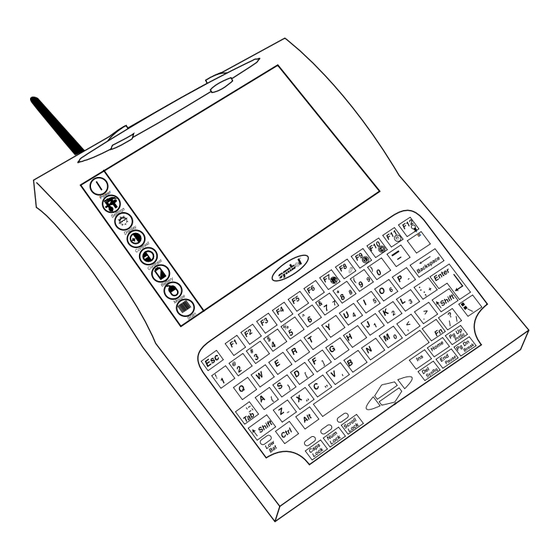
Introduction The PPT 4300 is a hand-held, PC-compatible terminal that incorporates pen input and a QWERTY keyboard. The PPT 4340 model also uses radio frequency technology to allow wireless communication with an existing network. Throughout this Quick Reference, “PPT 43xx” refers to any 4300 Series terminal. About This Guide This guide presents basic information on using the PPT 43xx terminal. - Page 5 Parts of the PPT 43xx The diagrams on this page show the parts of the PPT 43xx. Quick Reference...
- Page 6 Parts of the PPT 43xx (cont’d) 1. Pen Holder 2. Pen 3. Direct Access Panel 4. Display Screen 5. Keypad 6. Antenna 7. IrDA Port 8. Force On Switch 9. DC Power Input 10. External 3.3v Keyboard Connector 11. RS232/TTL Interface Connector 12.
-
Page 7: Starting The Terminal
Using the Power Icon The Power icon is the top icon on the Direct Access Panel on the left side of the display. To select it, press it with the pen. If the terminal is On: the Power icon places the terminal into Sleep mode (see Understanding the Power Save Modes on page 24). - Page 8 Host Choice List Display Application/Host Name Host IP Address Mode Key Map 1. ubiserver 192.75.16.1 VT220 standard 2. zephyr 192.75.16.8 VT220 standard 3. Library of Congress 140.147.254.3 IBM3270 3270 custom Directions:• Press the number or letter associated with the host, •...
- Page 9 Lift the pen to drop the object. Note: If you lose your pen, DO NOT use anything that will scratch or mark the screen. Symbol can supply extra Quick Reference...
- Page 10 <Fn-End> keys may not trigger an action. Their functions depend on your host application and system. Attaching an External Keyboard The PPT 43xx has a port for connecting a Symbol-approved, low power PS/2-AT keyboard. See Parts of the PPT 43xx on page 5 for the location of the External Keyboard port.
- Page 11 Numeric Keypad The keyboard incorporates a numeric keypad, using the symbols marked in small letters on the 7, 8, 9, 0, U, I, O, P, J, K, L, :, M and >. keys. To use the numeric keypad, press the NumLock key.
- Page 12 Connecting and Using a PCMCIA Card The PPT 43xx terminal has an expansion slot that may be used with a PCMCIA card (PC Card). A PC Card is a plug-in memory or I/O device that can be used in laptop computers and the PPT 43xx.
- Page 13 Replace the rubber plug for the Expansion Slot. Quick Reference...
- Page 14 The Direct Access Panel The PPT 43xx has a Direct Access Panel, located on the left side of the display window. The Direct Access Panel allows you to control settings on the PPT 43xx. Except for the Power icon, it is not active until after the terminal has finished booting.
- Page 15 To select an item from the Direct Access Panel, tap a Direct Access Panel icon gently with the pen. Icon What it does If the terminal is on, select this icon to place it into Sleep mode. After a number of minutes in Sleep mode, the terminal shuts itself off.
- Page 16 Icon What it does Displays Remaining Battery Life as a percentage. Battery By default, tapping the display with the pen acts as a left mouse click. Tapping twice acts as a double click. To perform a right click, se- lect the mouse icon. The next pen tap acts as a single or double right click.
- Page 17 Providing Power to the Terminal You can run a PPT 43xx terminal: • from a rechargeable NiMH (Nickel Metal Hydride) bat- tery pack, or • by using the supplied DC Adapter plugged into a stan- dard electrical outlet (see Using an External Power Source on page 23).
- Page 18 For example, the Battery Low and Battery Critical Warn- ings may appear at 5% and 1% of battery capacity, instead of 8% and 2%. See the PPT 4300 Series Product Reference Guide for more information on configuring the Battery Warnings.
- Page 19 Changing the Battery Note: For the first two to three days on a new terminal, end your session and turn the terminal off before you attempt to change the battery. This gives the swap battery time to ful- ly charge. You can change the battery on a PPT 43xx terminal without logging out or losing your session.
- Page 20 supplies power and maintains your session for 15-30 sec- onds. You may find it easier to remove the battery if you hold the Note: terminal with the display facing you, and the back of the terminal in your hand. Then, push up on the Battery Latch, and allow the battery to slip out of the battery com- partment.
- Page 21 Re-charging a Battery Pack Before you use a PPT 43xx terminal, make sure its NiMH battery pack has been completely charged. As an option, Symbol supplies a Battery Charger that can charge up to four batteries at once. To re-charge a battery: 1.
- Page 22 If the red REJECTED indicator flashes, the battery is faulty or damaged. Remove it from the battery charger and dispose of it properly. If the battery is still within its warranty period, contact your local Symbol Representative or the Symbol Support Center for replacement information. Quick Reference...
- Page 23 DC adapter. To connect power: 1. Connect the DC Adapter plug into the DC Power Input on the right side of the terminal. Plug the other end of the Adapter into the electrical outlet. Note: Use only a Symbol-approved DC adapter. Quick Reference...
- Page 24 Understanding the Power Save Modes When the terminal is not in active use, it can use Power Save Modes to decrease the drain on the battery. Note that your facility may deactivate some modes. Power Save Modes include: Mode Description Normal The terminal is in full active use, with all components working at full power.
- Page 25 Mode Description After 1 to 272 minutes in Sleep mode, the terminal switches off. To reboot the terminal, press the Power icon. If you have not saved your work, you may lose it when the terminal turns off. Quick Reference...
- Page 26 This warranty is limited to repair or replacement at Symbol’s option, with reasonable promptness after being returned to Symbol by a carrier selected and paid for by the customer. These provisions do not prolong the original warranty term for any product which has been repaired or replaced by Symbol.
- Page 27 70-31470-01 Revision A —December 1997...
Need help?
Do you have a question about the PPT 4300 Series and is the answer not in the manual?
Questions and answers