
Subscribe to Our Youtube Channel
Related Manuals for Durr Dental Tornado


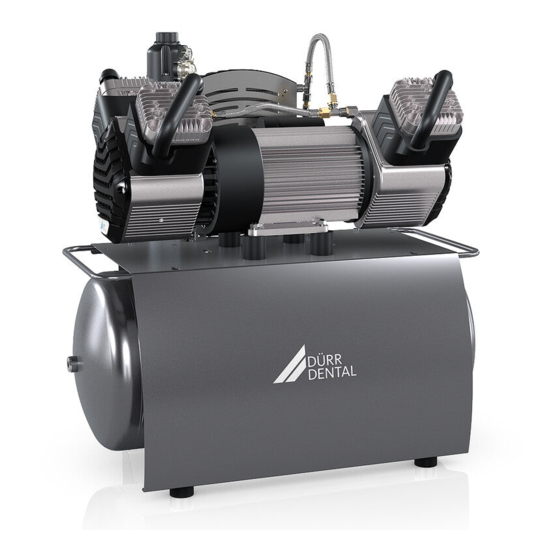
Summary of Contents for Durr Dental Tornado
- Page 1 INSTALLATION AND OPERATION INSTRUCTIONS DÜRR COMPRESSORS Tornado • Primo • Duo • Trio • Quattro • Duo-Tandem • Quattro Tandem 2003/06...
-
Page 2: Table Of Contents
CONTENT Important Information 10. Operation ..........16 1. Note ............3 10.1 Switching on the Compressor ..16 1.1 CE-Marking ........3 11. Maintenance Intervals – User / 1.2 Guidelines and Directives ....3 Technician ..........17 1.3 General Information ......3 12. -
Page 3: Important Information
IMPORTANT INFORMATION • Dürr Dental only regard themselves as being responsible for the unit from the angle of safety, reliability and proper functioning if 1. NOTE assembly, resettings, changes or modifications, extensions and repairs have 1.1 CE-Marking been carried out by Dürr Dental or an agency authorised by Dürr Dental and if the All products bear the CE Conformity Marking. -
Page 4: Safety Instructions On Protection From Electric Current
of rooms that are exposed to risk of 1.6 Warning Information and Symbols explosion. Explosion hazards may result In the Instructions for Assembly and Use, as from the use of inflammable anaesthetics, well as on the packaging and the product skin cleansing agents, oxygen and skin itself, use is made of the following terms or disinfectants. -
Page 5: Product Information
+10 to +40 °C. Trio, Quattro, Quattro Tandem ..0832-982-00 • Do not expose the compressor to rain. The Tornado ........5430-982-00 machine must not be operated in a damp or wet environment. Use is also prohibited in Fine-mesh filter for proximity to gases or combustible liquids. -
Page 6: Technical Data
4. TECHNICAL DATA Model Primo Trio Quattro 5150-01a 5250-01a 5250-51a 5450-51a 5151-01b 5251-01b 5251-51b 5351-01b 5451-51b Voltage 50 – 60 50 – 60 50 – 60 50 – 60 Frequency Current Consumption – 4,4 – 7,0 – 2,5 – 4,8 at 8 bar Motor Protection Switch max. - Page 7 Duo Tandem Quattro Tandem Tornado 70 Tornado 130 4251-01b / 4680-51a 5170-01a 5270-01a 5270-02a 4151-51b 4251-51b 4641-51b 4681-51b 5171-01b 5271-01b 5271-02b 2 Aggregate 2 Aggregates 1 Aggregate 2 Aggregates 1 Aggregate 230 / 400 50 – 60 50 – 60 50 –...
-
Page 8: Overview Of Functions Of Compressors
5. OVERVIEW OF FUNCTIONS OF COMPRESSORS 5.1 Compressor with Dry-air System 5.2 Compressor without Dry-air System... -
Page 9: Functional Description
6. FUNCTIONAL DESCRIPTION system (2). In this phase, the system under- goes a process of regeneration, for which purpose the compressor must be at a 6.1 Compressor with standstill. This process of regeneration will Dry-air System continue to repeat itself until the relative humidity originally set on the hygrostat (16) Concise Functional Description: The compressor aggregat (10a) draws in... -
Page 10: Assembly
Description". compressor records. ASSEMBLY Prior to placing in service for the first time, all transport security 7. STORAGE AND TRANSPORT devices must be removed. CONDITIONS 8.1 Environmental Conditions • The unit may only be installed and operated The compressor leaves the factory in dry rooms that are well ventilated and free packed in a transport carton which of dust. -
Page 11: Compressed-Air Connection
Fire Hazards! 8.2 Compressed-air Connection A standard feature of the compressor is a control unit comprising the following: pressure switch (11), safety valve (6), compressed-air connection coupling (20) and pressure gauge (7). • Slip flexible pressure hose (ø 8x3x14) onto connecting socket of pressure reducer and secure with hose clip (21) to prevent slipping off. -
Page 12: Placing In Initial Service
(31). Model Duo-, Quattro Tandem features fitted by the client. two separate motor protection switches which are built into the control box of the 8.4 Placing in Initial Service compressor set. These switches each have • Check to ensure that all transport security a setscrew (35) as well as a start and stop devices have been removed from the button (36 and 37). -
Page 13: Checking And Adjusting The Pressure Switch
8.7 Checking and Adjusting the Pressure Switch The pressure switch has been set at the factory. At 5.5 bar tank pressure the unit switches itself At 7.5 bar the unit switches itself off. If required, the working pressure of the compressor can be modified at the pressure switch. -
Page 14: Circuit Diagrams
This may otherwise impair proper functioning of the safety valve. 9. CIRCUIT DIAGRAMS 9.1 Version 1/N/PE AC230 V List of Equipment Q1 Pressure switch/motor protection switch X1 Mains connection 1/N/PE AC 230 V M1 Compressor motor M2 Proposed fan connection (can be allocated if required) 9.2 Version 3/N/PE AC 400 V List of Equipment... -
Page 15: Version 3/N/Pe Ac 400 V, 2 Aggregates, Duo Tandem
9.3 Version 3/N/PE AC 400 V, 2 Aggregates, Duo Tandem List of equipment Connection to A1 X3, X4 Connection A1 to M Pressure switch M1,M2 Compressor motors 1 and 2 Q2, Q3 Motor protection switch Control Mains connection 3/N/PE AC 400 V 2 4 6 3 3 3 2 2 2 1 1 1 7 7 7 PE PE PE... -
Page 16: Operation
M1 Compressor motor M2 Proposed fan connection (can be allocated if required) 10. OPERATION In dangerous situations always unplug the unit from the mains (disconnect plug from mains). The surfaces of the compressor are hot. There is a risk of burns being sustained if these surfaces are touched. -
Page 17: Maintenance Intervals - User / Technician
plug). Inform the technician responsible. 11. MAINTENANCE INTERVALS – USER / TECHNICIAN Maintenance due to be carried out Chapter Interval • Setting the pressure reducer 12.2 Once a year • Draining off condensation water 12.3 Compressors without dry-air system Once a month At a high degree of humidity Once a day Compressors with dry-air system... -
Page 18: Setting The Pressure Reducer
12.2 Setting the Pressure Reducer To set the flow pressure, place the syringe, turbine, etc. in operation. Lift the rotary adjusting knob (41) and continue to turn in the direction of the + arrow (to increase flow pressure) or in the direction of the – arrow (to reduce pressure) until the required flow pressure is indicated on the pressure gauge (42). -
Page 19: Filter Replacement
12.5 Filter Replacement Used filters must not be cleaned but must be replaced by new ones. Attempting to clean destroys filters. The intervals in which the filter cartridges need replacing will depend essentially on the amount of dust contained in the air. Regular filter replacement serves to preserve the high quality of the compressed air over a longer period... -
Page 20: Shutting Down The Unit
13. SHUTTING DOWN THE UNIT If the compressor is not used for a longer period of time, it is recommended that the condensation water be drained off from the pressure tank. Afterwards put the compressor into operation for approximately 10 minutes with the condensation-water drain cock (9) in the open state. -
Page 21: Trouble Shooting
TROUBLE SHOOTING 15. TIPS FOR USERS Fault Possible Cause Removal of Fault 1. Compressor fails • Absence of mains power. • Check mains fuse, if necessary, to start up. switch unit back on again (if fuse is defective, replace). • Pressure switch not •... -
Page 22: Tips For Technicians
16. TIPS FOR TECHNICIANS The following trouble shooting guide is intended solely for technical staff. Repairs may only be carried out by technicians. Removal of Fault Fault Possible Cause • Check mains fuse, switch unit 1. Compressor fails • Absence of mains power. back on again if necessary (if fuse to start up. - Page 23 Fault Possible Cause Removal of Fault To do this, please proceed as follows: – Remove mains connection. When one of the aggregates of model Duo-, Quattro Tandem is mal- functioning, the button "I" of its motor protection switch is released. In addition, the rotary switch of the pressure switch jumps into position "0 OFF".
- Page 24 Fault Possible Cause Removal of Fault 2. Compressor fails • Lamellar valve (inlet / outlet • Dismantle cylinder head and to switch off. valve) between cylinder and install new lamellar valve. cylinder head defective. • Air escaping on air-relief valve •...
- Page 25 Possible Cause Removal of Fault Fault 6. Water is dripping • Drain off condensation water • Condensation water in tank. from tank at least once a month. out of the air consumers This should be done once a day in areas where a high degree of (e.g., turbine).
- Page 26 Possible Cause Removal of Fault Fault 8. Failure on dry-air • Control unit defective. • Replacement of control unit; alternatively and temporarily: system. • Bridge over the dry-air system. In the event of failure occurring on the dry-air system, this can be bridged over so to enable work to continue with the compressor.
- Page 27 Fault Possible Cause Removal of Fault – Screw off pressure hose (72) from compressor set on dry-air system and screw onto threaded joint (73). – Remove screw plug (75) along with filter (76), turn 180° and insert. Tighten screw plug (75). This action serves to seal off the duct to the dry-air system, and the control head on the dry-air is...
Need help?
Do you have a question about the Tornado and is the answer not in the manual?
Questions and answers