
Related Manuals for AbleNet iTalk2


Summary of Contents for AbleNet iTalk2
- Page 1 Communication Aid Manual AbleNet, Inc. Minneapolis/St. Paul, MN 55113 800-322-0956 www.ablenetinc.com...
-
Page 2: 1 Getting Started
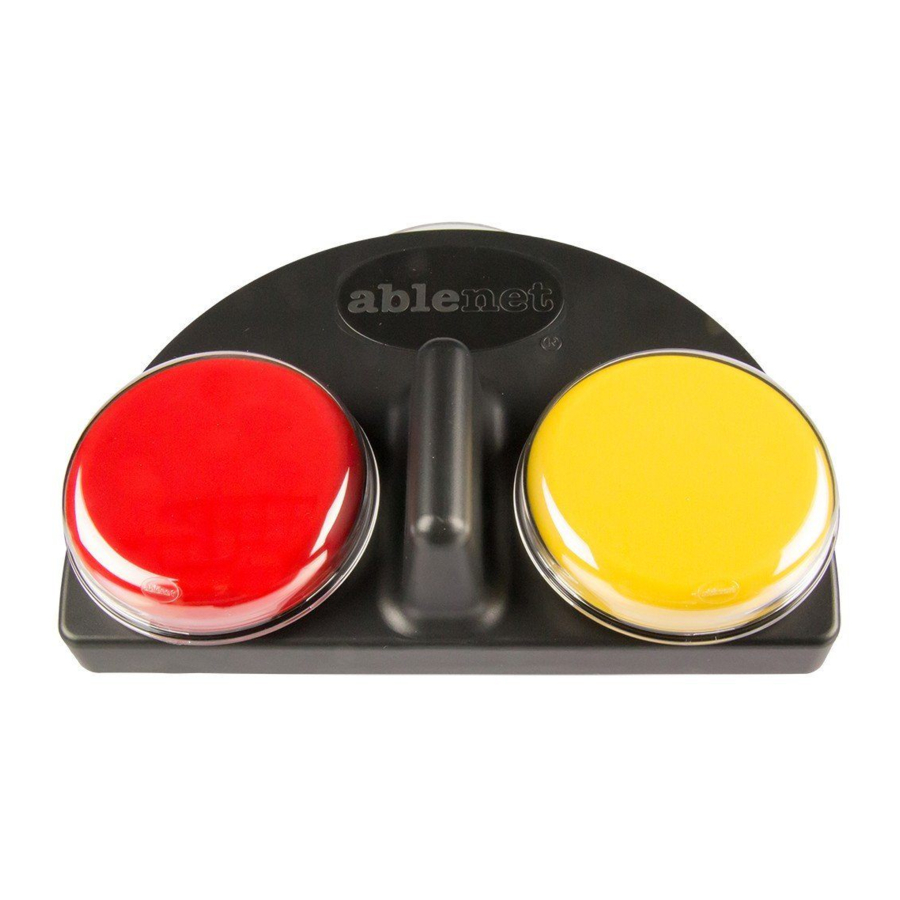
Communication Aid Getting Started Symbol Storage Tray Switch Tops A. Install the Battery 1. Open the battery compartment. 2. Insert 9 volt alkaline battery (not Microphone included). 3. Close compartment. ON/OFF Volume Switch Toy/ Appliance ON/OFF Volume Record Indicator Light Jacks Switch Battery Compartment Record Button B. Turn ON the iTalk2 and Adjust the Volume 1. Turn ON/OFF volume switch to the right to turn on the iTalk2 2. Adjust the volume by turning the ON/ OFF volume switch. iTalk2 Manual Page 2... -
Page 3: Recording Messages
Recording Messages Playing Messages Microphone A. Record Messages 1. Turn on the iTalk2. 2. Press and hold both the record button and switch top 1 simultaneously (light will begin to flash). 3. Record message. (Sample Message: “Did you know Mount Ranier is located near Seattle, Washington?”) 4. Release both switch top and record button. 5. Repeat for switch top 2. Record Button Record Indicator Light Press here Press here to play message 1. to play message 2. Hold the iTalk2 microphone 6-8 inches away while Using & Storing recording. - Page 4 Using the Toy/Appliance Jacks 1. Plug 1/8 inch (3.5 mm) cord or cable into toy/appliance jack 1 or 2. 2. Plug the other end of the cord or cable into the desired toy/appliance. 3. Ensure both your iTalk2 and the toy/ appliance are turned on. 4. Press the appropriate switch top to play recorded message and activate the toy/ appliance. Toy/Appliance Toy/Appliance Jack #2 Jack #1 Once properly connected, press the appropriate switch top to activate your toy/appliance. Plug your toy/appliance into the appropriate jack, and plug the other end of the cord into the jack on your toy/ Press here Press here appliance or into a battery device adapter as shown in the to play message 1 to play message 2 above diagram. and activate toy/ and activate toy/ appliance jack #1. appliance jack #2. iTalk2 Manual Page 4...
-
Page 5: Mounting Options
Mounting the iTalk2 Use the Easy Mounting Base Mounting Options (purchased separately) to mount the iTalk2 to a vertical Temporary Wall Mount Permanent Wall Mount Small Triangular Mounting surface or to a mounting 1. Place mounting plate on wall For a permanent mount, screw the Plate and mark location of the plate directly into the wall using system. When using the iTalk2 mounting slotted screw holes. three #8 pan head screws and the base with an AbleNet mounting 2. Drill holes where marked holes indicated in the drawing system, attach the mounting and insert screws (#8 pan below. base to the small triangular plate head screw). using the screws and wing nuts 3. Attach screws to wall and provided with the small triangular leave 1/8”-1/4” sticking out. mounting plate. This enables you 4. Hang mounting base on... -
Page 6: Troubleshooting Guide
Dimensions: 6.5” wide, 5.5” deep, 3.5” tall Will not operate toy/appliance 1. Make sure the toy/appliance you are trying to operate Total Record Time: 8.5 seconds/location is turned “on.” 17 seconds total 2. Make sure you are plugged into the toy/appliance Sensitivity jack that coincides with the activation surface you of Activation Areas: 2-3 oz wish to operate. 3. Make sure the iTalk2 is turned “on.” Safety Tips 4. Make sure you have recorded a message. 5. If above does not solve the problem, please call l Read instructions for all games, toys and AbleNet’s Technical Support at (800) 322-0956. appliances before using them. l Use caution when placing an appliance Only one activation area or toy/appliance is working 1. Call AbleNet’s Technical Support at (800) 322-0956. near a user, especially if the appliance has moving parts or generates heat. The recording has poor speech quality or slowed speech. 1. Replace the battery. l Never use the iTalk2 Communication 2. If above does not solve the problem, please call... - Page 7 Documentation that shows the purchase date (i.e., copy of packing slip, purchase order or invoice) for educators worldwide who strive to l Check, money order, or purchase order for the amount of the repair. improve the quality of life for all people with significant disabilities. Join our mission to improve the quality of life for Send the above to: To contact us: individuals with disabilities by providing AbleNet, Inc. Toll Free: (800) 322-0956 (U.S. and Canada only) meaningful opportunities for them to learn... Attention: your RA# Fax: 651-294-2259 participate...and communicate. Minneapolis/St. Paul, MN 55113 E-mail: customerservice@ablenetinc.com Web site: www.ablenetinc.com Warranty AbleNet offers a one-year warranty on all AbleNet products. Other manufacturer’s products carry manufacturer’s warranty. Warranty in full text is available upon request. Please call (800) 322-0956 for details. © 2005 AbleNet, Inc., All Rights Reserved PN900-80080 Rev D (8/05) iTalk2 Manual Page 7...
- Page 8 AbleNet, Inc. Minneapolis/St. Paul, MN 55113 800-322-0956 www.ablenetinc.com...
Need help?
Do you have a question about the iTalk2 and is the answer not in the manual?
Questions and answers