Advertisement
Quick Links
Advertisement

Related Manuals for UEi SSM1


Summary of Contents for UEi SSM1
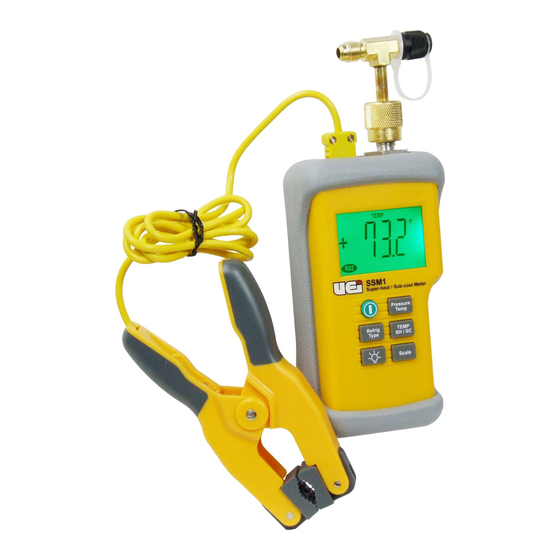
- Page 1 Instruction Manual SSM1 Measures • Pressure from 0~500 psia • Temperature from -40˚ ~ 400˚F Calculates • Superheat for low side • Subcool for high side (TVX) Systems Refrigerants: • R22 • R134a • R404a • R410a GlobalTestSupply www. .com Find Quality Products Online at: sales@GlobalTestSupply.com...
-
Page 2: Technical Note
SSM1: Super Heat / Sub Cool Meter Thank you for purchasing the UEi SSM1 Superheat/Subcool Meter. Use the SSM1 to measure superheat and subcool by direct connec- tions for temperature and pressure. The SSM1 is programmed with the most common four refrigerants, with data from the NIST-Pro refrigeration database for temperature-pressure values. Technical Note Superheat and subcool are the most effective measures to determine if a system is properly charged and operating within manufacture guidelines. GlobalTestSupply www. .com Find Quality Products Online at: sales@GlobalTestSupply.com... - Page 3 What is Super Heat / Sub Cool? Refrigerant superheat refers to the rise in temperature of vapor after the refrigerant has com- pletely changed from a liquid to a gas. The dew point (temperature at measured pressure where all of the liquid evaporates) is determined by properties of the refrigerant and measuring the pressure. When com- paring this to the measured pipe temperature of the return line will determine superheat. The SSM1 will calculate this value directly and update in real time. Use superheat on fixed orifice or capillary systems. Refrigerant subcooling refers to the drop in temperature of liquid refrigerant after it has com- pletely changed from a gas to a liquid. The boiling point (temperature at measured pressure where the liquid stops boiling and starts to further cool) is deter- mined by properties of the refrigerant and measuring pressure. When comparing this to the measured pipe temperature at the exit of the condenser determines subcooling. The SSM1 will calculate this value directly, and update in real time. Use Subcooling on TXV systems, as they are designed to maintain a constant superheat. GlobalTestSupply www. .com Find Quality Products Online at: sales@GlobalTestSupply.com...
-
Page 4: Operation
OPERATION 1. Press to power the meter on 2. Zero Pressure: While displaying pressure hold the “Pressure/TEMP” button for 3 seconds. 3. Press the “Pressure/TEMP” button to select the pressure or temperature mode. 4. Refrigerant Type: Press the “Refrig Type” button to scroll through the available refrigerant types (R22, R134a, R404A, R40A). 5. Press “ ” button to switch the backlight on or off. 6. Press “Temp SH / SC” while displaying temperature to scroll through either the probe temperature, calculated superheat or calculated sub cool. 7. Press “Scale” to select desired units for pressure or temperature. The available units for pressure include PSI, BAR, KPA, Kg/cm2, InHg and cmHg. The available units for temperature include °F and °C. GlobalTestSupply www. .com Find Quality Products Online at: sales@GlobalTestSupply.com... - Page 5 CONNECTIONS 1. Connect a standard refrigerant hose to the ¼” flare connector on top of the SSM1. (Fig.1) -OR- Connect the SSM1 in-line to a refrigerant source using the tee fitting (Fig.2) 2. Connect the included pipe clamp probe to the k-type input jack on top of the SSM1. (Fig. 1) Fig. 1 Fig.2 GlobalTestSupply www. .com Find Quality Products Online at: sales@GlobalTestSupply.com...
- Page 6 MEASuRINg SuPERHEAT 1. Connect the pressure to the suction line service port 2. Attach the pipe clamp temperature probe to the suction line (must be at least 6” from the compressor) GlobalTestSupply www. .com Find Quality Products Online at: sales@GlobalTestSupply.com...
- Page 7 3. Press “Refrig Type” to select the proper refrigerant. The selected refrigerant type will show on the display.* 4. Press “TEMP SH/SC” to select the desired parameter to view. 5. Add/ remove refrigerant by connecting the SSM1 in-line to a refrigerant source and monitor pressure while adding or removing refrigerant. NOTE: Refer to manufacturers specification and procedures when adding / removing refrigerant. GlobalTestSupply www. .com Find Quality Products Online at: sales@GlobalTestSupply.com...
- Page 8 MEASuRINg SuBCOOL 1. Connect pressure to the liquid line service port 2. Attach the pipe clamp temperature probe on the condenser exit line GlobalTestSupply www. .com Find Quality Products Online at: sales@GlobalTestSupply.com...
- Page 9 3. Press “Refrig Type” to select the proper refrigerant. The selected refrigerant type will show on the display.* 4. Press “TEMP SH/SC” to select the desired parameter to view. 5. Add/ remove refrigerant by connecting the SSM1 in-line to a refrigerant source and monitor pressure while adding or removing refrigerant. NOTE: Refer to manufacturers specification and procedures when adding / removing refrigerant. GlobalTestSupply www. .com Find Quality Products Online at: sales@GlobalTestSupply.com...
-
Page 10: Temperature Calibration
TEMPERATuRE CALIBRATION A process to set temperature calibration to an ice point is included to compensate for differences in temperature sensors, or to reset the unit to proper operation. Please follow these steps to perform a temperature set; 1. Connect temperature probe 2. Press “Pressure TEMP” to display probe temperature (verify that “TEMP” is shown on the LCD. 3. Place the temperature probe sensing area in a mixture of crushed ice and water. (Distilled water will provide the most accurate source) 4. Stir the ice water mixture with the temperature probe and allow the reading to stabilize 5. Press and hold “Temp SH/SC” button for four seconds This will set the ice point to 32°F. The meter will compensate for changes up to 10°F. GlobalTestSupply www. .com Find Quality Products Online at: sales@GlobalTestSupply.com... -
Page 11: Specifications
SPECIFICATIONS • Operating Environment: 32~122°F • Storage Environment: 0~140°F • Over-range indication: OL • Auto power off: After 30 minutes idle NOTE: Turn OFF when not in use to extend battery life. • Battery: Standard 9V battery, NEDA 1604, IEC6F22 Function Resolution Accuracy 0~500 psia 0.1 psi ±0.5% FS + 1 (2kPa, 0.02 bars) digit -40~400°F 0.1° ±1°F(-40~200°F) (-40~204°C) or ±0.5°C (-40~93°C) ±2°F (201~400°F) or ±1°C (94~204°C) GlobalTestSupply www. .com Find Quality Products Online at: sales@GlobalTestSupply.com...
Need help?
Do you have a question about the SSM1 and is the answer not in the manual?
Questions and answers