Table of Contents
Advertisement
Quick Links
Advertisement
Table of Contents

Subscribe to Our Youtube Channel
Related Manuals for Dual AXV830


Summary of Contents for Dual AXV830
-
Page 4: Copyright Notes
Copyright Notes This product incorporates copyright protection technology that is protected by method claims of certain U.S. patents and other intellectual property rights owned by Macrovision Corporation and other rights owners. Use of this copyright protection technology must be authorized by Macrovision Corporation, and is intended for home and other limited viewing uses only unless otherwise authorized by Macrovision Corporation. -
Page 5: Table Of Contents
Table of Contents Thank you for purchasing a Dual Multimedia unit. We hope you will find the instructions in this user manual clear and easy to follow. If you take a few minutes to look through it, you will learn how to use all the features of your new unit for your maximum enjoyment. - Page 6 Select AM/FM Band· · · · · · · · · · · · · · · · · · · · · · · · · · · · · · · · · · · · · · · · · · · · · · · · · · · · · · · · · · · · · · · · · · · · · · · · · · · · · · · · · · 24 Auto Tuning·...
-
Page 7: Warning
WARNING Upon installation of this Monitor/DVD player (“unit”) into a vehicle, the driver of the vehicle must not operate this unit by watching videos or playing video games while driving. Failure to follow this instruction could lead to driver distraction which could result in serious injury or death to the vehicle’s occupants or persons outside the vehicle and/or property damage. -
Page 8: Safety Information
Please read all instructions carefully before attempting to install or operate. Due to its technical nature, it is highly recommended that your DUAL XDVDN9131 is installed by a professional installer or an authorized dealer. This product is only for use in vehicles with 12VDC negative ground only. -
Page 9: Precautions
Precaution To avoid the risk of injury or accident, read the following precautions before installing and operating the unit. On Safety Comply with your local traffic rules and regulations. While driving You must not watch or operate the monitor. It may distract you and cause an accident. Park your car in a safe place to watch and operate the unit. -
Page 10: Dvd Region Management
WMA files that are protected by DRM (Digital Rights Management) WMA lossless format Discs recorded with Track At Once or packet writing MP3 PRO format MP3 playlists WAV format Some recordable DVDs and CDs may be incompatible with this unit, depending on media type and recording method. -
Page 11: Preparation
Preparation Please read all of the instructions below before beginning your installation. We recommend that you have your unit installed by an experienced car audio/navigation system installer. IMPORTANT NOTICE: It is very important that you read the WARNINGS and NOTES in this manual to ensure correct installation and use of your unit. - Page 12 NOTE: If the unit is to be installed in a car equipped with an on-board drive or navigation computer, do not disconnect the battery cable. If the cable is disconnected, the computer memory may be lost. Under these conditions, use extra caution during installation to avoid causing a short circuit.
-
Page 13: Controls And Indicators
Controls and Indicators Button Operation Eject Press to eject disc. Microphone Menu Press to enter MAIN menu, press again to return to previous source. Mode Press to change the current function menu. Power Off/VOL Press and hold to turn off the unit. Press once to power on when the unit is turned off. -
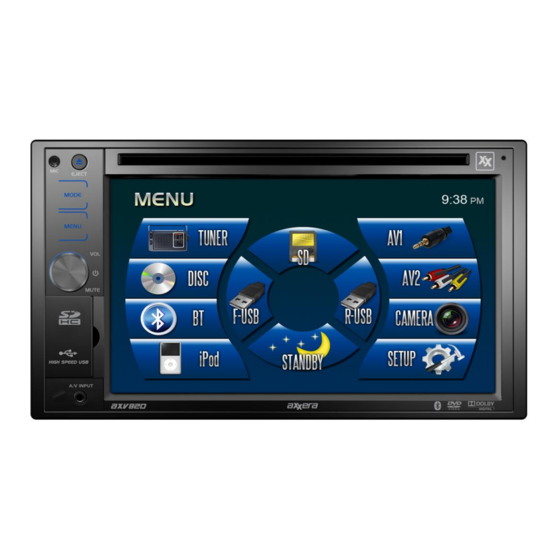
Page 14: Key Areas For The Touch Screen
Key Areas for the Touch Screen The key areas are outlined below, for DVD, VCD playback mode and so forth. -
Page 15: Remote Control
Remote Control Remote Control Functions Name Ref # Signal Function Power Turn the power on/off Open Eject Disc Mute Toggle on/off audio output Select source Numeric 1.2.3.4.5. Directly access certain chapter / track / preset station in button 6.7.8.9.0 current band VOL up Increase the volume VOL down... - Page 16 Repeat AB Set start point A and end point B to repeat continually Start or pause playback, confirm the settings Direction Up/down/left/right to select items for certain setting buttons Title Go back to title while playing DVD Enter the main menu of the disc Root Turn on PBC while playing DVD Repeat...
-
Page 17: Tft Monitor Operation
TFT Monitor Operation Rear Camera Mode When the vehicle is placed in "Reverse", and a rear camera is connected to the unit, the monitor will automatically switch to the camera input source. Please make sure the reverse wire is connected. Screen Adjustment “COLOR”... -
Page 18: Operating Instruction
Operation Instruction Power On / Off Press the POWER /VOL button to turn the unit on. You can also turn on the unit by pressing the button ( ) on the remote. Press and hold the POWER/VOL button on the front panel or press the POWER button ( ) on the remote to power off the unit. -
Page 19: System Reset
System Reset To reset the system in case of a halt or other unusual operation, use the tip of a pen to press the RESET button located on the front top-left corner of the unit. After the system resets, the unit will restores the settings before it was last powered off. -
Page 20: Setup Menu
Setup Menu There are three methods to access the MENU menu. · Press the MENU button on the front panel. · Press the MENU button on the remote control. A area (Top left corner) · Touch the on the touch-screen. Note: Touch screen must be used to select menu and adjust settings. -
Page 22: Dvd Setting
DVD Setting Press the DVD icon while on the SETUP menu. Selecting a Setting for Adjustment Touch directly the options on the screen to select a setting to be adjusted. -
Page 23: Time Setting
Parental Control To set the parental control the default password is 8888 you can then adjust your parental guidance. If a new set Password is used you must not forget the new set password, please write down on the manual. Once a new password is set you cannot use the default password or reset the password if forgotten. -
Page 25: Tuner Setting
Tuner Setting Press the TUNER icon while on the SETUP menu. Selecting a Setting for Adjustment Touch directly the options on the screen to select a setting to be adjusted. Calibrate Setting Press the Calibrate icon while on the SETUP menu. Selecting a Setting for Adjustment Touch directly the options on the screen to select a setting to be adjusted. -
Page 26: System Setting
System Setting Press the SYSTEM icon while on the SETUP menu. Selecting a Setting for Adjustment Touch directly the options on the screen to select a setting to be adjusted. -
Page 27: Security Setting
Security Setting Press the SECURITY icon while on the SETUP menu. Selecting a Setting for Adjustment Touch directly the options on the screen to select a setting to be adjusted. Gain Setting Press the GAIN icon while on the SETUP menu... -
Page 28: Ipod Setting
Selecting a Setting for Adjustment Touch directly the options on the screen to select a setting to be adjusted. iPod Setting Press the TFT icon while on the SETUP menu. Selecting a Setting for Adjustment Touch directly the options on the screen to select a setting to be adjusted. -
Page 29: Restore Settings
Select Manual, only operation via ipod is allowed Select Full, only operation via unit is allowed Select YES to activate Video input Select No to active audio input only Restore Setting Press the RESTORE icon while on the SETUP menu. Selecting a Setting for Adjustment Touch directly the options on the screen to select a setting to be adjusted. -
Page 30: Info Settings
Info Setting Press the INFO icon while on the SETUP menu. Selecting a Setting for Adjustment Touch directly the options on the screen to select a setting to be adjusted. -
Page 31: Tuner (Am/Fm) Operation
Tuner (AM/FM) Operation Tuner Display : Press to turn on or off the volume. : Press to seek down. Touch and hold for 3 seconds to scan the previous station. : Press to seek up. Touch and hold for 3 seconds to scan the next station. : Press to change between FM and AM. -
Page 32: Manual Tuning
Manual Tuning Press the button on the remote control or press the button on the screen to up the tuning frequency one step at a time. Press the button on the remote control or press and hold the button on the screen to down the tuning frequency one step at a time. -
Page 33: Dvd Player Operation
DVD Player Operation NOTE: When properly installed, DVD video cannot be displayed on the main screen unless the parking brake is applied. If you attempt to play a DVD while the vehicle is in motion, the screen will display “caution” with a blue background. Rear video output, (if used) will operate normally. Insert/Eject Disc Inserting a Disc When inserting a DVD disc, DVD mode will be enabled and disc will begin to play. -
Page 34: Controlling Playback
: Press to stop : Press to fast reverse : Press to Play/Pause : Press to fast forward : Press to do other settings : Press to go back to the title of the disc : Press to change languages : Press to display Sub-title : Press to do the EQ setting : Press to activate/deactivate Repeat Single/ Repeat Folder/Repeat All... -
Page 35: Moving Through Chapters
Moving Through Chapters Press the ( ) button on the remote control to advance to the next chapter on the DVD. Press the ( ) button on the remote control to move to the previous chapter on the DVD. Touch the right side of the screen to advance to the next chapter, or touch the left side of the screen to move to the previous chapter. -
Page 36: Direct Chapter / Track Selection
3. Enter a Time/Track number into the field using the numeric keypad on the remote control or on the screen. 4. Press the OK button on the remote control or on the touch screen to go to the specified location on the disc. - Page 37 DVD Playback Information The following information is displayed at the middle of the screen during DVD playback: : Indicates the current source playing. : Indicates the playback time of the current title. : Indicates the subtitle status. : Indicates the audio channel : Indicates velocity : Indicates angle : Indicates chapters on the DVD and which chapter it is currently playing.
-
Page 38: General Disc Information
General Disc Information Symbol 12cm Disc Properties Max Play Time (MPEG 2 Method) Single side single layer (DVD-5) 133 minutes Single side double layer (DVD-9) 242 minutes Double side single layer (DVD-10) 266 minutes Double side double layer (DVD-18) 484 minutes (MPEG 1 Method) Single side single layer (VCD) 74 minutes... -
Page 39: Cd/Mp3/Wma/Jpeg Operation
CD/MP3/WMA/JPEG Operation Instructions for Insert/Eject, Play/Pause, Stop Playback, Track Selection, Fast Forward/Fast Reverse, Scan, and Random Play are the same for DVD, CD and MP3 operation. Please see the DVD Player Operation section for information about these topics. The file naming formats listed below are compatible with this unit: •... -
Page 40: Mp3/Wma Disc
you can press the numeric button on the remote control or press a track on the screen to play. MP3/WMA Discs This player allows you to playback MP3/WMA files recorded on CD-R, CD-RW, DVD+R/RW and DVD-R/RW. For CD-RW discs, please make sure to use a slow speed write and not the fastest speed in order to prevent improper disc writing. - Page 41 : Flip the current image counter-clockwise...
-
Page 42: Ipod Operation
iPod Operation Accessing the iPod Menu 1. To switch to iPod menu, press the Menu button on the front panel and press the iPod icon or press the (SRC) button on the remote control until the iPod icon appears at the top of the screen. NOTE:1. - Page 44 When playing iPod video, press the upper right corner of the screen first , then, press back to Video Menu.
-
Page 45: Accessing Flash Source
SD Operation Accessing SD Source 1. To switch to SD menu, press the Menu button on the front panel and press the SD icon or press the (SRC) button on the remote control until the SD icon appears at the top of the screen. NOTE: Make sure the SD card is inserted properly into the unit. -
Page 46: Usb Operation
USB Operation Accessing USB Source 1. To switch to USB menu, press the Menu button on the front panel and press the USB icon or press the (SRC) button on the remote control until the USB icon appears at the top of the screen. NOTE: Make sure the SD card is inserted properly into the unit. -
Page 47: Troubleshooting
Troubleshooting Problem Cause Corrective Action GENERAL Radio Fuse blown Install new fuse with correct rating Car battery fuse blown Install new fuse with correct Unit will not power on rating Illegal operation Press the RESET button located at the top left corner of the front panel Battery depleted Replace battery with new one... - Page 48 Disc is dirty or wet Clean disc with soft cloth Incompatible disc is used Use compatible disc Disc rating exceeds Parental Lock Change Parental Lock settings rating limit to allow such restriction Disc region code is not compatible Use disc with proper region code with unit Disc is inserted upside down Insert disc with label side up...
- Page 49 Remote control Battery is covered with Pull out the insulation tape insulation tape Remote control does not function Battery depleted Replace battery with new one Battery installed incorrectly Remove battery and install correctly 1. When using the remote for the first time, you must pull out the insulation tape. 2.
- Page 50 Install the battery Insert the battery holder NOTE: Only use one CR2025(3V) lithium battery. Danger of an explosion if battery is incorrectly replaced. Replace only with the same or equivalent type of battery. Do not recharge, disassemble, heat or dispose of the battery in fire. Keep batteries away from children to avoid the risk of accident.
Need help?
Do you have a question about the AXV830 and is the answer not in the manual?
Questions and answers