Advertisement
Quick Links
Advertisement

Related Manuals for Orno OR-DOM-CL-909


Summary of Contents for Orno OR-DOM-CL-909
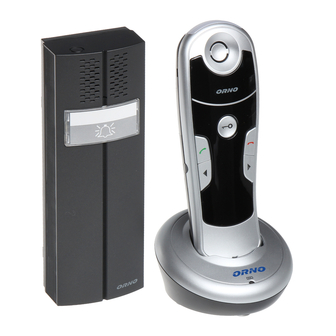
- Page 1 OR-DOM-CL-909 XL-6011 USER' S MANUAL...
- Page 2 Contents Technical Specifications Prior To Use Technical Specifications Frequency Range 1.8 ~1.90GHz Congratulations Channels 120 Duplex channels Safety Precautions Time Accuracy 0 2ppm Unpacking Modulation GFSK Phone Layout and Keys Function Frequency Stability < 50 KHz Installing Batteries Installation Instruction Standby time 7 hours Charging Handset...
- Page 3 Feature List Prior To Use Visitor calling function Congratulations 5 ring tones selectable Ring volume adjustable (5 levels) on purchasing our high quality product. This product is compatible with a hearing loop, such that the Unlocking function sound is transmitted from the handset to their hearing aid, so that the wearer can hear through the Hearing aid function hearing aid and adjust the volume and sound on the hearing aid to suit his needs.
- Page 4 5. Do not use this product in wet surroundings or environments where there is a risk of explosion. 6. Avoid spilling of any liquid on the phone. 7. Unplug this product from the wall outlet and refer servicing to qualified service personnel only. 8.
- Page 5 Ringtone Setting Unpacking Once you have unpacked your door phone, make sure that all the parts shown below are available. If Ring Type Selection: any pieces are missing or broken, please promptly call your dealer. When the handset is in the standby mode, press the key repeatedly to select the ringtone (up to 5 types).
- Page 6 Phone Layout and Keys Function Making a Call Indoor phone Handset A visitor presses the Call Button on the outdoor station. A delightful ring is heard by the host and the Visual ringer (orange)/ Visual ringer (orange) flashes. Then the host can lift the handset and press the key to talk with the Power indicator (red)/ In use indicator (blue)
- Page 7 Phone Layout and Keys Function (continued) Function Operations Indoor phone (Charger) Registration Before using the outdoor station, you should first register it to the handset. First, you should hold the Rear View key on the handset for 5 seconds or longer then release it. Second, please press the Call button of the Charge pins...
- Page 8 Phone Layout and Keys Function (continued) Unlock module (optional) Connect the wire between the outdoor station and the unlock module, Outdoor station please see the figure on the right. Rear View Charging Handset Call button ! Important Note YOU SHOULD FULLY : Before initial operation, CHARGE THE HANDSET for about...
- Page 9 Installing Batteries Indoor phone The rechargeable Ni-MH batteries (AAA size, 1.2V, 800mAh) come with your phone. Install the batteries before use. 110.0 Slide the battery cover in the direction of the arrow and pull it out. Insert new batteries as indicated, matching Notes: correct polarity (+,-).
- Page 10 Installing Batteries (continued) Installation Instruction Outdoor station Indoor phone You can install two C size batteries (not supplied) Connect the modular end of the AC power adapter to before using the outdoor station. the power jack of the charger, then plug the AC adapter into a standard AC wall outlet.
Need help?
Do you have a question about the OR-DOM-CL-909 and is the answer not in the manual?
Questions and answers