Table of Contents
Advertisement
Quick Links
Advertisement
Table of Contents

Subscribe to Our Youtube Channel
Related Manuals for Riccar PRIMAP.CPN


Summary of Contents for Riccar PRIMAP.CPN
- Page 1 Power Team Canister O w n e r ’ s M a n u a l...
-
Page 2: Table Of Contents
Tandem Air Power Nozzle ..................11-14 Full Size Power Nozzle ..................15-19 Compact Power Nozzle ..................20-22 Problem Solving Guide Problem Solving ....................Visit Riccar Vacuums Online .................. How to Contact Your Authorized Retailer .............. Key Replacement Parts ..................Warranty ........................ -
Page 3: Important Safety Instructions
IMPORTANT SAFETY INSTRUCTIONS When using an electrical appliance, basic precautions should always be followed, including the following: READ ALL INSTRUCTIONS BEFORE USING THIS APPLIANCE IMPORTANT: The manufacturer cannot accept responsibility for damage caused when the appliance is not used according to the instructions, or for uses other than those for which it was intended. -
Page 4: Polarization Instructions
POLARIZATION INSTRUCTIONS Power Cord, 2-Wire Polarized Cord To reduce the risk of electric shock, this product is equipped with a polarized alternating current line plug (a plug having one blade wider than the other). This plug will fit into the power outlet only one way. This is a safety feature. If you are unable to insert the plug fully into the outlet, try reversing the plug. -
Page 5: Description Of The Vacuum And Standard Accessories
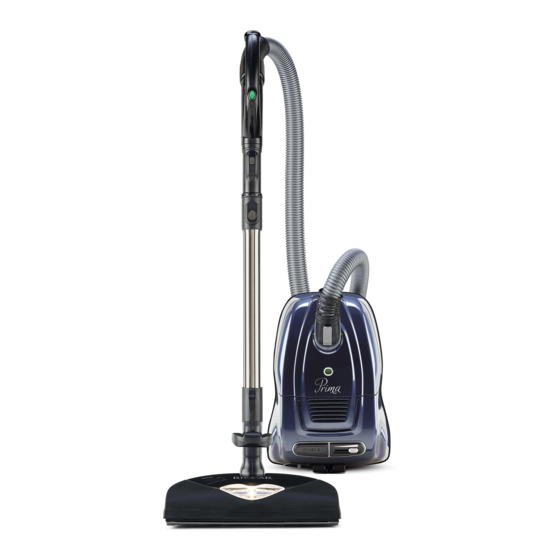
DESCRIPTION OF THE VACUUM AND STANDARD ACCESSORIES On/Off Switch Handle Release Button Motor Speed Control Wand Extension Button Full Bag Indicator Telescopic Wand Bag Compartment Latch Soft Sweep Bare Floor Tool with microfiber pad Tool Caddy Tool Adapter 2-n-1 Tool Wand and Floor Tool Storage (2) Crevice Tool Power Cord Catch... -
Page 6: Assembling The Vacuum
ASSEMBLING THE VACUUM Attaching the Hose to the Vacuum NOTE: Do not plug in the vacuum until it is completely assembled. Push the hose inlet into the canister body until it clicks into place. (Fig. 1) To remove the hose from the canister body, press the buttons on the hose inlet and pull it away from the canister (Fig. -
Page 7: Operation
OPERATION Motor Speed Control Slide to increase or decrease the power of the motor (Fig. 1). Fig. 1 Carrying the Vacuum To safely transport your vacuum, especially when carrying the vacuum up and down stairs, use the Carry Handle located at the top of the bag compartment (Fig. -
Page 8: Attachment Cleaning
ATTACHMENT CLEANING Cleaning Tools Your vacuum is equipped with a 2-n-1 (dusting brush/upholstery) tool, crevice tool and Soft Sweep floor tool. Attach any of the cleaning tools to the end of the Insert here for telescopic wand or the hose handle. Upholstery Tool 2-n-1 Tool Convert from a dusting brush to an upholstery tool... -
Page 9: Adjusting The Suction Power
ATTACHMENT CLEANING Adjusting the Suction Power for Tool Cleaning Full suction power may be too strong for some cleaning situations. For example, reduced suction power would be appropriate for cleaning sheer curtains. On the hose handle, locate the Suction Relief Dial and rotate it open. This reduces the suction power coming through the hose. -
Page 10: Tandem Air Cleaning Tools
TANDEM AIR CLEANING TOOLS Vac+Shine (Tandem Air Premium model only) Fig. 1 Combination Rug/Floor Tool with Snap-on Base, White Polishing Pad and Blue Mopping Pad • Ideal for mopping, polishing and vacuuming in one easy step (Fig. 1). • Attach the appropriate cleaning pad to the Fig. -
Page 11: Maintenance And Care
MAINTENANCE AND CARE When to Change the Vacuum Bag The Full Bag Indicator changes to red to show when the bag is full or when there is a clog in the vacuum (Fig. 1). The indicator could also turn red when vacuuming fine powders such as flour or drywall dust. -
Page 12: When To Change The Filters
MAINTENANCE AND CARE When to Change the Filters At a minimum, it’s recommended to replace the HEPA media and secondary filters after using 12 vacuum bags. If someone in your household is sensitive to airborne allergens, it is recommended to change the filter set after every six vacuum bags. - Page 13 DESCRIPTION AND OPERATION OF THE TANDEM AIR POWER NOZZLE Front View Handle On/Off Control for Power Nozzle Handle Release Button Wand Extension Button Telescopic Wand Wand Release Button • Headlight Tandem Air • Jammed Brushroll Warning Lights Power Nozzle (Premium model only) Soft Furniture Guard Rear View Handle...
-
Page 14: Tandem Air Power Nozzle
Fig. 4 situation. Items that cause jammed brushrolls include socks, excessive threads and corners the problem, contact your authorized Riccar of area rugs. The warning indicator lights in the retailer for further assistance. headlight lens will change to flashing red should... -
Page 15: Edge Cleaning
MAINTENANCE AND CARE OF THE TANDEM AIR POWER NOZZLE Edge Cleaning The edge cleaning feature provides improved cleaning near walls and stationary furniture. For maximum edge cleaning, place the left side of the nozzle, from the user’s perspective, against the wall. Automatic Carpet Height Adjustment Your vacuum is designed with an automatic self- adjusting nozzle. - Page 16 If the squeegee splits or begins to look worn, simply slide the worn squeegee from its track and slide a new one into the track (Fig. 1). If you have trouble installing the new squeegee, contact an Authorized Riccar Retailer for MATERIAL Fig. 1 DRAWN further assistance.
-
Page 17: Full Size Power Nozzle
DESCRIPTION OF THE FULL SIZE POWER NOZZLE Front View Handle On/Off Control for Power Nozzle Handle Release Button Wand Extension Button Telescopic Wand Height Indicator Window Jammed Brushroll Warning Light Full Size Wand Release Collar Power Nozzle Headlight Soft Furniture Guard Rear View Handle Telescopic Wand... -
Page 18: Carpet Height Adjustment
OPERATION OF THE FULL SIZE POWER NOZZLE Turning On the Power Nozzle Carpet Height Adjustment The power nozzle can only be turned on if Your power nozzle has six different settings the canister is also turned on. The canister’s to clean a variety of carpet types and floor On/Off switch is located on the main body. - Page 19 (Fig. 1). Fig. 2 If the breaker trips again, repeat these steps again to correct the problem. If this does not correct the problem, contact an Authorized Riccar Retailer for further assistance. Fig. 1...
- Page 20 MAINTENANCE AND CARE OF THE FULL SIZE POWER NOZZLE Removing the Brushroll To reinstall the brushroll, reinsert the brushroll back into the unit (make sure WARNING! To Reduce the Risk of Electrical the belt is attached properly). Next, insert Shock or Injury from Moving Parts, Turn the the belt cover guard.
- Page 21 MAINTENANCE AND CARE OF THE FULL SIZE POWER NOZZLE Replacing the Power Nozzle Belt Cont. Replacing the Bulb Insert the brushroll back into the brushroll WARNING! To Reduce the Risk of Electrical tray and place the belt guard back into Shock or Injury from Moving Parts, Turn the position (Fig.
-
Page 22: Compact Power Nozzle
DESCRIPTION OF THE COMPACT POWER NOZZLE Front View: Handle Handl On/Off Switch for Power Nozzle Handle Release Button Wand Extension Button Telescopic Wand Telescopic Wan Wand Release Button Headlight Compact Power Nozzle Compact Power Nozz Soft Furniture Guard Rear View: Handle Switch for Power Nozzle Release Button... -
Page 23: Using The Power Nozzle
If the nozzle shuts off again, repeat these steps to correct the problem. If this does not correct the problem, contact an Authorized Riccar Retailer for further assistance. Fig. 1 Removing and Inserting the Wand Removing the wand from the power Fig. - Page 24 MAINTENANCE AND CARE OF THE COMPACT POWER NOZZLE Removing the Brushroll WARNING! To Reduce the Risk of Electrical Shock or Injury from Moving Parts, Turn the Vacuum Off and Unplug it. The brushroll may need to be removed at times to cut threads that have become tangled around it.
-
Page 25: Problem Solving Guide
Power cord Contact an Authorized Riccar the vacuum. Retailer for further assistance. Any other service should be performed by an Authorized Riccar Retailer. To locate your nearest Authorized Retailer, visit our website at Riccar.com or call 1-888-6-RICCAR. Key Replacement Parts •... -
Page 26: Warranty
WARRANTY What is Covered: This warranty covers any defects in material and workmanship in your new Riccar vacuum and applies exclusively to the original purchaser. How Long Coverage Lasts: Warranty on the Warranty on the Power Model Motor and the Canister Itself... -
Page 27: Owner's Information
• Change the vacuum bag once a month or when the full bag indicator turns red to maximize cleaning performance. • Always use genuine Riccar vacuum bags and replacement parts. Use of other products may result in poor cleaning performance, potential vacuum cleaner damage, and may void vacuum warranty. - Page 28 Riccar.com ©2017 Tacony Corporation LROM-PRIMAP.4 4.17...
Need help?
Do you have a question about the PRIMAP.CPN and is the answer not in the manual?
Questions and answers