biodex ATOMLAB 500 Installation Manual
Hide thumbs
Also See for ATOMLAB 500:
- Operation and service manual (248 pages) ,
- Operation and service manual (212 pages) ,
- Quick reference procedures (4 pages)
Advertisement
Quick Links
ATOMLAB™ 500, ATOMLAB™ 500PLUS DOSE
CALIBRATOR, and ATOMLAB™ WIPE TEST
COUNTER
Installation Guide
086-330
086-331
086-332
086-336
075-594
Note: For a full Atomlab 500 or Wipe Test Counter Operation and
Service manual, please go to www.biodex.com/support/manuals.
FN: 17-353 Rev A 9/17
Advertisement

Related Manuals for biodex ATOMLAB 500


Summary of Contents for biodex ATOMLAB 500
- Page 1 ATOMLAB™ 500, ATOMLAB™ 500PLUS DOSE CALIBRATOR, and ATOMLAB™ WIPE TEST COUNTER Installation Guide 086-330 086-331 086-332 086-336 075-594 Note: For a full Atomlab 500 or Wipe Test Counter Operation and Service manual, please go to www.biodex.com/support/manuals. FN: 17-353 Rev A 9/17...
-
Page 2: Product Certifications And Classifications
• EC Certificate: EC #4132458 • Type B Applied Part • Electromagnetic Compatibility: This equipment complies with the Medical Equipment ICC 60601-2 EMC Standard. Authorized European Community Representative: Emergo Europe Prinsessegracht 20 2514 AP, The Hague The Netherlands Biodex Medical Systems, Inc. © 2017... -
Page 3: Contact Information
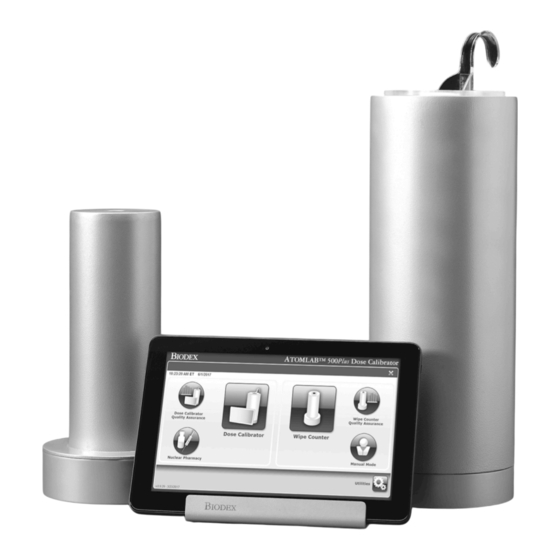
20 Ramsey Road, Shirley, New York, 11967-4704 Tel: 800-224-6339 (Int’l 631-924-9000) Fax: 631-924-8355 email: supportservices@biodex.com www.biodex.com Service and Technical Support For Installation questions, contact the BIODEX MEDICAL SYSTEMS, INC. Service/Technical Support Department at (800) 224-6339, (Int’l 631-924-9000). Biodex Medical Systems, Inc. © 2017... - Page 4 Introduction The Atomlab 500 Dose Calibrator and its respective components are carefully packed in two cartons inside a larger carton. One carton contains t he Tablet, In terface Module, cables, and manual; the other carton contains the detector unit. If ordered, the optional Atomlab Wipe Test Counter will be in its own carton.
- Page 5 To ensure the appropriate steps are followed, please advance to the correct pages. If you purchased an Atomlab 500, continue to the next page. • If you purchased an Atomlab 500Plus, advance to page 9.
- Page 6 Figure 4. Connecting Cables from Tablet to Interface Module and Power Strip. Note: Do not apply power to the Atomlab until all of the connections have been completed. Note: If a printer is not being installed on the Atomlab 500, proceed to page 15. Biodex Medical Systems, Inc. © 2017...
- Page 7 Cable 7 into the Label Printer as illustrated in the circular inset at the top left of Figure 5 and the other end into the power strip. Figure 5. Atomlab 500 – Connection to a Label Printer. Biodex Medical Systems, Inc. © 2017...
- Page 8 Place the power connector end of Cable 9 into the Report Printer as illustrated in the circular inset at the top left of Figure 6 and the other end into the power strip. Figure 6. Atomlab 500 – Connection to a Report Printer Proceed to Page 15.
- Page 9 Figure 7. Figure 7 Connecting the Detector and Wipe Test Chamber to the Interface Module Note: Do not apply power to the Atomlab until all of the connections have been completed. Biodex Medical Systems, Inc. © 2017...
- Page 10 Figure 8. Place the other end of the power cable into the power strip. Figure 8. Connecting the Power Cable 5 to the Interface Module. Note: If a printer is not being installed on the Atomlab 500, proceed to page 15. Biodex Medical Systems, Inc. © 2017...
- Page 11 Cable 7 into the Label Printer as illustrated in the circular inset at the top left of Figure 9 and the other end into the power strip. Figure 9. Connecting a Label Printer Biodex Medical Systems, Inc. © 2017...
- Page 12 Place the power connector end of Cable 9 into the Report Printer as illustrated in the circular inset at the top left of Figure 10 and the other end into the power strip. Figure 10. Connecting a Report Printer Proceed to Page 15. • Biodex Medical Systems, Inc. © 2017...
- Page 13 Figure 11. Connecting the Wipe Test Chamber Note: Do not apply power to the Atomlab until all of the connections have been completed. Note: If a printer is not being installed on the Atomlab 500, proceed to page 15. Biodex Medical Systems, Inc. © 2017...
- Page 14 Place the power connector end of Cable 9 into the Report Printer as illustrated in the circular inset at the top left of Figure 12 and the other end into the power strip. Figure 12. Connecting the Wipe Chamber to a Report Printer Biodex Medical Systems, Inc. © 2017...
- Page 15 Power Up the Atomlab 500 and/or Atomlab Wipe Test Counter The following steps detail the process for powering up the Atomlab 500/Atomlab Wipe Test Counter: Plug the Power Strip into an AC wall outlet. • On the Interface Module, verify that there is an LED indicator that is solid green and a •...
- Page 16 Biodex Medical Systems, Inc. © 2017...
Need help?
Do you have a question about the ATOMLAB 500 and is the answer not in the manual?
Questions and answers