
Related Manuals for HP SimpliVity 380 Gen9


Summary of Contents for HP SimpliVity 380 Gen9
- Page 1 Hewlett Packard Enterprise HPE SimpliVity 380 Gen9 Server Installation and Maintenance Guide Part number: P00117-001 Published: September 2017...
- Page 2 © 2017 Hewlett Packard Enterprise Development LP Notices The information contained herein is subject to change without notice. The only warranties for Hewlett Packard Enterprise products and services are set forth in the express warranty statements accompanying such products and services. Nothing herein should be construed as constituting an additional warranty. Hewlett Packard Enterprise shall not be liable for technical or editorial errors or omissions contained herein.
-
Page 3: Table Of Contents
Contents Chapter 1: Component identification............ 5 Server components........................5 Front panel components..................... 6 Back panel components......................7 Specifications..........................9 Vibration and shock......................9 Agency compliance......................9 Component upgrades........................9 Firmware revisions........................9 Chapter 2: Install the server components.......... 10 Electrostatic discharge........................ 10 Shipping carton contents......................10 Components not supplied in the shipping carton............... - Page 4 Chapter 5: Drive maintenance............. 29 Drive maintenance guidelines..................... 29 Remove a drive........................... 29 Install a drive..........................30 Chapter 6: Power supply maintenance..........32 Power supply maintenance guidelines..................32 Remove a power supply......................32 Install a power supply......................... 33 Chapter 7: Network cabling options........... 34 10 Gb-only network configuration....................
-
Page 5: Chapter 1: Component Identification
Chapter 1: Component identification This section contains the following topics: • Server components • Specifications • Component upgrades • Firmware revisions This section provides an overview of the HPE SimpliVity 380 server (components and specifications) configured for deployment into an HPE OmniStack federation. For complete information about the server, refer to the HPE SimpliVity 380 documentation included with your server or available from the http://www.hpe.com/support/hpesc website. -
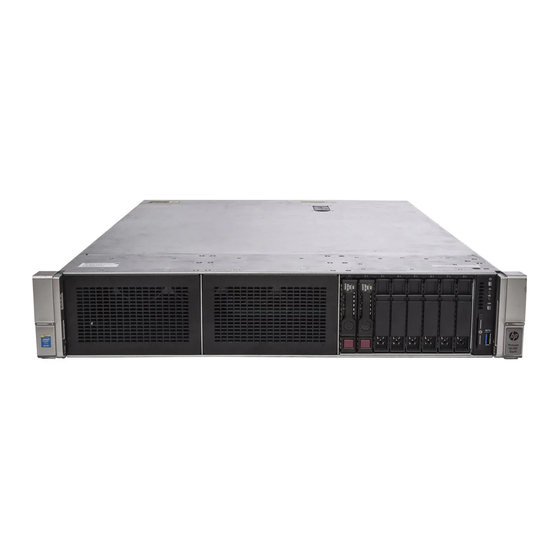
Page 6: Front Panel Components
Active/Active mode. Expansion slots, Optional NIC cards Supported network cards include: optional NIC cards • HP Ethernet 1 Gb 2-port 361T adapter • HP Ethernet 10 Gb 2-port 560SFT+ adapter • HP Ethernet 10 Gb 2-port 561T adapter Expansion slots,... -
Page 7: Back Panel Components
Callout Item Description Power On/Standby button Powers the server and system power LED on and off. Diagnostic indicators Indicate if the server is operating normally or whether there are server (Health and NIC status errors that require your attention. LEDs) User information tag Provides server identification information that might be required when contacting Customer Support (http://www.hpe.com/support/hpesc). - Page 8 Callout Item Description PCIe Slot 1 For all server models, the Accelerator card is installed in this slot. Both indicator LEDs on the card emit solid green continuously to indicate normal operation. PCIe Slot 2 For all server models, this slot is used by the Accelerator card. PCIe Slot 3 SAS Expander Card.
-
Page 9: Specifications
Callout Item Description 10 Gb ports # 1, 2 Two 10 Gb ports numbered 1 and 2, from right to left. Use interfaces 1 and 2 for the Hewlett Packard Enterprise federation network. Specifications There are optimium environment and technical specifications for the HPE SimpliVity 380. The specifications help you when planning the appropriate installation location, environmental conditions, and resources such as power and cooling. -
Page 10: Chapter 2: Install The Server Components
Chapter 2: Install the server components This section contains the following topics: • Electrostatic discharge • Shipping carton contents • Components not supplied in the shipping carton • Rack requirements • Rack installation guidelines • Install the server in a rack •... -
Page 11: Components Not Supplied In The Shipping Carton
Part Description Printed documentation • Hardware Installation Quick Start • Configuration and Deployment Quick Start • Product Information Guide (safety and regulatory notices) • End User License Agreement Components not supplied in the shipping carton Your network environment might require additional components not supplied in the shipping carton. Component Description Application... -
Page 12: Rack Installation Guidelines
• Each server is 2U. Ensure the rack has sufficient space for all systems. • For full power redundancy across all servers, you need a rack with two power distribution units (PDU) feeding separate outlet strips, with sufficient vacant outlets on each strip. •... -
Page 13: Connect The Power Cables
NOTE: Use the appropriate rack mounting hardware based on whether the rack has square, round, or threaded holes. The side slide mounting brackets are stamped front left and front right. Ensure that the brackets are positioned correctly (as viewed from the front of the rack). 3. -
Page 14: Federation Networks
Procedure 1. Connect the cables according to the guidelines for the HPE SimpliVity 380 networks only. 2. Ensure that no other network interfaces, such as optional 10 Gb interfaces, are connected to your network before deploying the server to a federation. Connect the optional network interfaces after deployment. -
Page 15: Power Up The Server
Use the cable management arm (CMA) to organize the power and network cables. NOTE: Make sure you have sufficient slack in the cables to fully extend the server from the rack until the rails are safely locked in the extended position. Procedure 1. - Page 16 NOTE: If an error occurs during server start-up, contact Customer Support (http://www.hpe.com/support/hpesc). Chapter 2: Install the server components...
-
Page 17: Chapter 3: Configure The Ilo Port For Remote Management
Chapter 3: Configure the iLO port for remote management This section contains the following topics: • Configure the iLO port to access the iLO remote console • Connect to iLO and launch the Integrated Remote Console (IRC) Configure the iLO port to access the iLO remote console Before you begin •... -
Page 18: Connect To Ilo And Launch The Integrated Remote Console (Irc)
b) Locate the icon for the Ethernet adapter, right-click it, and then select Properties. This is typically a Local Area Connection. c) Select Internet Protocol Version 4 (TCP/IPv4) and click Properties. d) Record the current settings on the General tab so that you can restore them later. e) Check the button labeled Use the following IP address. - Page 19 3. If you haven't changed the default settings, use the default user name and password found on the label attached to the top of the chassis to log in. If you have changed the default settings, use the user name and password you configured.
-
Page 20: Chapter 4: Server Troubleshooting
Chapter 4: Server troubleshooting This section contains the following topics: • Diagnostic indicators • Drive monitoring • Power supply monitoring • Accelerator card monitoring • Network interface monitoring You can use the diagnostic indicators and LEDs to identify problems with the server hardware. For assistance with resolving hardware problems, such as a component failing, contact Customer Support (http:// www.hpe.com/support/hpesc). -
Page 21: Drive Monitoring
Callout Function State Health LED Solid green Normal operation Flashing green ILO is rebooting Flashing amber System degraded Flashing red System critical NIC status LED Solid green Linked to network Flashing green Network active No network activity UID button Solid blue Activated Flashing blue One flash per second: Remote management or firmware... - Page 22 Callout Function State Drive Solid white Drive is online and is part of a logical drive. Removal Drive is offline or is not part of a logical drive. Drive status Solid green The drive is online, but may or may not be part of a logical drive. Flashing The drive is rebuilding.
- Page 23 Table 1: Drive state events and alarms Firmware state Tree view Event example Alarm Failed Failed Physical drive S0SDNEABC01131 HPE SimpliVity 380 Physical at slot:1 health state has changed Drive Health State Error from Healthy to Failed. Drive Set 0 in the SSD Array can HPE SimpliVity 380 SSD Array tolerate the loss of 0 more drive(s) Critical...
-
Page 24: Front Drive Numbering
Firmware state Tree view Event example Alarm Physical drive S0SDNEABC01131 HPE SimpliVity 380 Physical at slot:1 health state has changed Drive Foreign Configuration from Healthy to Unconfigured. Drive Set 0 in the SSD Array can HPE SimpliVity 380 SSD Array tolerate the loss of 0 more drive(s) Critical before the HPE OmniStack host... -
Page 25: Accelerator Card Monitoring
Each power supply has a status LED that indicates whether power is present or whether a power fault has occurred. The status LED is located to the left of the red latch lever. LED State Description System off or power supply failed Normal operation Steady green Accelerator card monitoring... -
Page 26: Accelerator Card Not Detected
Server state LED 1 LED 2 Description Field Programmable Gate Array (FPGA) Flashing red (1 on, configuration error detected or configuration 1 off) failed. FPGA configuration is complete. Solid green Firmware is not responding to health check. Flashing red (2 on, 2 off) POST Power-on self test (POST) is executing. -
Page 27: Revert An Accelerator Card To Its Backup Firmware
1. Shut down the server. 2. Wait three minutes for the server to fully shutdown. 3. Restart the server. This prompts the Accelerator card to revert to its backup firmware. Revert an Accelerator card to its backup firmware Procedure overview A firmware load failure on the Accelerator card can prevent the card from communicating with the HPE OmniStack server. - Page 28 Callout Type Port ID Network 3 and 4 Guest VM data (optional) NOTE: For minimum configurations, you can use only the 10 Gb interfaces to provide a single redundant path for all three networks: Storage, Federation, and Management. However, you must use VLANs to separate the networks as described in the HPE OmniStack for vSphere Client Administrator Guide.
-
Page 29: Chapter 5: Drive Maintenance
Chapter 5: Drive maintenance This section contains the following topics: • Drive maintenance guidelines • Remove a drive • Install a drive If a disk drive fails, replace it as soon as possible to avoid data loss. Drive maintenance guidelines •... -
Page 30: Install A Drive
• Obtained a replacement drive of the same type, speed, and capacity of the drive you are removing. • Read the guidelines for maintaining disk drives. • Read the guidelines for protecting components from electrostatic discharge (ESD). Procedure overview You remove a solid state drive (SSD) that has failed, or is failing, to replace it with a new drive. Replace a problem drive as soon as possible. - Page 31 2. Hold the drive by the edge of the plastic drive carrier. 3. Press the red release latch to release the drive handle. 4. Rotate the handle outward. 5. Align the drive with the guide rails in the drive bay. 6.
-
Page 32: Chapter 6: Power Supply Maintenance
Chapter 6: Power supply maintenance This section contains the following topics: • Power supply maintenance guidelines • Remove a power supply • Install a power supply Each server has two hot plug power supplies. If a power supply fails, replace it as soon as possible. Power supply maintenance guidelines Follow these guidelines for maintaining power supplies: •... -
Page 33: Install A Power Supply
Install a power supply Before you begin You have completed these tasks: • Obtained a replacement power supply of the same type and wattage. • Removed the failed power supply from the server. • Read the guidelines for maintaining power supplies. •... -
Page 34: Chapter 7: Network Cabling Options
Chapter 7: Network cabling options This section contains the following topics: • 10 Gb-only network configuration • Direct-connected network configuration • Switch-connected network configuration There are different options for cabling the 10 GbE and 1 GbE interfaces used for the HPE OmniStackStorage, Federation, and Management networks. -
Page 35: Direct-Connected Network Configuration
Configuration guidelines for each server: • Connect the 10 GbE FlexLOM ports to different 10 GbE switches. • Use VLANs on each switch according to the network separation rules specified in the HPE OmniStack for vSphere Client Administrator Guide. Direct-connected network configuration A direct-connected network configuration for a federation with two HPE SimpliVity 380 servers uses the 10 GbE connections for the HPE OmniStack Storage and Federation networks. -
Page 36: Switch-Connected Network Configuration
• Directly connect the 10 GbE network interfaces. • Connect the 1 GbE network interfaces to different 1 GbE switches. Switch-connected network configuration The switch-connected network configuration for a federation with two HPE SimpliVity 380 servers uses redundant connections to 10 GbE switches for the HPE OmniStack Storage and Federation networks. It uses redundant 1 GbE connections to 1 GbE switches for the Management network. - Page 37 Configuration guidelines for each server: • Connect the 10 GbE network interfaces to different 10 GbE switches. • Connect the 1 GbE network interfaces to different 1 GbE switches. Chapter 7: Network cabling options...
-
Page 38: Appendix A: Support And Other Resources
Appendix A: Support and other resources This section contains the following topics: • Support and other resources • HPE SimpliVity terminology • Documentation feedback Support and other resources Accessing Hewlett Packard Enterprise Support • For live assistance, go to the Contact Hewlett Packard Enterprise Worldwide website: http://www.hpe.com/assistance •... -
Page 39: Customer Self Repair
NOTE: Access to some updates might require product entitlement when accessed through the Hewlett Packard Enterprise Support Center. You must have an HP Passport set up with relevant entitlements. Customer self repair Hewlett Packard Enterprise customer self repair (CSR) programs allow you to repair your product. If a CSR part needs to be replaced, it will be shipped directly to you so that you can install it at your convenience. -
Page 40: Regulatory Information
Additional warranty information HPE ProLiant and x86 Servers http://www.hpe.com/support/ProLiantServers-Warranties and Options HPE Enterprise Servers http://www.hpe.com/support/EnterpriseServers-Warranties HPE Storage Products http://www.hpe.com/support/Storage-Warranties HPE Networking Products http://www.hpe.com/support/Networking-Warranties Regulatory information To view the regulatory information for your product, view the Safety and Compliance Information for Server, Storage, Power, Networking, and Rack Products, available at the Hewlett Packard Enterprise Support Center: http://www.hpe.com/support/Safety-Compliance-EnterpriseProducts Additional regulatory information... -
Page 41: Documentation Feedback
Term Definition datastore A container for virtual machine files, including compute and storage resources. For more information, refer to your hypervisor documentation. failure domain {internal} A collection of HPE OmniStack hosts that serve as potential high availability failover targets for each other for purposes of high availability and disaster recovery. federation A collection of HPE OmniStack hosts managed in a single globally-unified management domain.
Need help?
Do you have a question about the SimpliVity 380 Gen9 and is the answer not in the manual?
Questions and answers