Axis 241Q User Manual
Hide thumbs
Also See for 241Q:
- User manual (84 pages) ,
- Installation manual (55 pages) ,
- Specifications (2 pages)

Related Manuals for Axis 241Q


Summary of Contents for Axis 241Q
- Page 1 AXIS 241Q and AXIS 241S Video Servers User’s Manual Installation instructions are also available in German, French, Italian and Spanish in this manual.
- Page 2 • find answers to resolved problems in the FAQ database. purchase further licenses, contact your reseller. Search by product, category, or phrases • report problems to Axis support staff by logging in to your Electromagnetic Compatibility (EMC) private support area This equipment generates, uses and can radiate radio •...
-
Page 3: Table Of Contents
Quad Stream Settings (AXIS 241Q only) ....... . . 26... - Page 4 Y/C to BNC Cable (AXIS 241S only) ........
- Page 5 Application AXIS IP Utility ........
-
Page 6: Product Description
Motion JPEG and/or MPEG-4 video streams. The AXIS 241Q has 4 BNC inputs for analog video devices and the AXIS 241S has 1 BNC input and a matching loop-through output. The AXIS 241S can also accommodate Y/C video using an Y/C to BNC cable (not included). -
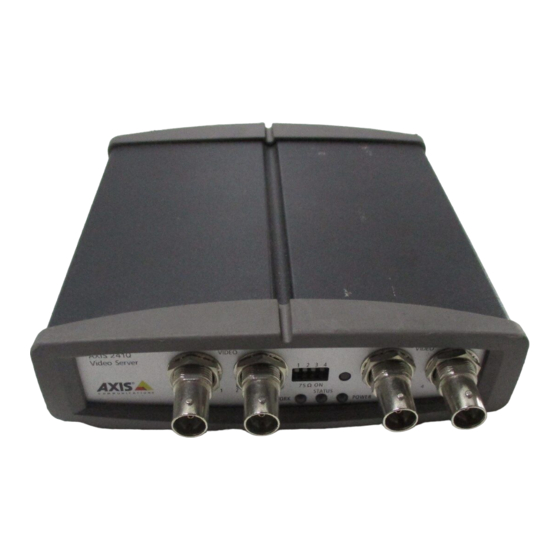
Page 7: Axis 241Q Front Panel
DIP switches set in the down-position. Note: If the AXIS 241Q is to be connected in parallel with other equipment, disable the input termination by turn- ing the corresponding DIP switch to the up-position (OFF). Failure to do so may cause reduced image quality. -
Page 8: Axis 241S Front Panel
Y/C video input Note: If the AXIS 241S is to be connected in loop-through with other equipment, disable the input termination by setting switch 1 to the up-position (OFF). Failure to do this may cause reduced image quality. Control Button - Press this button to restore the factory default settings, as described in Resetting to the Factory Default Settings, on page 47, or to install using AXIS Internet Dynamic DNS Service, see page 15. -
Page 9: Axis 241Q/241S Rear Panel
The I/O Terminal connector also provides an auxiliary connection point for DC power. Network Connector - The AXIS 241Q/241S connects to the network via a standard network cable. The AXIS 241Q/241S detects the speed of the local network segment (10BaseT/100BaseTX Ethernet). -
Page 10: Installation
Installation Mounting The AXIS 241Q/241S is supplied with a mounting kit for wall or rack mounting. The mounting brackets can be positioned for mounting the video server on a vertical surface or in a rack (4U). Follow the instructions below to attach the brackets to the video server: Slide the grey frame off the front panel of the video server (no tools needed). -
Page 11: Connecting Video Cameras
IP address, either manually or via an automated network service (DHCP). Select one of the following procedures depending on your network: • In Windows, use AXIS IP Utility to discover a dynamic IP address, or to set the IP address manually. -
Page 12: Upnp
6. If required, accept the installation of AMC onto your workstation. Notes: • AXIS IP Utility can also be used to change the IP address of a previously discovered Axis device. • AMC (AXIS Media Control) must be installed to view live video in Microsoft Internet Explorer. If your working environment restricts additional software components, you can configure your AXIS 241Q/241S to use a Java applet for updating the images. -
Page 13: Arp And Ping In Windows
2. Connect the AXIS 241Q/241S to the network using a standard network cable. 3. Locate the serial number (S/N) found on the label on the underside of the AXIS 241Q/241S. 4. From a computer on your network, open a Command Prompt, i.e. from the Windows Start menu, select Run... -
Page 14: Arp And Ping In Unix/Linux
1. Acquire an unused IP address for the AXIS 241Q/241S from your network administrator. 2. Connect the AXIS 241Q/241S to the network using a standard network cable. 3. Locate the serial number (S/N) found on the label on the underside of the AXIS 241Q/241S. Syntax: arp -s <IP Address>... - Page 15 Installation Procedure Please note that this procedure will send the AXIS 241Q/241S’s IP address, firmware version, product type and serial number to the Axis Internet Dynamic DNS Service. No personal information will be transferred. 1. Connect the AXIS 241Q/241S to your local network, using a standard network cable.
-
Page 16: Using The Video Server
ActiveX controls and allow AMC (AXIS Media Control) to be installed on your workstation. AMC is required to view MPEG-4. If your workstation restricts the use of additional software compo- nents, the AXIS 241Q/241S can be configured to use a Java applet for updating JPEG images. Please see the online help for more information. -
Page 17: The Live View Page
AXIS 241Q/241S - Using the video server The Live View page If the AXIS 241Q/241S has been customized, the buttons and other items described below will be displayed accordingly on the Live View page. The following provides an overview of each button: To resize the displayed image, click the View Size buttons: half-size ), full-size (x1), x2 or x4. - Page 18 The Snapshot button takes a snapshot of the currently displayed image. The Snapshot function and the target directory for saving snapshots can be configured from AMC (AXIS Media Control), which is available from the Windows Control Panel (Internet Explorer only).
-
Page 19: Video Streams
The supported video object types are: • Simple - sets the coding type to H.263, as used by e.g. QuickTime™. • Advanced Simple - sets the coding type to MPEG-4 Part 2, as used by AMC (AXIS Media Control) When using MPEG-4 it is also possible to control the bit rate, which in turn allows the amount of bandwidth usage to be controlled. -
Page 20: Mpeg-4 Protocols And Communication Methods
AXIS 241Q/241S - Video Streams MPEG-4 protocols and communication methods To deliver live streaming video over IP networks, various combinations of transport protocols and broadcast methods are employed. • RTP (Realtime Transport Protocol) is a protocol that allows programs to manage the real-time transmission of multimedia data, via unicast or multicast. -
Page 21: The Axis Media Control
Video/images from the AXIS 241Q/241S can also be accessed in the following ways: • If supported by the client, the AXIS 241Q/241S can use Motion JPEG server push to dis- play video. This option maintains an open HTTP connection to the browser and sends data as and when required, for as long as required. - Page 22 AXIS 241Q/241S - Video Streams Other MPEG-4 clients Although it may be possible to use other clients to view the MPEG-4 stream, this is not guaranteed by Axis. For some other clients, e.g. QuickTime™ the Video Object Type must be set to Simple. It may also be necessary to adjust the advanced MPEG-4 settings.
-
Page 23: Configuring The Video Server
Accessing the Setup tools Follow the instructions below to access the Setup Tools from a browser. 1. Start the browser and enter the IP address or host name of the AXIS 241Q/241S in the location/address field. 2. The Live View page is now displayed. Click Setup to display the Setup tools. -
Page 24: Video & Image Settings
AXIS 241Q/241S - Video & Image Settings Video & Image Settings The following descriptions show examples of the available features in the AXIS 241Q/241S. For details of each setting, please refer to the online help available from each page. Click to access the online help. -
Page 25: Video Source Settings
See the online help for more information. AXIS 241S only: Select the physical connector the video source is connected to, BNC or Y/C. The AXIS 241S supports conversion between composite video and Y/C (s-video) using an ACC Y/C to BNC cable. -
Page 26: Pan Tilt Zoom
AXIS 241Q/241S - Video & Image Settings Pan Tilt Zoom The settings here are for configuring preset positions and the PTZ Control Queue. For detailed information on these settings, please see the online help. For an overview of Pan Tilt Zoom functionality, please see page 37. -
Page 27: Overlay Image Settings
OS/2 4-bit BMP (16 colors) Overlay image limitations: • The maximum overlay image size supported by the AXIS 241Q/241S is the same as the maximum image resolution. See Technical Specifications, on page 57. • When a text overlay is also used, this reduces the amount of space available to the overlay image. -
Page 28: Live View Config
These are the tools for deciding the layout of the Live View page. The layout can be set in 3 ways: • Use Axis look - the layout is unchanged. • Use custom settings - modify the default page with your own colors, images etc. - Page 29 • To use your uploaded file, click the radio button and select the file from the drop-down list by Own: • To use an external file located somewhere other than in the AXIS 241Q, click the radio button and enter the URL by External:...
- Page 30 7. These links will appear in the web interface and can be used to control the PTZ camera For more information on the Axis HTTP API, see the Support / Developer pages on the Axis Web site at http://www.axis.com. See also the section on PTZ, on page 37.
-
Page 31: Html Examples
AXIS 241Q/241S - Live View Config HTML Examples You can add live video from your AXIS 241Q/241S to your own web site. The video server can send Motion-JPEG or MPEG-4 images to up to 20 simultaneous connections, although an administrator can restrict this to fewer. This does not affect or include the number of multicast viewers. -
Page 32: Event Configuration
Event Servers Event Servers are used for e.g. receiving uploaded image files and/or notification messages. To set up Event server for your AXIS 241Q/241S, go to Setup > Event Configuration > Event Servers and enter the required information according to the selected server type. -
Page 33: Event Types
AXIS 241Q/241S - Event Configuration Event Types An Event Type is a set of parameters describing how and when the video server is to perform certain actions. Example: If somebody walks past the connected camera, and an event has been configured to act on this, the video server can e.g. - Page 34 Note: If the pre- or post-buffer is too large for the AXIS 241Q's internal memory, the frame rate will be reduced and individual images may be missing. If this occurs, an entry will be created in the unit's log file.
-
Page 35: Motion Detection
In the Motion Detection menu, you can configure the video source(s) for motion detection. The motion detection feature is used to generate an alarm whenever movement occurs (or stops) in the image. The AXIS 241Q can use a maximum of 40 Include/Exclude windows, whilst the AXIS 241S can use a maximum of 10. -
Page 36: Port Status
Port Status Under Event Configuration > Port Status, there is a list that shows the status for the connected inputs and outputs of the AXIS 241Q/241S. This is for the benefit of an operator, who cannot access the System Options section. -
Page 37: Pan Tilt Zoom
AXIS 241Q/241S - Pan Tilt Zoom Pan Tilt Zoom If the AXIS 241Q/241S has been appropriately configured, the Live View page will display the controls available for the installed Pan Tilt Zoom (PTZ) device. The administrator can enable/disable the controls for specified users. - Page 38 Absolute click-in-image movement means that the camera view will center on the absolute position that was clicked. Relative click-in-image movement can be used when using the AXIS Media Control with Microsoft Internet Explorer, and when using a PTZ driver that supports it. By clicking and holding the mouse button down in the image, the PTZ device moves the camera in that direction, relative to the center of the image.
-
Page 39: Installing Ptz Devices
7. If required, click the Advanced Options button to make further settings. Note: Advanced users and application developers can also use the Axis Application Programming Interface and HTTP specification for generic control of PTZ devices using CGI commands or a TCP/IP client. Please refer to... -
Page 40: System Options
Allowed IP Addresses - The administrator can add up to 256 IP addresses to this list. If the IP address filtering checkbox is checked, the AXIS 241Q/241S will only allow access to requests coming from the IP addresses in the list. -
Page 41: Date & Time
AXIS 241Q/241S - System Options HTTPS For greater security, the AXIS 241Q/241S can be configured to use HTTPS (Hypertext Transfer Protocol over SSL (Secure Socket Layer)). That is, all communication that would otherwise go via HTTP will instead go via an encrypted HTTPS connection. -
Page 42: Network - Basic Tcp/Ip Settings
IP address change (under Services) to receive notification from the video server when the IP address changes. •Alternatively, if your DHCP server can update a DNS server, you can access the AXIS 241Q/241S by host name which is always the same, regardless of the IP address. -
Page 43: Network - Advanced Tcp/Ip Settings
DNS servers - enter the IP addresses of the primary and secondary DNS servers. Host Name Configuration The AXIS 241Q/241S can be accessed using a host name, instead of an IP address. The host name is usually the same as the assigned DNS Name. -
Page 44: Socks
For more information, please see the online help SOCKS SOCKS is a networking proxy protocol. The AXIS 241Q/241S can be configured to use a SOCKS server to reach networks on the other side of a firewall/proxy server. This functionality is useful if the video server is located on a local network behind a firewall, but notifications, uploads, alarms, etc., need to be sent to a destination outside the local... -
Page 45: Ports & Devices
AXIS 241Q/241S - System Options Ports & Devices I/O Ports - the pinout, interface support and the control and monitoring functions provided by this connector are described in Unit Connectors, on page 48. Maintenance • Restart - The unit is restarted without changing any of the settings. Use this method if the unit is not behaving as expected. -
Page 46: Support
The support overview page provides valuable information on troubleshooting and contact information, should you require technical assistance. Logs & Reports - when contacting Axis support, please be sure to provide a valid Server Report with your query. View Information - The Log report and the Parameter List also provide valuable information for troubleshooting and when contacting Axis’... -
Page 47: Resetting To The Factory Default Settings
AXIS 241Q/241S - System Options Resetting to the Factory Default Settings To reset the AXIS 241Q/241S to the original default settings, go to the System Options > Maintenance web page (described in Maintenance, on page 45) or use the control button... -
Page 48: Unit Connectors
Y/C to BNC Cable (AXIS 241S only), on page 51 The D-Sub Connector The AXIS 241Q/241S provides one 9-pin D-sub connector, providing the physical interface for an RS-232 port, used for connecting accessory equipment; such as stand-alone PTZ devices for the remote control of connected video cameras. -
Page 49: The I/O Terminal Connector
A half-duplex RS-485 interface for controlling auxiliary equipment, e g. PTZ devices. RS-485 - B (inverting) The AXIS 241Q/241S includes one (green) 12-pin connector block. Connect input/output devices to this block: 1. Loosen the corresponding screw on top of the pin on the connector block (see the table above to determine which pin to use). -
Page 50: Schematic Diagram - I/O Terminal Connector
HTTP • Pan Tilt Zoom (PTZ) - for controlling a PTZ device. A PTZ device requires a driver for its function. Drivers can be obtained from www.axis.com. Please see page 37 for information on how to connect PTZ devices. -
Page 51: Y/C To Bnc Cable (Axis 241S Only)
4. Set the dip switches on the front panel of the unit to 1=on, 2=on, 3=off, 4=off. 5. Go to the AXIS 241S Web pages under Setup > Video & Image > Video Source and select Y/C (S-video) from the Physical connector drop-down list. -
Page 52: Troubleshooting
Note: Pre-configured and customized settings will be retained for use when the new firmware is running (pro- vided the features are available in the new firmware) although this is not guaranteed by Axis Communica- tions. 1. Save the firmware file to your computer. The latest version of the AXIS 241Q/241S firmware is available free of charge from the Axis Web site at www.axis.com/techsup or from your local distributor. -
Page 53: Support
2. If the unit does not reply within a few seconds, restart it and wait for a reply. Press CTRL+C to stop Ping. 3. Open a browser and type in the AXIS 241Q/241S’s IP address. In the page that appears, use the Browse button to select the upgrade file to use, e.g. axis241q.bin or axis241s.bin. - Page 54 The IP address has been changed 1) Move the AXIS 241Q/241S to an isolated network or to one with no DHCP or BOOTP server. by DHCP Set the IP address again, using the ARP Ping command.
- Page 55 Using only 16 or 256 colors on your display will produce dithering artifacts in the image. Incorrect exposure in images Incorrect line termination If the AXIS 241Q/241S is to be connected in loop through with other equipment, disable the input termination by turning the corresponding DIP switch to OFF. Problems with the MPEG-4 format Lower frame rate than expected.
- Page 56 Color saturation is different in Modify the settings for your graphics adapter. Please see the adapter's documentation for more MPEG-4 and Motion JPEG. information. For additional assistance, please contact your reseller or check the product’s support pages on the Axis Website at www.axis.com/techsup...
-
Page 57: Technical Specifications
• Analog composite video, PAL/NTSC autosensing inputs • AXIS 241Q: 4 BNC video inputs • AXIS 241S: 1 BNC video input, 1 BNC output (loop through) or Y/C video input • Ethernet 10BaseT/100BaseTX, RJ-45 • Terminal block: 4 alarm inputs, 4 output transistors (max 24V, 0.1 A), 2-wire RS-485/422 (half-duplex), alternative voltage input •... - Page 58 C (41 F) to 50 C (122 • Humidity: 20-80% RH (non-condensing) System integration • API for software integration available at www.axis.com includes HTTP API, AXIS support Media Control SDK • Event trigger data in video stream • Embedded scripting •...
-
Page 59: General Performance Considerations
Optimizing your system To see the bandwidth and frame rate currently required by the video stream, the AXIS 241S/241Q provides a tool that can be used to display these values directly in the video image. To do this, special format strings are added as part of a text overlay. -
Page 60: Frame Rates - Motion Jpeg
25/30 Frame rates - MPEG-4 The following test results show the frame rates in frames/second (fps) for MPEG-4 streams from the AXIS 241S/241Q. Note that these values are guidelines only - actual values may vary. The MPEG-4 test conditions: • Compression level = 50% •... -
Page 61: Bandwidth
AXIS 241S/241Q - Technical Specifications Bandwidth As there are many factors affecting bandwidth, it is very difficult to predict the required amounts. The settings that affect bandwidth are: • the image resolution • the image compression • the frame rate •... -
Page 62: Installation
AXIS 241Q/241S - Installation Installation Montage Im Lieferumfang des AXIS 241Q/241S ist ein Montagesatz für die Wandanbringung oder den Rackeinbau enthalten. Die Halterungen können so montiert werden, dass der Videoserver auf einer senkrechten Fläche angebracht oder in ein Rack (4 HE) eingebaut werden kann. -
Page 63: Videokameras Anschließen
Ihre Kamera über einen RCA-Anschluss verfügt. Installationsmethoden Der AXIS 241Q/241S ist für die Installation in einem Ethernet-Netzwerk vorgesehen. Dazu muss dem Videoserver entweder manuell oder über einen automatischen Netzwerkservice (DHCP) eine IP-Adresse zugewiesen werden. Wählen Sie entsprechend Ihrem Netzwerk eine der folgenden Methoden: •... -
Page 64: Axis Ip Utility
Automatische Erkennung 1. Prüfen Sie, ob Netzwerk- und Stromkabel mit dem AXIS 241Q/241S verbunden sind. 2. Starten Sie AXIS IP Utility. Klicken Sie auf das Symbol des AXIS 241Q/241S, um die entsprechende Homepage zu öffnen. IP-Adresse manuell einstellen Wenn das Symbol des AXIS 241Q/241S nicht im Fenster angezeigt wird, klicken Sie auf die Schaltfläche Aktualisieren, um erneut nach dem Gerät zu suchen. -
Page 65: Upnp
7. Die Installation ist damit abgeschlossen. Fahren Sie mit dem Abschnitt Using the video server, auf Seite 16 fort. Die Seriennummer (S/N) befindet sich auf dem Etikett auf der Unterseite des AXIS 241Q/241S. UPnP™ Die UPnP-Funktionalität des AXIS 241Q/241S ist standardmäßig aktiviert. Sofern diese Funktionalität auch auf Ihrem Computer (Windows ME oder XP) aktiviert ist, wird der... - Page 66 Falls in Ihrer Arbeitsumgebung die Installation weiterer Softwarekomponenten nicht zugelassen ist, können Sie Ihren AXIS 241Q/241S so konfigurieren, dass zum Aktualisieren der Bilder ein Java-Applet verwendet wird. Einzelheiten dazu finden Sie in der Hilfedatei unter Live View Config (Direktübertragung konfigurieren) >...
-
Page 67: Arp And Ping Unter Unix/Linux
1. Lassen Sie sich von Ihrem Netzwerkadministrator eine nicht zugewiesene IP-Adresse für den AXIS 241Q/241S geben. 2. Schließen Sie den AXIS 241Q/241S über ein Standard-Netzwerkkabel an das Netzwerk 3. Die Seriennummer (S/N) ist auf dem Etikett auf der Unterseite des AXIS 241Q/241S zu finden. Syntax: arp -s <IP-Adresse >... - Page 68 Installationsprozess geführt. Halten Sie die Seriennummer Ihres Produktes bereit, und befolgen Sie die Anweisungen auf dem Bildschirm. Die Seriennummer (S/N) befindet sich auf dem Etikett auf der Unterseite des AXIS 241Q/241S. 6. Geben Sie ein Passwort für den Root-Benutzer (Administrator) ein.
- Page 69 Falls in Ihrer Arbeitsumgebung die Installation weiterer Softwarekomponenten nicht zugelassen ist, können Sie Ihren AXIS 241Q/241S so konfigurieren, dass zum Aktualisieren der Bilder ein Java-Applet verwendet wird. Einzelheiten dazu finden Sie in der Hilfedatei unter Live View Config (Direktübertragung konfigurieren) >...
-
Page 70: Installation
Installation Montage Votre AXIS 241Q/241S est équipé d’un kit de montage pour support mural ou sur baie (rack). Les supports de montage peuvent être positionnés pour monter le serveur vidéo sur une surface verticale ou dans une baie (4U). Suivez les instructions ci-dessous pour fixer les supports de montage au serveur vidéo :... -
Page 71: Connexion Des Caméras Vidéo
Utilisez un adaptateur RCA/BNC si votre caméra dispose d’un connecteur de type phono (RCA). Méthodes d’installation Votre AXIS 241Q/241S est conçu pour une installation dans un réseau Ethernet. Cela implique de lui affecter une adresse IP, soit manuellement soit via un service réseau automatisé... - Page 72 • AXIS IP Utility permet également de modifier l’adresse IP d’un appareil Axis détecté précédemment. • AMC (AXIS Media Control) doit être installé pour visionner les données vidéo en direct dans Microsoft Internet Explorer. Si votre environnement de travail limite les composants logiciels supplémentaires, vous pouvez configurer votre AXIS 241Q/241S pour utiliser un applet Java pour...
-
Page 73: Upnp
Affectez une adresse IP unique à votre ordinateur à partir d’un ordinateur du réseau, en procédant comme suit : 1. Trouvez une adresse IP non utilisée pour votre AXIS 241Q/241S en la demandant à votre administrateur de réseau. 2. Connectez votre AXIS 241Q/241S à votre réseau à l’aide d’un câble de réseau standard. - Page 74 Si votre environnement de travail limite les composants logiciels supplémentaires, vous pouvez configurer votre AXIS 241Q/241S pour utiliser un applet Java pour mettre à jour les images. Reportez-vous au fichier d’aide sous Live View Config > Layout > Default Viewer for Internet Explorer pour de plus amples informations.
-
Page 75: Arp Et Ping Sous Unix/Linux
Affectez une adresse IP unique à votre ordinateur à partir d’un ordinateur du réseau, en procédant comme suit : 1. Trouvez une adresse IP non utilisée pour votre AXIS 241Q/241S en la demandant à votre administrateur de réseau. 2. Connectez votre AXIS 241Q/241S à votre réseau à l’aide d’un câble de réseau standard. - Page 76 Nous recommandons un serveur DHCP dans le réseau pour l’affectation des adresses IP. Procédure d’installation Remarquez que cette procédure enverra l’adresse IP de votre AXIS 241Q/241S, la version du logiciel microprogrammé et le numéro de série à Axis Internet Dynamic DNS Service. Aucune information personnelle ne sera transmise.
- Page 77 AXIS 241Q/241S pour utiliser un applet Java pour mettre à jour les images. Reportez-vous au fichier d’aide sous Live View Config > Layout > Default Viewer for Internet Explorer pour de plus amples informations.
-
Page 78: Installazione
Installazione Montaggio AXIS 241Q/241S comprende un kit per montaggio a parete o su rack. Le staffe di montaggio possono essere posizionate per montare il server video su una superficie verticale o in un armadio rack (4U). Seguire le istruzioni in basso per collegare le staffe al... -
Page 79: Connessione Delle Videocamere
• Se la rete utilizza un server DHCP, visualizzarne le pagine di amministrazione per individuare l’indirizzo IP assegnato all’AXIS 241Q/241S. • Se la rete utilizza un server DHCP e il computer esegue UPnP™, l’AXIS 241Q/241S sarà rilevata automaticamente e visualizzata sullo schermo. Vedere pagina 81. - Page 80 6. Se necessario, accettare l’installazione di AMC sulla workstation. Note: • AXIS IP Utility può anche essere utilizzato per modificare l’indirizzo IP di un dispositivo Axis rilevato in precedenza. • AMC (AXIS Media Control) deve essere installato per visualizzare le immagini dal vivo con Internet Explorer di Microsoft.
-
Page 81: Upnp
ARP e Ping in Windows Assegnare al prodotto un indirizzo IP unico da un computer della rete, come segue: 1. Ottenere un indirizzo IP non utilizzato per l'AXIS 241Q/241S dall’amministratore di rete. 2. Collegare l’AXIS 241Q/241S alla rete mediante un cavo di rete standard. - Page 82 è possibile configurare AXIS 241Q/241S in modo da utilizzare un’applet Java per l’aggiornamento delle immagini. Vedere il file della Guida in Live View Config (Config immagini dal vivo) > Layout (Layout)> Default Viewer for Internet Explorer (Visualizzazione predefinita per Internet Explorer) per informazioni.
-
Page 83: Arp E Ping In Unix/Linux
ARP e Ping in UNIX/Linux Assegnare al prodotto un indirizzo IP unico da un computer della rete, come segue: 1. Ottenere un indirizzo IP non utilizzato per l'AXIS 241Q/241S dall’amministratore di rete. 2. Collegare l’AXIS 241Q/241S alla rete mediante un cavo di rete standard. - Page 84 AXIS 241Q/241S - Installazione Servizio AXIS Internet Dynamic DNS Il servizio AXIS Internet Dynamic DNS è un servizio gratuito fornito da Axis, che consente di installare in modo rapido e facile il server video, che riceve un nome statico (nome DNS) e un indirizzo IP dinamico.
- Page 85 è possibile configurare AXIS 241Q/241S in modo da utilizzare un’applet Java per l’aggiornamento delle immagini. Vedere il file della Guida in Live View Config (Config immagini dal vivo) > Layout (Layout)> Default Viewer for Internet Explorer (Visualizzazione predefinita per Internet Explorer) per informazioni.
-
Page 86: Instalación
Instalación Montaje El AXIS 241Q/241S se suministra con un kit especial para montaje de pared o sobre un bastidor (rack). Los soportes de montaje se pueden colocar de manera que servidor de vídeo pueda montarse en una superficie vertical o sobre un bastidor (4U). Siga las instrucciones siguientes para fijar los soportes de montaje en el servidor de vídeo:... -
Page 87: Conexión De Las Cámaras De Vídeo
IP que se le ha asignado a su AXIS 241Q/241S. • Si su red utiliza un servidor DHCP y su PC ejecuta UPnP™, el AXIS 241Q/241S se detectará y aparecerá automáticamente en la pantalla. Consulte la página 89. - Page 88 6. Si es necesario, acepte la instalación de AMC en su estación de trabajo. Notas: • También puede utilizarse AXIS IP Utility para cambiar la dirección IP de un dispositivo de Axis que se haya detectado con anterioridad. • AMC (AXIS Media Control) tiene que estar instalado para ver vídeos en vivo en Microsoft Internet Explorer.
-
Page 89: Upnp
Asigne una dirección IP única a su producto desde un ordenador de su red, de la siguiente manera: 1. Obtenga una dirección IP que no esté en uso para el AXIS 241Q/241S desde su administrador de red. 2. Conecte el AXIS 241Q/241S a la red con un cable de red estándar. -
Page 90: Arp Y Ping En Unix/Linux
Asigne una dirección IP única a su producto desde un ordenador de su red, de la siguiente manera: 1. Obtenga una dirección IP que no esté en uso para el AXIS 241Q/241S desde su administrador de red. 2. Conecte el AXIS 241Q/241S a la red con un cable de red estándar. - Page 91 Tenga en cuenta que, al llevar a cabo este procedimiento, se enviará la dirección IP del AXIS 241Q/241S, la versión de firmware, el tipo de producto y el número de serie al Axis Internet Dynamic DNS Service. No se transferirá ninguna información de carácter personal.
-
Page 92: Glossary
DVD-quality address is for the IP address. video streams at less than 1 Mbit/s. ARTPEC - Axis Real Time Picture Encoder - used for Multicast - A bandwidth-conserving technology that image compression. reduces bandwidth usage by simultaneously delivering a... - Page 93 AXIS 241Q/241S - Glossary TCP/IP - Transmission Control Protocol/Internet Protocol. A suite of network protocols that determine how data is transmitted. TCP/IP is used on many networks, including the Internet. TCP keeps track of the individual packets of information and IP contains the rules for how the packets are actually sent and received.
-
Page 94: Index
Generic TCP/IP 50 AMC 16, 21, 74 Anonymous viewers 40 ARP and Ping 13 Host name 43 AXIS Internet Dynamic DNS Service 15, 42 HTML examples 31 AXIS IP Utility 11 HTTP API 29, 38 HTTP port number 43 HTTP server 32... - Page 95 AXIS 241Q/241S - Index MPEG-4 protocols 20 MPEG-4 settings 44 Scheduled event 32 Multicasting 20 Security 40 Sequence mode 17, 31 Serial number 9 Services 42 Network indicator 8 Set the IP address 12 Network settings 42 SMTP settings 44...
Need help?
Do you have a question about the 241Q and is the answer not in the manual?
Questions and answers