
Related Manuals for Wohler AMP1-16V-MD


Summary of Contents for Wohler AMP1-16V-MD
- Page 1 AMP1-16V Series • AMP1-16V-MD • AMP1-E16V-MD 1RU, 3Gb/s, 16-Channel, Audio and Video Monitor User Guide (Software Version: 3.2x) Part Number 821697, Revision P...
- Page 2 In no event will Wohler Technologies, Inc. be liable for direct, indirect, special, incidental, or consequential damages resulting from any defect in the hardware, software, or its documentation, even if advised of the possibility of such damages.
-
Page 3: Table Of Contents
Table of Contents Chapter 1. Quick Start......1 Introduction ..............1 Overview..............1 Topics ..............1 Safety Instructions ............2 Installation Recommendations...........3 Mounting..............3... - Page 4 How do I Cluster Meter Pairs Together for Easy Readability? ............16 How do I Customize the Meter Scales?......17 How do I Configure a Hot Key to Solo a Cluster? ..18 How do I Configure a Hot Key to Mute a Cluster? ..19 How do I Configure the AES and Analog Outputs? ..21 How do I Set Up for External Surround Sound?....23 How Do I Sync Internal Speaker Audio with an External...
- Page 5 Chapter 4. Video and Data ......47 Introduction ..............47 Overview..............47 Topics ..............47 Configuration Options ............ 48 Overview..............
- Page 6 Turning Active Help On or Off ..........63 Chapter 6. Menu List......65 Introduction..............65 Overview ..............65 Topics ..............65...
- Page 7 Upgrading the Sub-Processor Firmware ......98 Chapter 8. Features and Specifications....105 Introduction ............... 105 Overview.............. 105 Topics ..............105 Features ..............106 Product Benefits ............ 106 Distinction Between Models........
- Page 8 Overview .............. 131 Topics ..............131 Navigating to the Unit Information Menu ......132 Enabling FTP Access............. 133 8 2 1 6 9 7 : A M P1 -1 6 V S e r i e s U s e r G u i d e viii ©...
-
Page 9: Quick Start
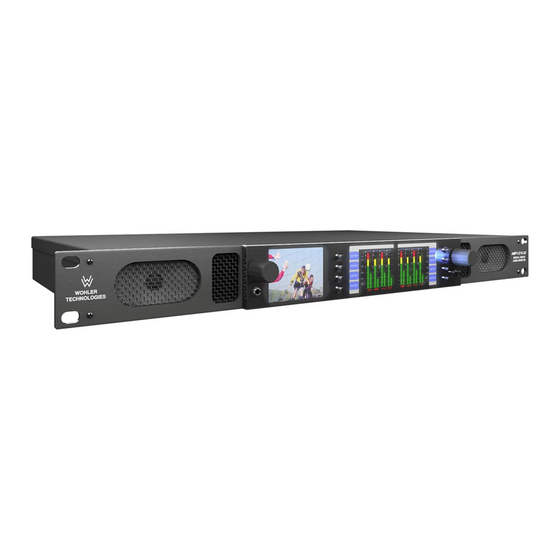
Quick Start Introduction Overview The AMP1-16V-MD and AMP1-E16V-MD are Wohler’s first 1RU, 16-channel, 3G audio/video monitors. These units come with three 2.4” video screens and an easy-to-use configuration interface that provides flexible audio metering, video monitoring, and other data display. -
Page 10: Safety Instructions
Ch a p te r 1 Q ui ck S ta r t Sa f et y I ns t ru cti o ns Safety Instructions Read, keep, and follow all of these instructions; heed all warnings. Do not use this equipment near water. Use only a dry cloth to clean the equipment. -
Page 11: Installation Recommendations
Power The AMP1-16V-MD has a standard IEC connector on the rear panel from which it can connect to AC mains power (100 to 240 VAC ± 10%, 50/60 Hz, 65W). You may use the power cord provided, or another approved cord, to adapt the unit to the proper country-specific power connection. -
Page 12: Compliance
Ch a p te r 1 Q ui ck S ta r t Co m p l i a nc e Compliance This equipment has been tested and found to comply with the limits for a Class A digital device, pursuant to part 15 of the FCC Rules. These limits are designed to provide reasonable protection against harmful interference when the equipment is operated in a commercial environment. -
Page 13: Front Panel
C ha p te r 1 Quick Start U s i ng th e M o n it or Front Panel Figure 1–1 Front Panel Layout Balance and Menu Data/Menu Navigation Volume Monitors (Rotary Knob) (Rotary Knob) Video Monitor Hot Keys/Menu Buttons Menu Navigation Buttons Headphone Jack Speakers... -
Page 14: Back Panel
Hot Keys/Push Buttons: Ten buttons are used for menu navigation and hot key access to solo, mute, and preset functions. Back Panel The AMP1-16V-MD and AMP1-E16V-MD back panel contains all of the connectors except for the headphone jack as shown in Figure 1–2 below. -
Page 15: Getting Started
Figure 1–3 Video Monitor Display (Left) To begin any procedure on the AMP1-16V-MD or the AMP1-E16V-MD, powering up the system should display the video input on the left screen, and the audio level meters on the... - Page 16 Ch a p te r 1 Q ui ck S ta r t G et ti ng St ar t ed You can launch the menu system by pressing either of the buttons directly below the Balance control. These same buttons also either ) or ).
-
Page 17: Configuring The System
C ha p te r 1 Quick Start Co nf i gu r in g t he Sy s tem Configuring the System The functional descriptions fall under the following categories: • Configuring Audio and Metering (Chapter 3 on page •... - Page 18 Ch a p te r 1 Q ui ck S ta r t Co n fi gu r i ng th e S ys te m 8 2 1 6 9 7 : A M P1 -1 6 V S e r i e s U s e r G u i d e ©...
-
Page 19: The "How Do I
CHAPTER 2 The “How Do I...” Chapter Introduction Overview This chapter answers many questions that naturally come up as the AMP1-16V Series monitor is first put into service. Topics Topics Page Introduction How do I Select the Inputs I Want to Hear in the Speakers? How do I Decode and Monitor a Dolby Bitstream? How do I Decode and Monitor a Dolby Bitstream (Continued)? -
Page 20: Notation
Ch a p te r 2 T he “ H ow D o I .. .” C ha p te r N ot at i on Topics Page How Do I Terminate or Unterminate AES Inputs? How do I Find Software Version Information? Notation In this chapter, we use a shorthand method to show you how to progress form the Main Screen to the menus. -
Page 21: Frequently Asked Questions
How do I Select the Inputs I Want to Hear in the Speakers? The AMP1-16V-MD offers a wide variety of inputs. You many monitor any 16 of the input channels, in any mix, on the meters and through the speakers. Assigning inputs to be monitored is done in the... -
Page 22: How Do I Decode And Monitor A Dolby Bitstream
Ch a p te r 2 T he “ H ow D o I .. .” C ha p te r Fr e qu en tl y A sk e d Q ue s ti on s How do I Decode and Monitor a Dolby Bitstream? You can continuously monitor a single Dolby bitstream from the SDI or AES inputs even if the bitstream itself doesn't appear on the Main... -
Page 23: How Do I Decode And Monitor A Dolby Bitstream (Continued)
C h a pt er 2 The “How Do I...” Chapter F re qu e nt ly A s k ed Q u es ti o ns How do I Decode and Monitor a Dolby Bitstream (Continued)? Now that you have connected a Dolby bitstream source to the Dolby decoder, you need to connect the outputs of the Dolby decoder to the metering channels you will be monitoring the audio on. -
Page 24: How Do I Cluster Meter Pairs Together For Easy Readability
Ch a p te r 2 T he “ H ow D o I .. .” C ha p te r Fr e qu en tl y A sk e d Q ue s ti on s For the Center and LFE channels, press the knob Speaker Assign and then turn the... -
Page 25: How Do I Customize The Meter Scales
Refer to the following section to set up a hot key that will solo the whole cluster. How do I Customize the Meter Scales? The AMP1-16V-MD contains a number of commonly-used meter scales. You can set the meter scale in the... -
Page 26: How Do I Configure A Hot Key To Solo A Cluster
Ch a p te r 2 T he “ H ow D o I .. .” C ha p te r Fr e qu en tl y A sk e d Q ue s ti on s If you would like to adjust the color-to-color transition points of the meter segments, use the Upper Segment Middle Segment... -
Page 27: How Do I Configure A Hot Key To Mute A Cluster
How do I Configure a Hot Key to Mute a Cluster? Solo hot keys are part of the default configuration of the AMP1-16V-MD. Sometimes it is convenient to also have some Mute controls as well. You can set this up in the... -
Page 28: Configuration Menu
Ch a p te r 2 T he “ H ow D o I .. .” C ha p te r Fr e qu en tl y A sk e d Q ue s ti on s press the knob repeatedly until is selected and the Balance Mute... -
Page 29: How Do I Configure The Aes And Analog Outputs
C h a pt er 2 The “How Do I...” Chapter F re qu e nt ly A s k ed Q u es ti o ns How do I Configure the AES and Analog Outputs? You can use the AES and analog output ports to output selected signals from the inputs: from the optional Dolby decoder, from the monitor mix, or from the single monitor pair mixed to the speakers. - Page 30 Ch a p te r 2 T he “ H ow D o I .. .” C ha p te r Fr e qu en tl y A sk e d Q ue s ti on s Press the button and turn the Output = Selected Sources Balance knob to select any of the SDI channel pairs, the Dolby...
-
Page 31: How Do I Set Up For External Surround Sound
AES or analog outputs are available for this use. After connecting the needed AES or analog outputs to your surround sound system, you will need to set up the AMP1-16V-MD to provide the channels you need. This is done in the... -
Page 32: How Do I Sync Internal Speaker Audio With An External Video Monitor
170 ms. Typically, this can be done to compensate for video processing delays a video monitor that may be used in conjunction with the AMP1-16V-MD. Adjust the Main Screen controls so that you are viewing the video and hearing the associated audio. -
Page 33: How Do I Use Presets To Change Inputs
F re qu e nt ly A s k ed Q u es ti o ns How Do I Use Presets to Change Inputs? The AMP1-16V-MD has more inputs than can be monitored on a 16- channel screen. The AMP1-16V-MD has the ability to store eight entire system configurations as presets, including the inputs that are being monitored. -
Page 34: How Do I Quickly Recall Presets From The Main Screen
Ch a p te r 2 T he “ H ow D o I .. .” C ha p te r Fr e qu en tl y A sk e d Q ue s ti on s The preset naming screen will automatically appear to allow you to name the preset. -
Page 35: How Do I Display The Loudness Of A Cluster Of Channels
C h a pt er 2 The “How Do I...” Chapter F re qu e nt ly A s k ed Q u es ti o ns name the preset. Enter a name that is descriptive and that you will recognize later. - Page 36 Ch a p te r 2 T he “ H ow D o I .. .” C ha p te r Fr e qu en tl y A sk e d Q ue s ti on s Press the button to change from Loudness Mode Program Press the...
-
Page 37: How Do I Display Dolby Metadata Instead Of Video
C h a pt er 2 The “How Do I...” Chapter F re qu e nt ly A s k ed Q u es ti o ns How do I Display Dolby Metadata instead of Video? The left screen can be used to display either video from the SDI signal or up to eight lines of Dolby metadata. -
Page 38: How Do I Display Dolby Metadata Along With Video
Ch a p te r 2 T he “ H ow D o I .. .” C ha p te r Fr e qu en tl y A sk e d Q ue s ti on s Figure 2–15 Screen Information Setup Menu Screen Information Setup Menu Video Mode AC3 Data Rate... -
Page 39: How Do I Adjust The Screen Saver Or Screen Brightness
C h a pt er 2 The “How Do I...” Chapter F re qu e nt ly A s k ed Q u es ti o ns Figure 2–16 Screen Information Setup Menu Screen Information Setup Menu Video Mode AC3 Data Rate Data Field Format Video... -
Page 40: How Do I Terminate Or Unterminate Aes Inputs
AES signals should have one and only one termination. This termination should physically be located at the last destination of an AES coax cable. If the AMP1-16V-MD is the last connection in a series of AES connection, then its terminations should be turned on. By default, the AES inputs of the AMP1-16V-MD are all terminated. -
Page 41: How Do I Find Software Version Information
AES Terminate All How do I Find Software Version Information? Occasionally, when speaking with a customer service representative, it is necessary to locate the software versions of the software in the AMP1-16V-MD. Unit Information Screen Unit Information Menu Application: AMP1-16-3G... -
Page 43: Chapter 3. Audio And Metering
CHAPTER 3 Audio and Metering Introduction Overview The AMP1-16 Series monitors are primarily designed to monitor audio and video. Configuration options include specifying channels to monitor, phase indicators, setting audio delay, and individual channel volume controls. Topics Topics Page Introduction Configuration Options Configuring the Audio Outputs Level Metering... -
Page 44: Configuration Options
Ch a p te r 3 A u d io a nd M e te ri n g Co n fi gu r a ti on O p ti on s Configuration Options The AMP1-16 Series monitors are very flexible and can be configured to adapt to almost any audio configuration. -
Page 45: Surround Sound
C h a pte r 3 Audio and Metering C on fi g ur i n g th e A u di o O ut pu ts as presets and recalled later. See Chapter Efficiency Enhancements on page Figure 3–1 Audio Routing Diagram 3G SDI Input 1 Configuration Selection... -
Page 46: Stereo Downmix
Ch a p te r 3 A u d io a nd M e te ri n g Co n fi gu r i ng th e A u di o O utp u ts From the , press either the button or the Main Screen button to display the... - Page 47 C h a pte r 3 Audio and Metering C on fi g ur i n g th e A u di o O ut pu ts analog output pairs are available for this purpose. The front panel Volume Balance , and solo controls will then affect the stereo downmix output sound.
- Page 48 Ch a p te r 3 A u d io a nd M e te ri n g Co n fi gu r i ng th e A u di o O utp u ts Next, press the button and then rotate the AES Channel Pair Balance knob to select the AES pair that will receive the...
-
Page 49: Aes And Analog Outputs
C h a pte r 3 Audio and Metering C on fi g ur i n g th e A u di o O ut pu ts AES and Analog Outputs Any monitored input can be routed to any AES or analog output pair. This powerful feature will allow de-embedded, Dolby decoded, or other digital or analog audio to be used by other products. - Page 50 Ch a p te r 3 A u d io a nd M e te ri n g Co n fi gu r i ng th e A u di o O utp u ts The AES input pairs can be converted into analog audio. Table 3–1 Available Signal Types/Channels Signal Sources...
- Page 51 C h a pte r 3 Audio and Metering C on fi g ur i n g th e A u di o O ut pu ts The pin-out of the balanced analog output connector is listed in Table 3–3 below.
-
Page 52: Level Metering
Ch a p te r 3 A u d io a nd M e te ri n g Le ve l M et er i n g Level Metering Overview The AMP1-16 Series monitors are capable of showing 16 level meters simultaneously along with a loudness indication. -
Page 53: Metering Menus
C h a pte r 3 Audio and Metering Le ve l M et er i ng Metering Menus The display of the level meters and related visual indications is determined as follows: The source for each of the 16 level meters is set in the Monitor The phase indicators are also Mixer Configuration Menu. -
Page 55: Video And Data
CHAPTER 4 Video and Data Introduction Overview This chapter describes how to configure the AMP1-16V-MD and AMP1-E16V-MD to display both video and data. Topics Topics Page Introduction Configuration Options 8 2 1 6 9 7 : A M P 1 - 1 6 V S e r i e s U s e r G u i d e... -
Page 56: Configuration Options
Co n fi gu r a ti on O p ti on s Configuration Options Overview The AMP1-16V-MD will display a variety of 3G, HD, and SD video formats. It supports two 3G SDI inputs that can be alternately selected. The selected SDI input is reclocked and output. -
Page 57: Video Menus
C ha p te r 4 Video and Data C on fi g ur a ti o n O p ti o ns Video Menus The display of the level meters and related visual indicators is determined as follows: Select the SDI source for video from the Configuration Selection Menu Select the format setting in the... -
Page 59: Efficiency Enhancements
CHAPTER 5 Efficiency Enhancements Introduction Overview This chapter describes the processes of creating presets and hot keys. These features allow you to configure the AMP1-16V-MD and AMP1-E16V-MD and then save those settings for immediate recall. Topics Topics Page Introduction Presets... -
Page 60: Presets
Ch a p te r 5 E ff ic i en cy E nh a n ce m e nt s Pr e se ts Presets Overview Modifying the menu settings allows you to configure the entire AMP1-16 Series monitor to function exactly the way you want it to for your specific application. -
Page 61: Naming Or Renaming
C ha p te r 5 Efficiency Enhancements P r es e ts From the , press the Configuration Selection Menu Recall Preset button to recall a preset. Rotate the Balance knob to select the desired preset, and then press the Balance knob. -
Page 62: Clearing A Preset
Ch a p te r 5 E ff ic i en cy E nh a n ce m e nt s Pr e se ts Press the button to initiate the knob for character Select Balance selection. Rotate the knob until the M is highlighted. Balance Press the knob to select the character. -
Page 63: Recalling A Preset On Power Up
Efficiency Enhancements H ot K e ys Recalling a Preset On Power Up After a power fail or deliberate power shutdown, you can define how the AMP1-16V-MD configures itself when power is restored. From the , press the Configuration Selection Menu... -
Page 64: Defining/Modifying A Hot Key
Ch a p te r 5 E ff ic i en cy E nh a n ce m e nt s H ot Ke ys in another. Note that both the mute and the solo functions allow you to select more than one channel. Defining/Modifying a Hot Key From the Configuration Selection Menu... -
Page 65: Creating A Preset Hot Key
C ha p te r 5 Efficiency Enhancements H ot K e ys When Channel 4 is highlighted, press the knob to select Balance Now rotate the Balance knob again until you highlight Channel 8. When Channel 8 is highlighted, press the Balance knob to select Use this same procedure to unselect any channels that are selected... -
Page 66: Copying Presets To Another Monitor
Ch a p te r 5 E ff ic i en cy E nh a n ce m e nt s Co p yi n g Pr e se ts to A no th er M o ni to r Press the button to display the Hot Key Menu... -
Page 67: Verifying Compatibility
C ha p te r 5 Efficiency Enhancements C op yi n g Pr e s et s to A no th er M o n it or Verifying Compatibility Important: If the two AMP1-16 Series monitors are not compatible, you should not attempt to copy the preset file. - Page 68 Ch a p te r 5 E ff ic i en cy E nh a n ce m e nt s Co p yi n g Pr e se ts to A no th er M o ni to r Figure 5–1 Unit Information Menu Unit Information Menu...
-
Page 69: Backing Up The Saved Presets
(plural) must appear in the filename. • The file’s extension must be .S19 Important: If the new filename does not meet the requirements listed in Step above, the AMP1-16V-MD Series monitor will not accept the file. Examples: Acceptable filenames: Unacceptable filenames: • My Presets.S19 •... -
Page 70: General Purpose Inputs And Outputs (Gpi/Os)
This concludes the entire preset copying procedure. General Purpose Inputs and Outputs (GPI/Os) The AMP1-16V-MD contains eight General Purpose Inputs (GPIs) and two General Purpose Outputs (GPOs). The inputs (GPIs) are detected as DC voltages between 12 and 24 VDC. Their action replicates the action of the hot keys on the front panel. -
Page 71: Turning Active Help On Or Off
C ha p te r 5 Efficiency Enhancements T u rn i n g A ct iv e H e l p O n or O ff but it is reserved for future functionality. The pin out of the GPI/O (inputs and/or outputs) connector is listed in Table 5–1 below. - Page 72 Ch a p te r 5 E ff ic i en cy E nh a n ce m e nt s T u rn i ng A cti v e H e l p O n or O ff Press the button to toggle the help display on the Active Help video monitor on or off.
-
Page 73: Chapter 6. Menu List
CHAPTER 6 Menu List Introduction Overview This chapter provides an in-depth description of all the features, specifications, and menus and all their respective options and functions. Note that the menus are listed alphabetically for easy reference. Topics Topics Page Menu Navigation Overview AES Output Configuration Menu Analog Output Configuration Menu Configuration Selection Menu... -
Page 74: Menu Navigation Overview
The configuration menus (shown in Figure 6–1 on page 67) appear on the AMP1-16V-MD and AMP1-E16V-MD to display information and to allow you to configure the operation of the monitor. 8 2 1 6 9 7 : A M P1 -1 6 V S e r i e s U s e r G u i d e... -
Page 75: Menu Tree
C ha p te r 6 Menu List M e n u N a vi g a ti on O v er v ie w Figure 6–1 Menu Tree Main Screen System Configuration Display Hot Key 1 Hot Key 5 Hot Key 2 Hot Key 6 Data Monitoring... -
Page 76: Aes Output Configuration Menu
Ch a p te r 6 M en u L i st A E S O ut pu t C on fi g ur a ti o n M e n u AES Output Configuration Menu Figure 6–2 AES Output Configuration Menu (Selected Sources) AES Output Configuration Menu AES Output =... - Page 77 C ha p te r 6 Menu List A E S O u tp ut Co nf i gu r a ti on M e nu affect each channel pair. Pressing this button highlights it. Subsequent presses toggle between for the selected channel pair.
-
Page 78: Analog Output Configuration Menu
Ch a p te r 6 M en u L i st A na l o g O u tp ut C o nf i gu r a ti on M e nu Analog Output Configuration Menu Figure 6–4 Analog Output Configuration Menu (Selected Sources) Analog Output Configuration Menu Analog Output =... - Page 79 C ha p te r 6 Menu List An a l og O u tpu t C on f ig u ra t io n M en u affect each channel pair. Pressing this button highlights it. Subsequent presses toggle between for the selected channel pair.
-
Page 80: Configuration Selection Menu
Ch a p te r 6 M en u L i st Co n fi gu r a ti on Se l ec ti on M e n u Configuration Selection Menu Figure 6–6 Configuration Selection Menu Configuration Selection Menu Recall a Preset Late Show Preset Management... -
Page 81: Cluster Configuration Menu
C ha p te r 6 Menu List C l us te r Co nf i gu r a ti on M e nu Cluster Configuration Menu Figure 6–7 Cluster Configuration Menu Cluster Configuration Menu Cluster Cluster Start Select Cluster Edit Default Label... -
Page 82: Dolby Setup Menu
Ch a p te r 6 M en u L i st Do l by Se tu p M e n u • Default 2-4-8: Pressing this button and then rotating the Balance knob selects two, four, or eight. Pressing the Balance knob reformats the screen to form:... -
Page 83: Hardware Configuration Menu
C ha p te r 6 Menu List H a r d wa r e Co nf i gu r a ti on M e nu • : When this option is selected, the Dolby Decoder Automatic will automatically detect and decode Dolby E or Dolby Digital signals, and will pass PCM signals. - Page 84 Ch a p te r 6 M en u L i st H a r dw a r e C on fi g ur a ti o n M en u • -20 dBFS = +4 dBu • -18 dBFS = +4 dBu •...
-
Page 85: Label Menu Screen
C ha p te r 6 Menu List L a be l M en u Scr e en Label Menu Screen Figure 6–10 Label Menu Label Menu Mine Mine Annc. Backspace Stm1 Jack7 Label: N_______________________ Three Msc. Music2 Revert Pair Channel Shift a b c d e f g h i j k l m... -
Page 86: Loudness Configuration Menu Screen
Ch a p te r 6 M en u L i st Lo ud n es s C o nf i gu ra t i on M e nu Scr e en Loudness Configuration Menu Screen This screen has two modes, as shown in Figure 6–11 below. -
Page 87: Main Screen
C ha p te r 6 Menu List M a i n S cr ee n • Loudness Window: This control is active only when Program Loudness Mode is selected. Pressing this button and then rotating knob adjusts the averaging time between values of 1 Balance second and 60 seconds by one second increments. - Page 88 Ch a p te r 6 M en u L i st M a i n S cr ee n Figure 6–12 Main Screen Dolby Logo Loudness Icon Dolby Pair Indicator Solo Solo Pair 1 Pair 5 Solo Solo Pair 2 Pair 6 Solo Solo...
-
Page 89: Main Screen Hot Key Button Configuration Menu
C ha p te r 6 Menu List M a i n Scr e en H ot Ke y B u tto n C on f ig u ra t io n M en u If a button is configured to be off (non-functional) it will turn gray. With the exception of the preset or off functions, pressing a button is automatically latching/momentary as controlled by the Options... -
Page 90: Meter Configuration Menu
Ch a p te r 6 M en u L i st M e te r Co nf i gu r a ti on M e nu • Pressing the knob while the highlight is over the button Balance label displays the Text Entry Menu . - Page 91 C ha p te r 6 Menu List M e te r C on f ig u ra t io n M en u Table 6–2 Audio Scale Specification Domains and Defaults Default Color Volume Default Ballistics Bounds Scale Lower Upper Default Lower...
-
Page 92: Monitor Mixer Configuration Menu
Ch a p te r 6 M en u L i st M o ni to r M i x er Co n fi g ur a ti o n M e n u • Lower Display Color: Rotating the knob after pressing Balance this button cycles the lower color of the displayed sample level... - Page 93 C ha p te r 6 Menu List M on i to r M ix e r Co nf i gu r a ti on M e nu • Speaker Assign: This button directs audio from the channel to the left, right, or both speakers.
-
Page 94: Option Configuration Menu
Ch a p te r 6 M en u L i st O p ti on C on fi g ur a ti o n M e n u Option Configuration Menu Figure 6–16 Option Configuration Menu Option Configuration Menu Exclusive Active Help Solos / Mutes... -
Page 95: Preset Management Menu
C ha p te r 6 Menu List Pr es e t M a n a ge m e n t M e nu Preset Management Menu When you enter this menu, all of the controls are set to affect the most recently recalled preset number. -
Page 96: Screen Display Menu
Ch a p te r 6 M en u L i st Sc re e n Di s p la y M e nu • Clear Preset: Pressing this button and then rotating the Balance knob allows you to select from any of the presets. Press the knob to erase the preset. -
Page 97: Screen Information Setup Menu
C ha p te r 6 Menu List S cr ee n In fo r m a ti o n S et up M e nu • Screen Information Menu: Displays Screen Information Setup Menu so you can set up and display a variety of parameters for the video screen. - Page 98 Ch a p te r 6 M en u L i st S cr ee n I n fo r m a ti o n S et up M en u • Video image • Data list • Left Screen: Pressing this button selects the left screen to be set up with the Displayed Data Data Text Color...
-
Page 99: Unit Information Menu
C ha p te r 6 Menu List U n i t I nf or m a ti on M e nu • Coding Mode • Center Mix Level • Surround Mix Level • Surround Mode • Low Frequency Effect •... - Page 100 Software Update Instructions ftp://0.0.0.0/ Unit S/W Info See also the instructions sent with the software update package provided by Wohler . Serial / Ethernet Info Once software updates are enabled , this screen will go blank. Unplug and then re-power the unit ENABLE FTP to halt the FTP server and cause it to restart .
-
Page 101: Chapter 7. Firmware Updates
CHAPTER 7 Firmware Updates Introduction Overview This chapter describes how to establish an Ethernet connection between a host computer and an AMP1-16V, and then how to update the AMP1- 16V’s firmware through that Ethernet connection. These steps will be described in detail in the following Topics: Note: It may prove useful to reprint this chapter every time you need to perform an upgrade, since several sections provide... -
Page 102: Upgrade Requirements
• Download the latest update package available from the Downloads tab in the AMP1-E16V-MD section of the Wohler website (www.wohler.com). Once downloaded, be sure to unzip the update package to a convenient location on the host computer, such as the Desktop. - Page 103 C om pa r i ng Fi r m w a r e V e rs i o ns If you haven’t already, unzip the update package downloaded from the Wohler website. Open the S19 Files folder in the package. It should look similar to this: Compare the versions in the S19 Files folder to the versions shown on the screen of the AMP1-16V.
-
Page 104: Upgrading The Netburner Software
Ch a p te r 7 F i rm w a re U pd a te s U p gr a di n g t he N etb u rn e r S of tw a r e Upgrading the Netburner Software Refer to Appendix A to establish a connection between the host computer and the AMP1-16V. - Page 105 C h a pte r 7 Firmware Updates U pg r a di n g th e N e tb ur n er So ft w a re Figure 7–2 AutoUpdate IP Address Input Dialog - Incomplete Click and locate the file in Browse AMP1_16_Vx.xx_APP.s19...
-
Page 106: Upgrading The Sub-Processor Firmware
Ch a p te r 7 F i rm w a re U pd a te s U pg r a di n g th e S ub -P ro ce s so r F i rm w a r e Figure 7–4 Autoupdate Confirmation Dialog Click... - Page 107 C h a pte r 7 Firmware Updates U pg ra d i ng th e S ub -Pr o ce ss o r F i rm w a re Figure 7–5 Unit Information Menu Unit Information Menu Application: AMP1-16-3G Hardware 1RU Hardware Unit S/W Info...
- Page 108 Ch a p te r 7 F i rm w a re U pd a te s U pg r a di n g th e S ub -P ro ce s so r F i rm w a r e Figure 7–6 FTP Location If you see the following dialog similar to the one in...
- Page 109 C h a pte r 7 Firmware Updates U pg ra d i ng th e S ub -Pr o ce ss o r F i rm w a re Figure 7–8 FTP Window Press the key to refresh the window. I m po r ta nt : You must refresh the file window after each of the following steps since Windows caches the file and folder information.
-
Page 110: File Transfer
Ch a p te r 7 F i rm w a re U pd a te s U pg r a di n g th e S ub -P ro ce s so r F i rm w a r e Figure 7–9 File Transfer Figure 7–7... - Page 111 C h a pte r 7 Firmware Updates U pg ra d i ng th e S ub -Pr o ce ss o r F i rm w a re Figure 7–10 Copy Completed Once an sub-processor has been reprogrammed, wait about 15 seconds, and press to refresh the window.
- Page 112 Ch a p te r 7 F i rm w a re U pd a te s U pg r a di n g th e S ub -P ro ce s so r F i rm w a r e 8 2 1 6 9 7 : A M P1 -1 6 V S e r i e s U s e r G u i d e ©...
-
Page 113: Features And Specifications
CHAPTER 8 Features and Specifications Introduction Overview This chapter lists the features and specifications of the AMP1-16V-MD and AMP1-E16V-MD. Topics Topics Page Introduction Features Specifications 8 2 1 6 9 7 : A M P 1 - 1 6 V S e r i e s U s e r G u i d e... -
Page 114: Features
Ch a p te r 8 F e a tur e s a n d S pe ci f ic a ti on s Fe a tu r es Features Product Benefits • Monitoring of up to 16 channels of embedded audio in a single, multirate SDI signal can be used in the most complex, multi-channel and surround applications. -
Page 115: Distinction Between Models
Ballistics Distinction Between Models The Dolby CAT552 hardware is included in the AMP1-E16V-MD, making it the first 1RU Wohler audio monitor with Dolby E, D, and Dolby Digital Plus built in. By contrast, the AMP1-16V-MD must have an additional hardware add-on installed before both the Dolby D and Dolby E protocols are available. -
Page 116: Compliance
Ch a p te r 8 F e a tur e s a n d S pe ci f ic a ti on s Sp ec i fi ca ti o ns Compliance All components comply with UL, CE, and RoHs specifications. Standards Loudness measurements comply with ITU-1770/1771 standards. - Page 117 C ha p te r 8 Features and Specifications S pe ci fi c a ti on s Table 8–1 Specifications (Continued) Specification Values/Domains Configurable Outputs: • AES/EBU output 8 unbalanced on high density DB-15 • Analog: 8 balanced channels configurable on DB25 •...
-
Page 118: Technical Functional Overview
Ch a p te r 8 F e a tur e s a n d S pe ci f ic a ti on s T e chn i ca l Fu n cti o na l O ve r vi e w Table 8–1 Specifications (Continued) Specification... - Page 119 C ha p te r 8 Features and Specifications T e ch n ic a l F un ct io n a l O v er v ie w Figure 8–1 AMP1-16 Block Diagram 8 2 1 6 9 7 : A M P 1 - 1 6 V S e r i e s U s e r G u i d e ©...
-
Page 121: Appendix 9. Establishing Connectivity
APPENDIX 9 Establishing Connectivity Introduction Overview This appendix explains how to establish an Ethernet link between a Windows host computer and an AMP1-16V by two different methods. Either method may be used. Topics Topics Page Introduction Connectivity Options Connecting to a LAN Connecting Directly Setting a Static IP in the AMP1-16V Setting a Static IP in a Windows XP Computer... -
Page 122: Connectivity Options
Connectivity Options The fastest and simplest way to establish connectivity to your AMP1-16V-MD Series monitor is through a LAN (local area network) that includes a DHCP server, which will provide Ethernet settings for both the host computer and the AMP1-16V automatically. The alternative is to set up a direct connection between the host computer and the unit through a crossover cable. -
Page 123: Setting A Static Ethernet Configuration
A p pe nd i x 9 Establishing Connectivity Co n ne cti n g t o a LA N Figure 9–1 NetBurner IPSetup Dialog - Unconfigured If multiple NetBurner modules appear in the box, be Select a Unit sure to note which IP address belongs to the AMP1-16V you wish to update. - Page 124 A pp en d ix 9 E s ta b li s h in g C o nn ec ti vi ty Co n ne cti n g t o a LA N Figure 9–2 NetBurner IPSetup Dialog - With IP Address and Net Mask Press the button and wait approximately 30 seconds.
-
Page 125: Connecting Directly
A p pe nd i x 9 Establishing Connectivity Co n ne cti n g D i re ct ly Connecting Directly This set of instructions describes how to connect a Windows PC directly to an AMP1-16V. Direct connections are not as easy to accomplish as network connections. - Page 126 A pp en d ix 9 E s ta b li s h in g C o nn ec ti vi ty Co n ne cti n g D i re ct ly Once the AMP1-16V has restarted, please remove the power cord once again.
- Page 127 AMP1-16V units, or reset the network interface in the computer between changes. If you cannot get a connection to the AMP1-16V, close the Wohler IP Setup Utility and wait a few minutes. Open it again, and try the button.
-
Page 128: Setting A Static Ip In The Amp1-16V
Setting a Static IP in the AMP1-16V In order to make a direct connection with units that have an Application Version earlier than 3.10, you must FIRST set a static IP in the unit. In order to do this, both the unit and the computer must be connected to a LAN. -
Page 129: Setting A Static Ip In A Windows Xp Computer
A p pe nd i x 9 Establishing Connectivity Se tti n g a St a ti c I P i n a W i n do w s X P C o m p ut er Setting a Static IP in a Windows XP Computer Open the Start menu and choose the Control Panel. - Page 130 A pp en d ix 9 E s ta b li s h in g C o nn ec ti vi ty Se tt in g a S ta ti c I P i n a W i n d ow s X P Co m p ut er Figure 9–5 Windows XP Local Area Connection Properties...
- Page 131 A p pe nd i x 9 Establishing Connectivity Se tti n g a St a ti c I P i n a W i n do w s X P C o m p ut er Figure 9–6 Windows XP IP Properties If there is any information in the fields above, write it here so the settings can be restored later: IP Address...
- Page 132 A pp en d ix 9 E s ta b li s h in g C o nn ec ti vi ty Se tt in g a S ta ti c I P i n a W i n d ow s X P Co m p ut er Figure 9–7 Set Windows XP IP Properties Press...
- Page 133 A p pe nd i x 9 Establishing Connectivity Se tti n g a St a ti c I P i n a W i n do w s X P C o m p ut er Your computer should have a network icon in the system tray that indicates the state of the network connection.
-
Page 134: Setting A Static Ip In A Windows 7 Computer
A pp en d ix 9 E s ta b li s h in g C o nn ec ti vi ty Se tt in g a S ta ti c I P i n a W i n d ow s 7 Co m p u te r Setting a Static IP in a Windows 7 Computer Open the Start menu and choose the Control Panel. - Page 135 A p pe nd i x 9 Establishing Connectivity S et ti n g a Sta t i c I P i n a W i n do w s 7 C o m p ut er Figure 9–9 Windows 7 PCI Card Properties Click on “Internet Protocol (TCP/IP)”.
- Page 136 A pp en d ix 9 E s ta b li s h in g C o nn ec ti vi ty Se tt in g a S ta ti c I P i n a W i n d ow s 7 Co m p u te r Figure 9–10 Windows 7 Internet Protocol Properties If there is any information in the fields above, write it here so you...
- Page 137 A p pe nd i x 9 Establishing Connectivity S et ti n g a Sta t i c I P i n a W i n do w s 7 C o m p ut er Connect the crossover cable between the computer’s Ethernet port and the unit’s Ethernet port (labeled as CMD NET on the back of the AMP1-16V).
- Page 138 A pp en d ix 9 E s ta b li s h in g C o nn ec ti vi ty Se tt in g a S ta ti c I P i n a W i n d ow s 7 Co m p u te r 8 2 1 6 9 7 : A M P1 -1 6 V S e r i e s U s e r G u i d e ©...
-
Page 139: Appendix 10. Setting Up File Transfers
APPENDIX 10 Setting Up File Transfers Introduction Overview This appendix explains how to set up the AMP1-16V-MD Series monitor to transfer files to or from a PC through an Ethernet connection. See Appendix 9 on page 113 for establishing connectivity to the PC. -
Page 140: Navigating To The Unit Information Menu
Software Update Instructions ftp://0.0.0.0/ Unit S/W Info See also the instructions sent with the software update package provided by Wohler . Serial / Ethernet Info Once software updates are enabled , this screen will go blank. Unplug and then re-power the unit ENABLE FTP to halt the FTP server and cause it to restart . -
Page 141: Enabling Ftp Access
Ap p en di x 1 0 Setting Up File Transfers E na b l in g F T P A c ces s Enabling FTP Access If the unit's graphics screens remain black after the unit has had power applied for more than thirty seconds, the unit is already in FTP mode. - Page 142 A pp en d ix 1 0 S et ti ng U p F il e T r a ns fe r s E n a bl i ng FT P A cce s s If the unit still fails to connect, double check all physical connections, and try using the IP Setup tool to discover the unit's IP address and...
Need help?
Do you have a question about the AMP1-16V-MD and is the answer not in the manual?
Questions and answers