
Related Manuals for Warmup 5iE


Summary of Contents for Warmup 5iE
- Page 1 The Smartest Smart Thermostat Installation Manual Technical Helpline 0345 345 2288...
-
Page 2: Table Of Contents
Components .......... 3 Safety Information ........4 Step 1 - Install Boiler Receiver ....7 Step 2 - Assembling the 5iE ....... 10 Step 3 - Paring and testing ....... 12 Step 4 - Review Installation ...... 14 User Guide Step 5 - Getting Started ...... -
Page 3: Components
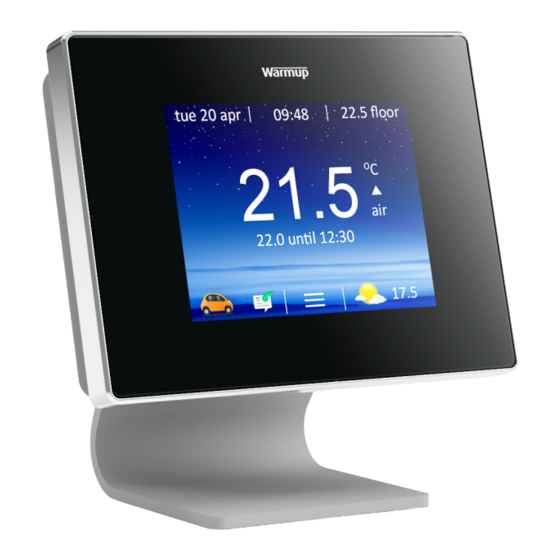
Pack Contents Components Thermostat Face Power Base Stand Power Adapter with 1m USB Cable Boiler Receiver... -
Page 4: Safety Information
Safety Information Safety Information IMPORTANT INFORMATION: Installation of the Boiler Receiver should only be carried out by a qualified electrician. It requires a permanent 230V supply. The Boiler Receiver should be connected to the central heating fused spur or circuit breaker in accordance with current wiring regulations such that there is a single point of isolation for all interconnected devices. - Page 5 Mounting/positioning Step 1 - Install Boiler Receiver Before making any permanent fixtures Warmup recommends progressing through to ‘Step 3 - Paring and Testing’ upon identifying preferred locations for the Boiler Receiver and Power Base. This will ensure the wireless connection is not subject to range or interference issues once installed.
- Page 6 Wiring Connections Step 1 - Install Boiler Receiver NOTE: For alternative installation configurations, see online at www.warmupsmart.com/installation...
-
Page 7: Step 1 - Install Boiler Receiver
Re-assemble Step 1 - Install Boiler Receiver Once the Boiler Receiver has been wired correctly, reattach the front panel to the back plate and tighten both screws to secure. Restore power to the Test the manual control boiler. The LED on the function (Page 8) Boiler Receiver will flash... - Page 8 LED Status Step 1 - Install Boiler Receiver LED Colour Status Meaning Not lit Paired Green Lit constantly Relay on Flashing slowly Not paired Flashing quickly Relay off Lit constantly Communication Lost Relay on...
- Page 9 Manual Control Step 1 - Install Boiler Receiver The Warmup 5iE has been designed to still provide heating control should communication between the Power Base and Boiler Receiver be interrupted. With the Power Base and Boiler Receiver paired and the Thermostat face calling for heat, the relay will be activated and the Boiler Receiver will show a constant green LED indication.
-
Page 10: Step 2 - Assembling The 5Ie
Stand Mounted Step 2 - Assembling the 5iE For optimal performance the Thermostat should be located in an area with good ventilation. It should not be beside a drafty window/door, in direct sunlight or above another heat generating device (e.g. radiator or TV). - Page 11 Wall Mounted Step 2 - Assembling the 5iE For optimal performance the Thermostat should be located in an area with good ventilation. It should not be beside a drafty window/door, in direct sunlight or above another heat generating device (e.g. radiator or TV).
- Page 12 Address Setup Step 3 - Pairing and Testing When using multiple 5iE’s, each Power Base should be set to a unique address to prevent interference. Use the dip switches on the power base to select the unique address for each 5iE.
-
Page 13: Step 3 - Paring And Testing
Paring Step 3 - Paring and Testing Before pairing, please make sure the Power Base and Boiler Receiver are powered. If the LED on the Boiler Receiver is not slowly flashing RED, indicating that it is ready to be paired, reset its pairing by pressing and holding the power button for 6 seconds. -
Page 14: Step 4 - Review Installation
17. It can be found in the Thermostat settings, by navigating the menus to go to: > settings > advanced settings > about > info Registering Ensure the MyHeating app has been downloaded and installed. Search ‘MyHeating by Warmup’... - Page 15 So the hard work is nearly over. All that remains is to register and setup your device by logging onto your MyHeating app or my.warmup.com to complete your installation. It is useful if you have a recent energy bill nearby for this.
-
Page 16: Step 5 - Getting Started
Getting Started Step 5 - Getting Started Depending on who has installed your 5iE, you will have one of the following screens visible. If you have anything other than the below screens, please press the standby button briefly on the underside of Thermostat Face. -
Page 17: Step 6 - Download 'Myheating' App
The MyHeating App is available for iOS and Android devices via the App Store or Google Play. If you have not done so already, download the MyHeating App to your tablet or smartphone. Search ‘MyHeating by Warmup’ Device Number When first registering and setting up your location on MyHeating, you will need the device number of the Thermostat. -
Page 18: Step 7 - Registration
Location A location needs to be setup before a room can be configured and the 5iE device registered. Creating a location is user friendly and easy to follow, it is advised to have details of your current energy tariff and pricing to hand, as these will be required for the energy monitoring features. -
Page 19: Step 8 - General Information
Ok, so you are now all set up and ready to go! Have you tested your wireless heating control yet? The 5iE will take approximately two weeks of learning your routines before it can set a customer schedule just for you. So at the moment, adjust the temperature as required, once the 5iE knows your routine, it’ll take over and keep you cosy. -
Page 20: Step 9 - Troubleshooting
Is the 5iE compatible with Due to the large number of different boiler systems this heating system? and wiring plans in use, Warmup cannot guarantee compatibility with a particular system. Compatible systems include Combi and System boilers with 230VAC, volt-free or low voltage input up to 3A. The boiler manufacturer or manual will be able to confirm if your boiler is compatible. -
Page 21: Technical Specifications
Technical Specifications Technical Specifications Power Base Dimensions (Assembled with Thermostat) 120 x 121.4 x 72.5mm Power Supply 5V DC, 300mA IP Rating IP30 Operational Temperature Range 0°C - 50°C Operational Humidity Range <95% RH Boiler Receiver Dimensions 86 x 86 x 26.5mm Power Supply 230V AC, 50Hz IP Rating... - Page 22 This warranty does not cover removal or re-installation costs, and shall not apply if it is shown by Warmup that the defect or malfunction was caused by failure to follow the instruction manuals, incorrect installation or damage which occurred while the product was in the possession of a consumer.
Need help?
Do you have a question about the 5iE and is the answer not in the manual?
Questions and answers