Table of Contents
Advertisement
Quick Links
HUNTING CAMERA
INSTRUCTION MANUAL
Model #: SL1008_Black IR
V0.4 For Europe Hunting
Camera Kit Contents
1. Hunting Camera.
2. Instruction Manual.
3. USB Cable
4. Mounting Strap.
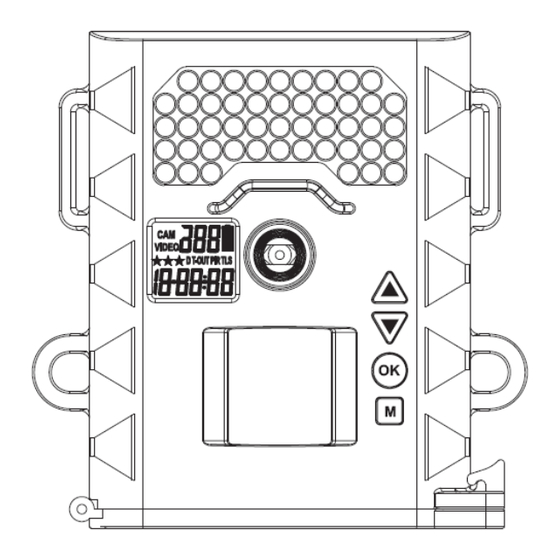
Camera Overview
Front View
TABLE OF CONTENTS
Camera Kit Contents........................................ 3
Camera Overview............................................. 3
General Information........................................ 5
Definitions......................................................... 6
Quick Start Guide............................................. 10
Battery and Memory Installation................... 12
Camera Setup and Program........................... 14
Setting up the Camera in Field....................... 24
Using the Camera in Time Lapse Mode........ 29
Viewing and Deleting Files............................. 30
Technical Specifications................................. 34
FCC Compliance............................................... 37
2014. June
3
Bottom View
Bottom View (After Open Cover)
2
4
Advertisement
Table of Contents

Subscribe to Our Youtube Channel
Related Manuals for annke SL1008


Summary of Contents for annke SL1008
-
Page 1: Table Of Contents
TABLE OF CONTENTS HUNTING CAMERA Camera Kit Contents…………………………….…… 3 Camera Overview…………….……………………….. 3 General Information……………………………….… 5 Definitions………….…………………………………….. 6 Quick Start Guide……………………………………… 10 Battery and Memory Installation…………….… 12 Camera Setup and Program……………….…..14 Setting up the Camera in Field……….….……… 24 Using the Camera in PIR Detection Mode.… 27 Using the Camera in Time Lapse Mode…….. -
Page 2: General Information
General Information Definitions Storing conditions Definitions of Front View parts • • Operating Environment: 14 to 104 deg F (-10 to 40 deg C). Infrared LED : It is invisible light for night time capture. 20-85% relative humidity, non-condensing. • Strap Holes : It is to attach the camera to pillar or tree by Special care instructions !! provided strap. -
Page 3: Quick Start Guide
Quick Start Guide • : It indicates the still image/video resolutions. Image resolution is 12Mp. This guide is designed to get you up and running in a matter of moments. To get the most out of this HUNTING CAMERA tools, Image resolution is 5Mp or video resolution is please read the manual thoroughly before operating. -
Page 4: Camera Setup And Program
And once memory up to full, the camera will show FULL, camera Camera Setup and Program will stop the capturing. When the camera switch is first turned in the A or B or MANUAL Inserting SD memory card location, the status display shows the camera status. The •... - Page 5 • • The word PIR will be blinking, press [OK] to confirm the Press [OK] then press the [UP] or [DN] button to select camera’s operation is PIR detection. the desired resolution. • • Press [UP] or [DN] button until the word CAM is blinking. Press [OK] to save your selection, then T and V will blinking to indicate you into the time of video length •...
-
Page 6: Setting Up The Camera In Field
• Your camera can be set the program for a pre-determined time After completing the start time setting, camera will go period [such as 19:00 to 07:00]. And then sets the frequency of into Time Lapse Mode "End Time" setting. still images only (video function not available in Time Lapse •... -
Page 7: Using The Camera In Pir Detection Mode
(Example: Mounting) Aims Your Camera Your Camera built with a laser beam to indicate the Positive Infrared Sensor detection coverage area and the capture area, please follow below operations to test that area. • After mounting the camera to pillar or tree by provided supplied mounting strap, and installing batteries. -
Page 8: Using The Camera In Time Lapse Mode
Using The Camera In Time Lapse Mode Viewing and Deleting Files • The camera offers the user different options for viewing their Mount the camera to the tree or wall or other sturdy images. You can view images or videos through either on your object using supplied mounting strap. -
Page 9: Technical Specifications
d-ALL (Delete ALL) - Deletes ALL images on the SD card. TV Out System Settings: • Press the [M] button once. Ft (Format) - Deletes all files and reformats the SD card. • • The word “ tu ” on the camera’s internal screen will be Press [OK] to confirm your selection. -
Page 10: Fcc Compliance
Version Update: DO NOT PRINT THIS PAGE TO MANUAL FCC Compliance R0.0: Preliminary issue. This equipment has been tested and found to comply with the limits for Class B digital device, pursuant to part 15 of the FCC R0.1: Amend the mistake of FOR VIEWING ON YOUR HOME TV Rules.
Need help?
Do you have a question about the SL1008 and is the answer not in the manual?
Questions and answers