AEM 30-3350 Setup And Installation Manual

AEM 30-3350 Setup And Installation Manual

Multi-input water/methanol injection kit

Advertisement

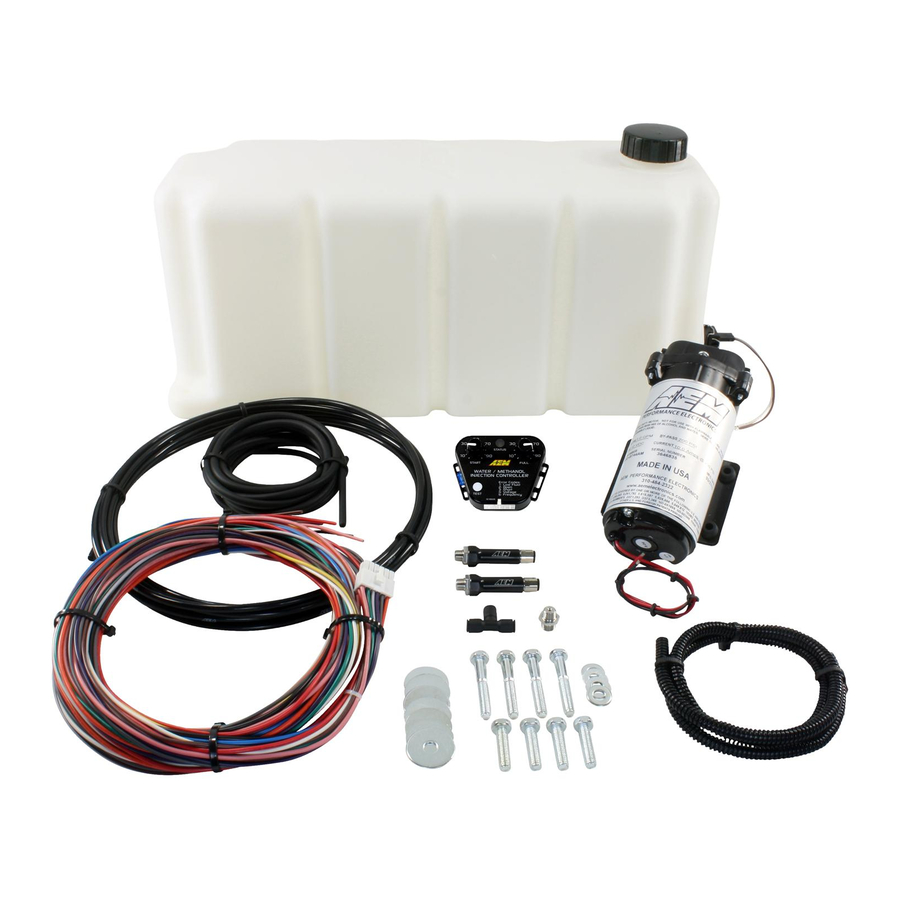
Multi-Input Water/Methanol
P/N 30-3350, 30-3351, 30-3352
Improper installation and/or adjustment of this product can result in
major engine/vehicle damage! Use of this injection system requires
proper tuning! Use this system with EXTREME caution! If you are
!
uncomfortable with anything about this, please refer the installation to
an AEM trained tuning shop or call 800-423-0046 for technical
assistance. You should also visit the AEM Performance Electronics
Forum at http://www.aempower.com
NOTE: AEM holds no responsibility for any engine damage that
results from the misuse of this product!
This product is legal in California for racing vehicles only and should never be used
upon a highway. This product is legal solely for vehicles used in competition which
may never be used upon a public road or highway
Injection Kit
WARNING:
ADVANCED ENGINE MANAGEMENT INC.
th
2205 126
Street Unit A, Hawthorne, CA. 90250
Phone: (310) 484-2322 Fax: (310) 484-0152
http://www.aemelectronics.com
Instruction Part Number: 10-3350 Rev A
 2013 Advanced Engine Management, Inc
Page 1

Advertisement

Table of Contents
loading
Need help?

Need help?

Do you have a question about the 30-3350 and is the answer not in the manual?

Questions and answers

Subscribe to Our Youtube Channel

Summary of Contents for AEM 30-3350

  • Page 1 Use this system with EXTREME caution! If you are ! uncomfortable with anything about this, please refer the installation to an AEM trained tuning shop or call 800-423-0046 for technical assistance. You should also visit the AEM Performance Electronics Forum at http://www.aempower.com...
  • Page 2: Table Of Contents

    Solenoid Driver (optional) ......................20 Non-Progressive Operation (optional) ..................20 Engine Tuning ..........................20 Important Safety Notice Regarding Methanol ................21 Cold Weather Operation ......................21 Maintenance ..........................21 Optional System Upgrades ......................22 AEM Electronics warranty ......................23 Page 2...
  • Page 3: Introduction

    Introduction Congratulations on your purchase of the AEM Water/Methanol Injection Kit. This document will help guide you through the setup and installation process. Please take the time to review its contents prior to installation. Pay especially close attention to any bolded text, as it indicates an important note, or step in the process.
  • Page 4: Installation

    Installation Diagram NOTE: THIS KIT INCLUDES NEW STYLE INJECTOR NOZZLES THAT HAVE INTERNAL CHECK VALVES. AN EXTERNAL CHECK IS NO LONGER NEEDED OR INCLUDED IN THIS KIT. Page 4...
  • Page 5: Installation Checklist

    □ Flush Tank o Connect the remainder of hose to pump. (DO NOT CONNECT NOZZLE) o Fill Tank with Water (AEM recommends using Distilled Water). o Turn on key power to power on controller. o Use Test button on controller to flush the tank into a separate container.
  • Page 6: Pump And Tank Install

    Pump and Tank Install Find a suitable location to mount the tank and pump. The tank should be mounted such that it is below the injection point. The tank and pump must be mounted in the same area. Pump may be mounted on exterior of vehicle but should be mounted away from wheel wells or other areas where it will come into direct contact with water or road debris.
  • Page 7: Controller Install

    Take note of the direction of flow, indicated by the arrows on the pump body, when mounting the pump. Use four #8 sheet metal screws along with the 4 small washers or the #8-32 bolts and nylock nuts to mount the pump. The pump can be mounted in any position horizontally or vertically. Once the tank and pump are mounted, cut the appropriate length of tubing needed to connect the outlet fitting on the tank to the inlet fitting on the pump.
  • Page 8: Progressive Controller Installation

    Progressive Controller Installation Pin # Description Wire** Color Connection Pump Ground Orange Connect to ground (black) wire of pump. LED - Gray Connect to ground (black) wire of external LED. LED + Violet Connect to positive (red) wire of external LED. 1.5A Low Side output.
  • Page 9: External Map, Injector Duty, Maf Overview

    External MAP, Injector Duty, MAF overview The connection of the External MAP/MAF pin will depend on the desired mode of operation. Please follow the table in determining where to connect this wire. Mode of operation Dip Switch Settings Pin Installation location MAF / MAP (0V-5V) ON –...
  • Page 10: External Map 0-5V Installation

    The 0 – 5 Volt external MAP mode is designed for vehicles running high boost, beyond that of the Internal and HD models, or for users who already have a sensor or output of their MAP with a range of 0 – 5 Volts. See Table 1 for compatible AEM MAP sensors. Dip Switch Settings: ON –...
  • Page 11: Injector Duty Installation

    Injector Duty Installation Operation: The Injector Duty mode is designed for vehicles where water methanol injection rate is desired to be highly coupled to the injector duty, meaning the more fuel the more water methanol. This mode can be used when MAF is not available, or in NA vehicles. Injector duty is NOT intended to work with diesel or other multi-pulse injection systems.
  • Page 12: 0-5V Maf Installation

    0-5V MAF Installation Operation: The 0 – 5 Volt MAF mode is designed for vehicles where MAF is used and the output of their MAF sensor is 0-5V and not a frequency. Dip Switch Settings: Mode Common Applications DIP Switches VW/Audi 1.8T 0 - 5 Volt ON –...
  • Page 13: Frequency Maf Installation

    Frequency MAF Installation Operation: The Frequency MAF mode is designed for vehicles where MAF is used and the output of their MAF sensor is digital and a frequency. Dip Switch Settings: Mode DIP Switches Common Applications Frequency MAF OFF – ON – OFF 1993 and older GM (40Hz - 220Hz) Frequency MAF...
  • Page 14: Pump/Tank Flush

    Pump/Tank Flush After all wires are hooked up, add water to the tank and with the hose pointed into a container, press and hold the “TEST” push button on the controller module. The “TEST” button can be used to test the system. The pump speed will gradually increase from zero to full speed over 3 seconds, and then remain full for another 3 seconds before stopping.
  • Page 15: Nozzle Mounting

    Nozzle Mounting Select the location where the nozzle will be installed. Nozzle should be mounted such that it is higher than the tank. Nozzle must be mounted before the throttle plate. Nozzle should also be mounted after the MAF sensor if present. Nozzle must also be mounted after any intercoolers.
  • Page 16: System Errors

    System Errors The controller will continuously check for errors; when an error is detected it will be reported to the user by a flashing sequence of the external LED, as well as a corresponding red flashing sequence of the status LED. Damage to vehicle or engine may occur if these faults are not resolved immediately.
  • Page 17: Troubleshooting Diagram

    Troubleshooting Diagram Page 17...
  • Page 18: Controller

    Controller Settings The AEM Water Methanol Injection Controller is a progressive type controller. This means that fluid will be injected in proportion to the amount of boost that is detected by the external MAP input. In other words, higher signal input equals more fluid. It is therefore imperative that the external signal connection be made properly and securely or vehicle/engine damage could occur.
  • Page 19: Fuse

    Repeating this operation will toggle between the two modes. A More Linear Flow Output AEM’s Water/Methanol Injection system delivers a linear flow rate as pump speed increases. This is unlike competitors’ systems that simply have a linear pump speed drive between start and full settings which results in a non-linear delivery of water/methanol.
  • Page 20: Boost-Safe Output (Optional)

    1.7 amp switched ground. This wire can be hooked up to a solenoid that will vent waste gate pressure when activated. Apply 12v to the other side of the solenoid (AEM P/N 30-2400 or equivalent). This output can also be used to trigger a timing retard function in a standalone ECU or a CDI whenever the system runs out of fluid, thus protecting your engine.
  • Page 21: Important Safety Notice Regarding Methanol

    However, the safety issues are very real and far outweigh any perceived benefit of running high concentrations of methanol. Note: AEM holds no responsibility for any engine damage or personal injury that results from the misuse of this product, including but not limited to injury or death caused by the mishandling of methanol.
  • Page 22: Optional System Upgrades

    Available in max flow rates of 500 cc/min or 1000 cc/min with a black or white face. The AEM water/methanol injection filter is HIGHLY RECOMMENDED when using this flow gauge.
  • Page 23: Aem Electronics Warranty

    Any AEM electronics product can be returned for repair if it is out of the warranty period. There is a minimum charge of $50.00 for inspection and diagnosis of AEM electronic parts. Parts used in the repair of AEM electronic components will be extra.

This manual is also suitable for:

30-335130-3352

Table of Contents

Save PDF