Table of Contents
Advertisement
Advertisement
Table of Contents

Related Manuals for Gnet GN700


Summary of Contents for Gnet GN700
- Page 1 1CH Wi-Fi SMART DASH CAM USER MANUAL G-NET SYSTEM l...
-
Page 2: Table Of Contents
CONTENTS - HOW TO CHECK RESULT OF TAMPER CHECK BEFORE USE - RECORDING MODE - VOICE GUIDANCE CAUTION FOR SAFE USE ・・・・・・・・・・・・・・・・・・・・・・・・・・・・・・・・・・・・・・・・・ MEMORY CARD VIDEO FOLDER ・・・・・・・・・・・・・・・・・・・・・・・・・・・ CAUTION FOR MEMORY CARD ・・・・・・・・・・・・・・・・・・・・・・・・・・・・・・ PRODUCT FEATURES ・・・・・・・・・・・・・・・・・・・・・・・・・・・・・・・・・・・・・・・・・・・・・・・・ PC VIEWER FUNCTION COMPONENT ・・・・・・・・・・・・・・・・・・・・・・・・・・・・・・・・・・・・・・・・・・・・・・・・・・・・・・・・・・・・・・・・ - BASIC COMPONENT / OPTIONAL PRODUCTS PC VIEWER INSTALLATION ・・・・・・・・・・・・・・・・・・・・・・・・・・・・・・・・・・・・・... -
Page 3: Before Use
BEFORE USE All copyrights reserved to GNET SYSTEM. If you take illegal action(copy, modification, distribution) without prior consent by GNET SYSTEM. GNET SYSTEM will apply legal sanctions. Do not shock and insert foreign material. Video quality and GPS signal reception may be affected by dark tint or special windshield. Refrain from dark tint or special windshield. -
Page 4: Caution For Memory Card
- Recommend you to format memory card through SD formatter program (www.sdcard.org). Highly recommend to use genuine Gnet memory card. If you use other brand's SD card with dash cam, compatibility problem would be faced with Dash cam. Support memory card Minimum: 4GB, Maximum: 128GB. -
Page 5: Product Features
PRODUCT FEATURES BEFORE USE Voice Guide & Record Support CMOS Sensor Built-in Microphone Wi-Fi function : Communication with your IOS & Android Device Check Video/ Download to Smart device / Configuration 1920x1080 Full HD / Update latest Firmware Super Clear Image Quality *Communication distance: 3m~5m Depending on environment, communication distance would be affected Memory Auto Recovery System... -
Page 6: Component
Basic Components FULL HD 간단설명서 rev01 본 간단 설명서는 GN700을 사용하기 위한 가장 기본적인 내용만을 다루고 있으며, GN700에 대한 상세한 내용은 지넷시스템 홈페이지(http://www.gnetsystem.com) > 고객센터 > 다운로드에서 사용자 설명서를 다운로드해 상세 내용을 확인 후 사용하시기 바랍니다. Main Camera(Including bracket) Direct power cable... -
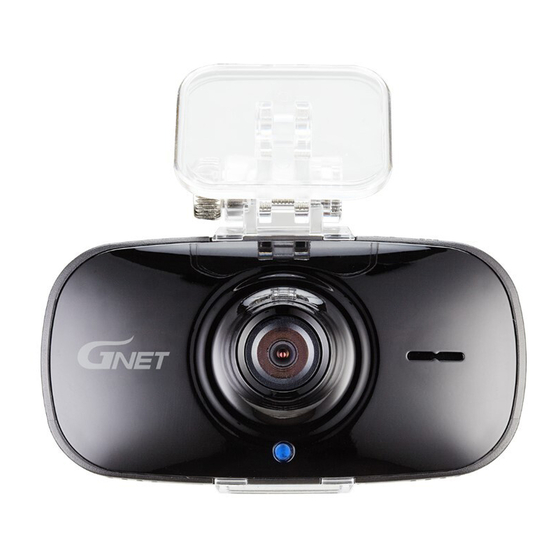
Page 7: Name Of Each Part
NAME OF EACH PART BEFORE USE Front / Back Left / Right side DC-IN External GPS terminal When device is power on, Speaker it will start normal Wi-Fi USB Slot recording Camera lens Security LED Wi-Fi button for registration Wi-Fi Stanby mode last Micro SD Memory for 2mins, it will be released card Slot... -
Page 8: Specification
SPECIFICATION BEFORE USE Image Sensor Full HD CMOS Sensor Audio input Built-in Microphone Video Compression H.264 Audio Compression ADPCM Resolution Full HD 1080P(1920x1080) Max. 30fps Wi-Fi Standby mode for mobile registration. G-Sensor Event recording by External Shock Voice Guide(Speaker) Operation Status alarm / Voice guidance External GPS Sensor Synched with Google map, Keep track of location and Speed Lens... -
Page 9: Installation
INSTALLATION BEFORE USE How to install Dash cam Assemble the Front cam with a bracket. Until the hook is located on right place with coming sound of click according to the order (①,②). ① ② Put Memory card into Memory card slot then detach adhesive tape. - Page 10 BEFORE USE Install cam to Front windshield, then adjust the right angle position. Front angle may be different depend on car brand & model. Connect direct power cable to Fuse box in car. * Please refer to next page for hard wire installation.
- Page 11 BEFORE USE BEFORE USE Arrange power cable with cable holder for safe driving condition. Constant power cable ※Caution : few car navigations may face GPS reception of interruption. When installing Power cable and External GPS cable. Recommend installing each cable in the opposite direction. For instance, Power cable is toward driver seat and External GPS cable is toward passenger seat.
-
Page 12: Fuse Cable Connetion
BEFORE USE Fuse cable Connetion Fuse box s location inside of car is different depend on brand and car model, user be informed that need to contact shop and mechanic for ’ installation. Our company is not responsible for any personal carelessness. Find Fuse box inside of car and then, Open up cover to find Fuse. - Page 13 BEFORE USE GND wire need to be connect to ground in car (Do not connect the volt which is connected to Dash board) Start Dash cam to check the operation, neatly arrange the cables With Front cam. The colors of wires VCC, ACC, GND may be different. Please check Product manual before installation.
-
Page 14: How To Insert Memory Card
BEFORE USE How to Insert Memory card Before use memory card, you should be aware of caution as below. Misplaced memory card causes defective which can’t record any video data. Therefore, please Insert memory card into right place with right position.. In case that first use Memory card or after format, memory card will be standby mode for 3min ~ 5min to Copy JDR File system and inspect Memory card. -
Page 15: Basic Function
HOW TO USE BASIC FUNCTION HOW TO USE - After power on, all of LEDs with camera will be on. Power on - Start normal recording with voice guidance “start recording” - If there is no GPS module with cam, GPS LED is not on. Power off - If power cable is removed from dash cam, all LEDs will be off. -
Page 16: Tamper Check
BASIC FUNCTION Tamper check If user press Wi-fi button for 5 seconds or more, the Tamper check will be started with voice guidance. All of recording files in SD card will be verified through inspection, there will be buzzer sound every time each file is completed. When it detects tampered recording file, the log record will be saved as designated directory(sdroot/config/tamper.txt) The result of tamper check will be notified to user with Voice guidance. -
Page 17: How To Check Result Of Tamper Check
BASIC FUNCTION How to check result of Tamper check Put Memory card Reader into PC after removing Memory card from Device. And, open the “Config” folder. Open the “Tamper.txt” file in the “Config” folder. log.txt system.cfg version.ini Tamper.txt You can check the log record when the file is opened. [TAMPER_RESULT] [File name] = [Tamper check status] 00000000.jdr=Tamper Detection... -
Page 18: Recording Mode
BASIC FUNCTION Recording Mode Automatically normal recording is initiated. Normal Record Security LED will blink every 2 seconds. Any impact on dash cam is detected by internal sensor, dash cam record videos as event recording Event Record Impact Record mode with LED blinking. After event record is finished, normal record will be initiated. -
Page 19: Voice Guidance
BASIC FUNCTION Voice guidance Contents Voice guide Normal recording Start recording. System off Shut down the system. Already registered Already registered smart phone. Battery off Shut down the system to protect the battery of car. Error of capture Video is not being entered. Disable registration Stand-by mode for the registration is released. - Page 20 BASIC FUNCTION Voice guidance Contents Voice guide Recording start Start recording. Registration complete Complete the registration. Registration Wi-Fi via a smart phone Press the Wi-Fi button to register a smart phone. Memory card damage Reboot because of the damaged memory card. Please replace the memory card if this occurrence continues. Memory card format On formatting the memory card.
-
Page 21: Memory Card Video Folder
MEMORY CARD VIDEO FOLDER BASIC FUNCTION Removing Memory card after device is perfectly off. Please put the memory reader with SD card into USB port of PC. Select removal disk in “My computer” - If there is a configuration about event capacity which is over 10% by viewer or application, Event folder is created in SD card. Please do not manually format memory card. - Page 22 BASIC FUNCTION ※ Recording time (Default: 30fps) : 8GB(150mins), 16GB(5hrs), 32GB(10hrs), 64GB(20hrs), 128GB(40hrs) Log.txt : It records device's statement as text file. Config (Manage system) Version.ini : State version information about device. Recording files are located. The number of recording files are different depend on memory capacity. Data (Normal recording) And, fake files in SD card are existed to secure space in advance after initialization.
-
Page 23: Pc Viewer Function
PC VIEWER INSTALLATION PC VIEWER FUNCTION To play the Full HD resolution, the specification of PC should be over CPU-Dual 2.0G, RAM -2G, VGA-256M. If the specification of PC is lower than standard, it is possible to happen ‘No play-back’ or ‘disconnect’ There is no viewer program in SD card for the first time usage or get formatted by formatter. - Page 24 PC VIEWER FUNCTION Double click the "Viewer.exe" file in Memory card to install GNET viewer program as picture shown. Click the "Yes" button on the user control menu. Click the "Next" button after select the installation.
- Page 25 PC VIEWER FUNCTION Confirmation pop-up window appears if there is internet condition as picture shown. If there is no internet connection, Gnet viewer program will be executed directly. Press “Execute a viewer” button to start viewer program. When the installation is completed, the program runs automatically and Gnet icon will be created on your PC.
-
Page 26: Pc Viewer Menu
PC VIEWER MENU PC VIEWER FUNCTION Playback Recording Reverse Play, Normal Play ◀ Pause Repeat event Step Reverse, Step ◀ ◀ 1 Frame Play ◀ ◀ ◀ ◀ Speed meter Available only when installed GPS. Video Control Thumbnail Drawing a lane Print Recording File list G-Sensor(Acceleration) Graph... - Page 27 PC VIEWER FUNCTION How to check the G-sensor data When play the video, you can check the G-sensor data of X-axis (direction), Y-axis (left and right), Z-axis (height). <Enlarge G-sensor Data> Location where video is playing Data and graph (G-sensor data)
-
Page 28: Wi-Fi Connection With Smartphone
WITH SMARTPHONE Precaution for Wi-Fi connection It provides Android and IOS platform. Please search “GNET” on Google play store or Apple App store. Real time recording and playback via Wi-Fi may be delayed depend on specification of Smart device. Do not use camera while driving, it may cause some serious accident. Please operate camera after parking in Safety place Wi-Fi I USB dongle is optional product. -
Page 29: Wi-Fi Connection & Function
How to connect – Android Execute GNET app icon after installation to smart device. The screen of GNET app is horizontal mode. The message to guide you to register dash cam will show up at the first time. If select “No” to terminate the application or select “Yes”... - Page 30 WI-FI CONNECTION WITH SMARTPHONE Press the Wi-Fi registration button of product, there will be voice guidance “Stand- by mode for the registration” and select the product in the list to register. If you want to research dash cam, Press “Search” button. 2 minutes for registration standby mode and If the time is over, there will be voice guidance “Stand-by mode for the registration released”...
- Page 31 WI-FI CONNECTION WITH SMARTPHONE Simple and easy setup with application by smartphone. Press save button, dash cam will reboot to apply new configuration. Move to registration page if click “Add” icon. Real time recording shows if click “Connect” icon after registration. Delete registered product if click “Delete”...
-
Page 32: How To Connect / Use(Ios)
WI-FI CONNECTION WITH SMARTPHONE How to connect – iOS Execute GNET app icon after installation to Smart phone. Turn on Wi-Fi function of Smart phone. Select “GNET_BB_GN700_XXXXX” in Wi-Fi list. Put [qwertyuiop] in the password window and touch the “Join” button. - Page 33 WI-FI CONNECTION WITH SMARTPHONE Press the Wi-Fi registration button of cam to activate register standby mode. (Voice guidance: “Stand-by mode for the registration”) Maintenance time of register standby mode is 2 minutes. If there is no connection of Wi-Fi, The voice guidance “Stand-by mode for the registration is released”...
- Page 34 WI-FI CONNECTION WITH SMARTPHONE Check Real time recording. Playing record files in list which is organized on the timeline. User can play video file. Setup the product via smart phone easily if touch the “Settings” icon. It will be rebooted once when press save button after finishing setup. If you touch the “help”...
-
Page 35: Warranty Card
Warranty Card Product GNET Dash cam Model GN700 Serial Number Purchasing date Name Consumer Address Vendor 1 year since purchasing date (It date not confirmed by receipt, manufacturing date + 2 Months) Period of free guarantee Camera : 1 year, Micro SD Memory card, Accessory : 3 months This product is manufactured through a process of strict quality confirm and inspection. - Page 36 www.gnetsystem.com 6F Lotte IT Castle II Gasan Digital 2ro 98, Geumcheon-gu, Seoul, Korea...
Need help?
Do you have a question about the GN700 and is the answer not in the manual?
Questions and answers