
Related Manuals for Gnet GI700


Summary of Contents for Gnet GI700
- Page 1 USER MANUAL G-Net system DASH CAM Read user manual carefully in order to protect the user’s safety and ensure the accurate use of the product...
-
Page 2: Table Of Contents
CONTENTS G-Net system DASH CAM BEFORE USE WI-FI CONNECTION WITH iOS AND ANDROID 11. BEFORE WI-FI CONNECTION CAUTION FOR SAFE USE ··········· 01 ··········· 35 12. WI-FI CONNECTION & CAUTION FOR MEMORY CARD ··········· 02 ··········· 36 FUNCTION 01. PRODUCT FEATURES ···········... -
Page 3: Caution For Safe Use
G-Net system DASH CAM Check ▶ All copyrights reserved to GNET SYSTEM. ▶ If you take illegal action(copy, modification, distribution) without prior consent by GNET SYSTEM. GNET SYSTEM will apply legal sanctions. Do not shock and insert foreign material. Video quality and GPS signal reception may be affected by dark tint or special windshield. -
Page 4: Caution For Memory Card
Please purchase genuine Gnet memory card for preventing incompatibility problem Warranty of memory card is covered only when using genuine memory card which is designated and supplied by GNET SYSTEM. When car accident, recommend get memory car out of Dash cam. Then save video data to your computer. -
Page 5: Product Features
1. PRODUCT FEATURES G-Net system DASH CAM CMOS Sensor Voice Guide & Record Support Super Clear Image Quality Built-in Microphone Front : Full HD 1080p Wi-Fi function : Communication with your Rear : Full HD 1080p iOS & Android Device Check Video/ Decent Video Quality Save Video to your device/ Change setting /Update latest Firmware... -
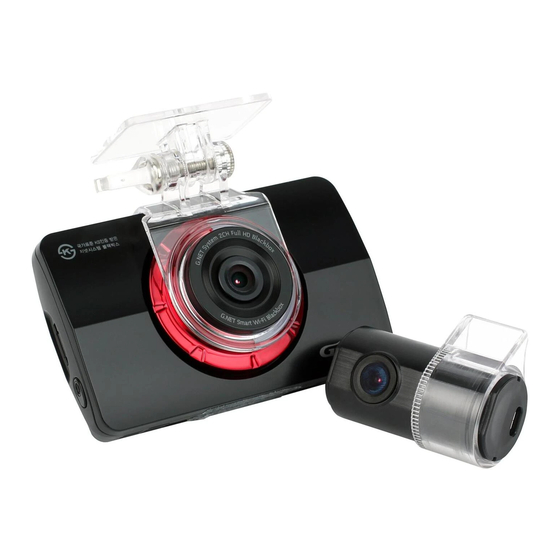
Page 6: Component
※The image of components may be different from the real components. ※Specifications and Components are subject to change without notice for improving quality. ※Highly recommend using Gnet Genuine Memory External GPS Cigar jack power Cable Wi-Fi dongle card that Gnet supplied. -
Page 7: Name Of Each Part
3. NAME OF EACH PART G-Net system DASH CAM ·Front Cam ·Rear cam ⑩ DC-IN ⑪ Rear cam connection terminal ⑫ External GPS connection terminal ① LED ② Camera lens ③ Front cam connection terminal ① Micro SD Memory card Slot ③... -
Page 8: Specification
4. SPECIFICATION G-Net system DASH CAM Image Sensor Full HD CMOS Sensor Audio input Built in Microphone Video Compression H.264 Audio Compression ADPCM Resolution Front cam : Full HD(1920x1080) / Rear cam : Full HD(1920x1080) Front cam : Max 30fps, Rear cam : Max 30fps Wi-Fi Communication with your iOS &... -
Page 9: Installation
5. INSTALLATION G-Net system DASH CAM ·How to install the Dash cam Connect direct power cable to Fuse box in car. Assemble the Front cam with a (Connect Power cable and Rear cam connection cable in each terminal.) bracket. Until come sound of click according to the order (①, ②) ※... - Page 10 5. INSTALLATION G-Net system DASH CAM ·How to install the Dash cam Tuck Power cable and Rear cam connection cable to roofline and pillar. ※ Caution : few car navigations may face ※ Caution of installing Dash cam. GPS reception of interruption. When installing Power cable and Rear cam connection cable.
-
Page 11: Fuse Cable Connection
6. Fuse cable Connetion G-Net system DASH CAM * Fuse box’s location inside of car is different depend on brand and car model, user be informed that need to contact shop and mechanic for installation. Our company is not responsible for any personal carelessness. Find Fuse box inside of car and then, Open up cover to find Fuse. -
Page 12: How To Use
7. HOW TO USE G-Net system DASH CAM ·HOW TO USE - All LED lights will lit when starting up your vehicle. Power On - Recording starts with the voice guidance, "Start recording." Only red recording LED will lit. - Blue GPS LED will lit only if cam is connected with GPS unit. - Press the power button on the side, 'power off' button on the LCD screen or plug out the Power Off power cable. - Page 13 7. HOW TO USE G-Net system DASH CAM ·How to use LCD - SETUP Main Screen After Voice guide of "start recording" comes out, dash cam shows LCD screen as below. Play Play recorded video. After Screen is turned off, LCD off then touch LCD anywhere, LCD would be turned on.
- Page 14 7. HOW TO USE G-Net system DASH CAM ·How to use LCD - SETUP 1. Video play When touch the play button, recorded video list is shown. Organize video type list (Normal and Event) by touching top tab. Touch one of the recorded video files, the video will be played. Once touch left and right arrow, it moves to the next video list page or previous video list page.
- Page 15 7. HOW TO USE G-Net system DASH CAM ·How to use LCD - SETUP Move to initial Screen when touch home or back icon. ※Enlargement In case that checking exactly specific part on video, keep touching where you want. Then it shows Enlarged screen. After playing video, touch anywhere except on function icon.
- Page 16 Able to move Setup Screen by Touching Setup button. Able to set Brightness, resolution, Event (FPS), Normal (FPS) by touching Front, Rear button at Setup screen. The default resolution of GI700 is 1080P (Front) and 1080P (Rear).
- Page 17 7. HOW TO USE G-Net system DASH CAM ·How to use LCD - SETUP ① Able to set Resolution, Brightness, Event(FPS), Normal(FPS), Night Vision, after touching Front Setting. ※ Night Vision – If it is on, the brightness of Dash cam at night will be bright.
- Page 18 7. HOW TO USE G-Net system DASH CAM ·How to use LCD - SETUP Set Date/time, Auto rebooting time when you touch Date/Time button at Time zone setting. ① The arrow will show up with one touch in the screen, ②...
- Page 19 7. HOW TO USE G-Net system DASH CAM ·How to use LCD - SETUP Able to set ADAS function after touching ADAS button. After GPS reception is correctly working, ADAS function can be set. ① ADAS Setting - Able to turn on/off ADAS setting as touching ON/OFF button.
- Page 20 7. HOW TO USE G-Net system DASH CAM ·ADAS Function 1. LDWS : The alarm that the car leave its lane. The green lane will showing if the lane is detected correctly. When the car is leaving its lane the indicator’s color will be changed to Red or Yellow with alarm.
- Page 21 7. HOW TO USE G-Net system DASH CAM ·How to use LCD - SETUP Able to set Buzzer, Parking, Impact, Movement and recording time after touching Event button at SETUP MENU. And, the Buzzer sound, parking, impact, Movement can be on/off with touch, the recording time can be adjusted with arrow control that the arrow will be shown when user touch button.
- Page 22 7. HOW TO USE G-Net system DASH CAM ·How to use LCD - SETUP ① Impact / LED – Adjusting Security LED on/off and impact sensitivity. ②-1 Auto –off-Timer – Able to set auto off time(3~48hours) once the engine ignition is off. ※...
- Page 23 7. HOW TO USE G-Net system DASH CAM ·How to use LCD - SETUP ③ Memory - Adjust storage ratio of Event and Normal recording Integrated recording(Recommended) Split Recording The normal recording and event The normal recording and event recording recording will be saved in order will be saved separately as divided memory area.
- Page 24 7. HOW TO USE G-Net system DASH CAM ·How to use LCD - SETUP ※ TAMPER CHECK The inspection will start after touching TAMPER CHECK button. And, the system will be rebooted when you button in the screen.
- Page 25 7. HOW TO USE G-Net system DASH CAM ·How to use LCD - SETUP ※ How to check result of Tamper check ▶ The successful cases from tamper check, the tamper.txt file will be Insert Memory card Reader after taking out the Memory made even if there is no statement in that file.
- Page 26 7. HOW TO USE G-Net system DASH CAM ·How to use LCD - SETUP ④ LCD – Adjusting LCD Time off and Calibration ※ TIME OFF User can check time off option. After setting of Time Off, the LCD will be automatically off according to what user set.
- Page 27 7. HOW TO USE G-Net system DASH CAM ·How to use LCD - SETUP 3. LIVE VIDEO Real time video will play when you touch “LIVE” button. The (Back) button will disappear after 5 sec without touch If users touch the video which is playing on screen, the Front or operation.
- Page 28 7. HOW TO USE G-Net system DASH CAM ·Record type - Automatically normal recording is initiated. Normal Record - Security LED will blink every 2 seconds. - If there is impact on device, the record LED will be blink as recorded event recording at event Impact Record folder in SD card.
-
Page 29: Voice Guide
7. HOW TO USE G-Net system DASH CAM ·Voice guide Contents Voice guide Normal recording Start recording. System off Shut down the system. Already registered Already registered smart phone. Battery off Shut down the system to protect the battery of car. Error of capture Video is not being entered. - Page 30 7. HOW TO USE G-Net system DASH CAM ·Voice guide Contents Voice guide Wi-Fi function start Wi-Fi connected. Wi-Fi function stop Wi-Fi turned off. Fail to Wi-Fi function This Wi-Fi-Module is not supported. Parking mode recording Start Records in parking mode. Event recording Alarm Impact event has occurred during parking.
- Page 31 7. HOW TO USE G-Net system DASH CAM ·Voice guide Contents Voice guide Registration Wi-Fi via a smart phone Press the Wi-Fi button to register a smart phone. Reboot because of the damaged memory card. Memory card damage Please replace the memory card if this occurrence continues. Memory card format On formatting the memory card.
-
Page 32: Memory Card Video Folder
8. MEMORY CARD VIDEO FOLDER G-Net system DASH CAM Removing Memory card after device is off. Connection PC with Memory card need to use dedicated memory reader. Select removal disk in “My computer” -“Event folder in SD card need to be set over 10% of capacity through Memory setting which can be adjusted via PC viewer. -
Page 33: Pc Viewer Installation
Insert the Memory card to PC. Click the "Next" button after select the installation. Double click the "Viewer.exe" file in Memory card to install GNET viewer program as picture shown. - Page 34 Confirmation pop-up window appears if there is internet condition folder window as shown in the picture. Select removable disk, as picture shown. If there is no internet connection, Gnet viewer press “OK” button. program will be executed directly.
-
Page 35: Pc Viewer Function
10. PC VIEWER FUNCTION G-Net system DASH CAM ·Menu Playback Recording Reverse Play, Normal Play ◀ ◀ Pause Repeat event Step Reverse, Step ◀ ◀ 1 Frame Play ◀ ◀ ◀ ◀ Speed meter Available only when installed GPS. Video Control Thumbnail Drawing a lane Print... - Page 36 10. PC VIEWER FUNCTION G-Net system DASH CAM ·Menu ※How to check the G-sensor data. <G-sensor data zoom in> Position of recording view Data and graph (G-sensor data) ▶ When play the video, you can check the G-sensor data of X-axis (direction), Y-axis (left and right), Z-axis (height).
-
Page 37: Before Wi-Fi Connection
·Precaution before connect Smartphone. Check It provides Android and iOS platform. Please search “GNET” on Google play store or Apple App store. Real time recording and playback via Wi-Fi can be able to be delayed depending on specification of Smart device. -
Page 38: Wi-Fi Connection & Function
Execute GNET app icon after installation to It is searching and displaying registered product. smart device. The screen of GNET app is horizontal mode information window appears to guide registration when first use as picture. If select “No” to terminate the application or select “Yes”... - Page 39 12. WI-FI CONNECTION & FUNCTION G-Net system DASH CAM ·How to connect - Android Press the Wi-Fi registration button of product, there will be voice guidance “Stand- by mode for the registration” and select the product in the list what you want to register touch “Search”...
- Page 40 12. WI-FI CONNECTION & FUNCTION G-Net system DASH CAM ·How to connect - Android Setup the product via smart device easily if touch the “setup” icon – It will be rebooting when save button after finished setup. Move to registration page if click “Add” icon. Real time recording shows if click “Connect”...
- Page 41 G-Net system DASH CAM ·How to connect - iOS Please connect with Smartphone when main screen or turn off the LCD for stabilization. Execute GNET app icon after Press the Wi-Fi registration button of product installation to Smart phone. to activate register standby mode.
- Page 42 G-Net system DASH CAM ·How to connect - iOS Real time Video shows directly when touch Gnet application. If register standby mode is not activated or unlocked, you can see the message. If so, please kindly touch the Wi-Fi user register button to be activated.
- Page 43 12. WI-FI CONNECTION & FUNCTION G-Net system DASH CAM ·How to connect - iOS Real time recording. Playback recorded video in the list. Select to playback recording what you want to confirm. Setup the product via smart phone easily if touch the “Settings”...
-
Page 44: Product Warranty Card
Product Warranty Card Product GNET Dash cam Model GI700 Serial Number Purchasing date Name Consumer Address Vendor 1 year since purchasing date Period of free (It date not confirmed by receipt, manufacturing date + 2 Months) guarantee Camera : 1 year , Micro SD Memory card, Accessory : 3 months This product is manufactured through a process of strict quality confirm and inspection. - Page 45 www.gnetsystem.com 6F Lotte IT Castle II Gasan Digital 2ro 98, Geumcheon-gu, Seoul, Korea...
Need help?
Do you have a question about the GI700 and is the answer not in the manual?
Questions and answers