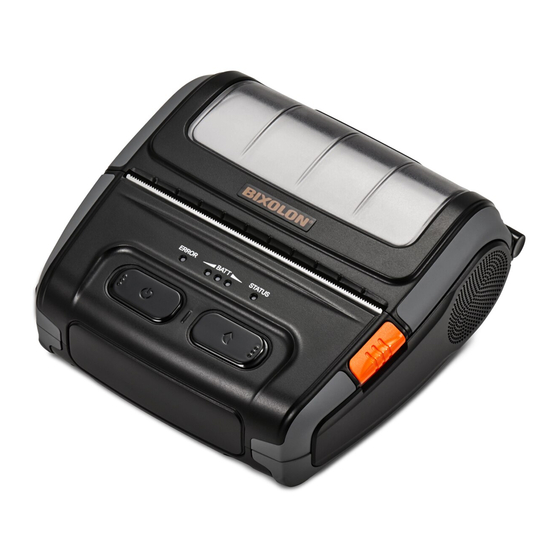
BIXOLON SPP-R310 Installation Manual
Mobile receipt printer
Hide thumbs
Also See for SPP-R310:
- Installation manual (24 pages) ,
- Reference manual (50 pages) ,
- User manual (31 pages)
Table of Contents
Advertisement
Available languages
Available languages
Quick Links
KN09-00045A (Rev.1.0)
◈ Information
This installation guide contains quick information required for the product installation.
Refer to the User's Manual in the CD that comes with the product for detailed
installation instructions. The CD contains the following information.
1. Manual: User's, Windows CE Module Program, Code pages, Commands,
Bluetooth & Wireless
2. Driver: Windows driver
3. Utility: VMSM (Virtual Memory Switch Manager),
NV Image Download Manager, Firmware Download Manager
We at BIXOLON maintain ongoing efforts to enhance and upgrade the functions and
quality of all our products. In following, product specifications and/or user manual
content may be changed without prior notice.
◈ Battery Safety Precautions
1. If you observe any abnormal symptom, such as strange smell and overheating, on
first use after purchasing the product, contact your local dealer immediately.
2. Charge the battery only with the exclusive charger specified (optionally provided)
by BIXOLON. The use of an incorrect charger may result in overheating,
combustion and/or explosion of the battery.
3. Do not use or leave the battery in a location exposed to high temperatures or intense
direct sunlight, such as within an automobile. Doing so can cause battery
overheating and/or combustion. In addition, battery performance and product life
may be reduced.
4. Do not allow water, seawater or moisture to enter or leak into the battery. If the
safety mechanism within the battery becomes oxidized, the battery may overcharge
with abnormal electrical current and/or voltage so that it may overheat, ignite and/or
explode.
5. Do not throw the battery or subject it to strong shock. If the safety mechanism in the
battery is damaged, the battery may be overcharged and, consequently, an adverse
chemical reaction may be generated in the battery.
There is a potential risk of battery overheating, combustion, and/or explosion.
6. Do not use the battery if it is damaged or the exterior is deformed due to external
shock or if it is swollen.
◈ Content Confirmation
SPP-R310
Battery
Power Cord
Belt Clip
◈ Product Part Names
Paper Cover
Paper Cover
Power Button
Power Button
Button
Open button
Paper Feed
Paper Feed Button
Button
◈ Installation and Charging
Battery
Installation
※ Note
As the battery is not charged at the time of purchase, charge the battery
prior to product use. (Use the battery charger)
Battery Charger
CD
Installation Guide
Hole for mounting belt strap / belt clip
Hole for mounting belt strap / belt clip
Interface Cap
Interface Cap
Open
Cable Connection
Cable Connection
Power Connection
Power Connection
1. Insert the battery on the rear side of
the printer, aligning the battery hook
properly.
2. Push the battery into the slot until a
snapping sound is heard.
Printer Installation Guide
Mobile Receipt Printer SPP-R310
Paper
Installation
Battery
Charging
※ Note
The printer may incur serious damage If the battery charger provided
by BIXOLON is not used. BIXOLON is not legally liable for any such
damage. (The voltage and electrical current specifications of the printer
and battery charger must match.)
Belt Strap
Installation
Belt Clip
Installation
Paper Roll
◈ Control Panel Usage
POWER BUTTON
• POWER BUTTON
This button is used to turn the printer on and off.
Battery
Battery
• FEED BUTTON
This button is used to feed paper manually, take the self-test and dump hexadecimals.
• ERROR LED
If the red led is lit, the paper cover is open.
If the red led is blinking, either the paper has been fully used or the print head is
overheated.
If the red led continues to blink, it may indicate a more serious problem with the
product, and thus an authorized service dealer should be consulted.
• BATTERY LED
If Three blue led are lit, the battery is fully charged.
If two blue led are lit, the battery is half charged.
If one blue led is lit, the battery is at the lowest charge level.
If the red led is lit, the battery must be charged or replaced.
• STATUS LED (Bluetooth or Wireless LAN)
1) When using Bluetooth
If the printer is ready for wireless communication with any Bluetooth, the green led
as well as the battery status led is turned on..
2) When using wireless LAN
The right indicator shows the signal strength from wireless LAN.
The green led is solid for acceptable signal strength while the green led blinks for
weak signal strength.
※ Note
In power save mode, only the Status led is lit.
1. Press the open button to open the
paper cover.
2. Insert the paper as shown in the
image.
(Remove any remaining core of a
fully used paper roll.)
3. Take care to align the paper
correctly.
4. Pull the paper out and close the
paper cover.
5. Tear off any excess paper in the
direction of the side of the printer.
1. Turn off the printer power.
2. Connect the power cord to the
battery charger, and the connect AC
power.
3. Open the external interface cap in
the direction of arrow.
4. Connect the battery charger to the
power connector.
1. Insert the belt strap screw into the
belt strap hole.
2. Use a coin to tighten the belt strap
screw
As shown in the image.
1. Insert the screw of the belt clip to the
belt clip mounting hole.
2. Fasten the screw of the belt clip with
an object like a coin as shown in the
picture.
(be careful to fasten in the correct
direction.)
FEED BUTTON
ERROR LED
BATTERY LED
STATUS LED
Advertisement
Table of Contents

Related Manuals for BIXOLON SPP-R310


Summary of Contents for BIXOLON SPP-R310
- Page 1 5. Tear off any excess paper in the direction of the side of the printer. We at BIXOLON maintain ongoing efforts to enhance and upgrade the functions and quality of all our products. In following, product specifications and/or user manual 1.
-
Page 2: Printer Cleaning
● U.S. Office If label paper gaps are not properly recognized, use the auto calibration function. (Add) BIXOLON America Inc., 3171 Fujita St, Torrance, CA 90505 (Tel.) +1-858 764 4580 ● Europe Office •... - Page 3 Sie sich bitte umgehend an den Händler. Akkus 3. Öffnen Sie die Abdeckung der externen 2. Der Akku darf nur mit dem angegebenen Ladegerät (optional erhältlich) von BIXOLON Schnittstelle in Richtung des Pfeils. geladen werden. Die Verwendung eines falschen Ladegeräts kann zu Überhitzen, 4.
- Page 4 (Tel.) +82-31-218-5500 automatische Kalibrierfunktion. ● U.S. Office (Add) BIXOLON America Inc., 3171 Fujita St, Torrance, CA 90505 • Anweisungen für die automatische Kalibrierung (Tel.) +1-858 764 4580 1) Schalten Sie den Stromschalter des Druckers aus, während sich dieser im Betriebszustand Etikettendruck befindet.
- Page 5 NV Image Download Manager, Gestionnaire de téléchargement de Firmware BIXOLON s'engage à poursuivre ses efforts pour améliorer les fonctions et la qualité de ses produits. Par conséquent, les caractéristiques du produit et/ou le contenu du manuel d'utilisation peuvent être modifiés sans avis préalable.
- Page 6 (Tel.) +82-31-218-5500 4) Répétez les étapes ci-dessus pour revenir en mode Reçu. ● U.S. Office (Add) BIXOLON America Inc., 3171 Fujita St, Torrance, CA 90505 • Paramétrage Via Memory Switch (Tel.) +1-858 764 4580 1) Reportez-vous à la section de modification de Memory Switch du manuel de commandes.
-
Page 7: Uso Del Panel De Control
Administrador de descarga de firmware En BIXOLON, mantenemos esfuerzos continuos para mejorar y actualizar las funciones y la calidad de todos nuestros productos. En lo sucesivo, las especificaciones del producto y/o el contenido del manual del usuario pueden modificarse sin previo aviso. -
Page 8: Especificaciones Del Producto
(Tel.) +82-31-218-5500 etiquetas no se reconoce de forma adecuada, utilice la función de calibración automática. ● U.S. Office (Add) BIXOLON America Inc., 3171 Fujita St, Torrance, CA 90505 • Instrucciones para la calibración automática (Tel.) +1-858 764 4580 1) Apague la impresora mientras permanece en el modo de impresión de etiquetas. - Page 9 5. Retire qualquer excesso de papel na direcção da lateral da impressora. Na BIXOLON fazemos esforços contínuos para melhorar e actualizar as funções e a qualidade dos nossos produtos. Desta forma, as especificações do produto e/ou o conteúdo do manual de utilizador podem ser alterados sem aviso prévio.
-
Page 10: Especificações Do Produto
1) Desligue a energia da impressora enquanto estiver no modo de impressão de etiquetas. ● U.S. Office 2) Pressione e mantenha o botão de alimentação de papel e em seguida pressione o botão (Add) BIXOLON America Inc., 3171 Fujita St, Torrance, CA 90505 de alimentação. (Tel.) +1-858 764 4580 3) Após ser emitida a seguinte impressão, pressione o botão de alimentação para realizar a... - Page 11 프린터 설치 안내서 모바일 영수증 프린터 SPP-R310 ◈ 안내 1. 열림 버튼을 눌러 용지커버를 여십시오. 본 설치 안내서는 제품 설치에 필요한 간단한 정보만 기록하고 있습니다. 자세한 2. 그림과 같이 용지를 넣으십시오. 설치 안내는 첨부된 CD 의 사용 설명서를 참고하십시오. CD 에 포함되어있는...
- Page 12 라벨 용지 갭을 정상적으로 인식하지 못할 경우 Auto calibration 기능을 (전화) +82-31-218-5500 사용하십시오. ● 미주 지사 (주소) BIXOLON America Inc., 3171 Fujita St, Torrance, CA 90505 (전화) +1-858 764 4580 • Auto calibration 방법 1) 라벨 인쇄 모드에서 프린터 전원을 끄십시오.
- Page 13 打印机安装指南书 移动发票打印机 SPP-R310 ◈ 指南 1. 按下开启按钮打开纸卷盖。 本安装手册仅收录有安装产品所需的简单信息。详情请参考随附光盘内的 请如图所示放入纸卷。 使用说明书。光盘内含如下内容。 (如有纸管请予以清除。) 2. 请注意纸张方向。 1. 手册:用户、Windows CE 模块程序、代码表、控制命令、 3. 将纸张略微拉出一些后 安装纸卷 蓝色牙&无线网 关闭纸卷盖。 2. 驱动器:Windows 驱动器 4. 请沿打印机前面方向握住多 3. 实用程序: VMSM(Virtual Memory Switch Manager)、 余的纸,拉动撕下。 NV Image Download Manager、Firmware Download Manager (株)BIXOLON 不断改善产品的功能和质量。因此,产品的参数和手册内容...
- Page 14 Bundang-gu, Seongnam-si, Gyeonggi-do, 13494, Korea (ROK) 2. Auto calibration 功能 (Tel.) +82-31-218-5500 标签打印功能应可以识别标签纸张间隙和黑标纸张的黑条。 ● U.S. Office 无法正常识别标签纸张间隙时,请使用 Auto calibration 功能。 (Add) BIXOLON America Inc., 3171 Fujita St, Torrance, CA 90505 (Tel.) +1-858 764 4580 • Auto calibration 方法 1) 请在标签打印模式下关闭打印机电源。 ● Europe Office 2) 请在按下送纸按钮的状态按电源按钮。...
- Page 15 изображений, Firmware Download Manager ― диспетчер загрузки прошивки направлению к боку принтера. Компания «BIXOLON» постоянно совершенствует качество своей продукции и расширяет спектр его функциональности. Компания оставляет за собой право вносить впоследствии изменения в характеристики и/или руководства пользователя без предварительного о том уведомления.
- Page 16 1) Выключите принтер. Учтите, до этого принтер должен был находиться в режиме ● U.S. Office печати этикеток. (Add) BIXOLON America Inc., 3171 Fujita St, Torrance, CA 90505 (Tel.) +1-858 764 4580 2) Нажмите и удержите кнопку протяжки бумаги, а затем нажмите кнопку питания.
- Page 17 4. 用紙を前に引っ張り、用紙カバーを閉じ 2. ドライバ:Windows ドライバ てください。 3. ユーティリティ:VMSM(Virtual Memory Switch Manager)、 5. はみ出した用紙はプリンターの前面に引 NV Image Download Manager、Firmware Download Manager っ張り出して切ってください。 (株)BIXOLON は製品の機能と品質向上のために、持続的な改善をしています。 こ の た め 、 製品の仕様とマニュアルの内容は、事前通告なしに変更する場合があります。 1. プリンターの電源を切ってください。 2. 電源コードをバッテリー充電器に接続 ◈ バッテリーの安全注意事項 し、AC 電源に接続してください。 1. 製品の購入後、初めて使用する際に悪臭または過熱のような異常症状を発見した場合、 3. 矢印の方向に外部インターフェイスキャ...
- Page 18 Bundang-gu, Seongnam-si, Gyeonggi-do, 13494, Korea (ROK) ください。 (Tel.) +82-31-218-5500 ● U.S. Office • Auto calibration の方法 (Add) BIXOLON America Inc., 3171 Fujita St, Torrance, CA 90505 1) ラベル印刷モードでプリンターの電源を切ってください。 (Tel.) +1-858 764 4580 2) 用紙移送ボタンを押した状態で電源ボタンを押してください。 ● Europe Office 3) 次の印刷物が出力されたら、電源ボタンを押して Auto calibration を実行します。...
-
Page 19: Content Confirmation
5. Tear off any excess paper in the direction of the side of the printer. We at BIXOLON maintain ongoing efforts to enhance and upgrade the functions and quality of all our products. In following, product specifications and/or user manual 1. - Page 20 ● U.S. Office If label paper gaps are not properly recognized, use the auto calibration function. (Add) BIXOLON America Inc., 3171 Fujita St, Torrance, CA 90505 (Tel.) +1-858 764 4580 ● Europe Office •...
Need help?
Do you have a question about the SPP-R310 and is the answer not in the manual?
Questions and answers