Table of Contents
Advertisement
Advertisement
Chapters
Table of Contents
Troubleshooting

Related Manuals for ADVANTAGE AIR MyAir


Summary of Contents for ADVANTAGE AIR MyAir
- Page 1 Smart Home Systems User Manual V1.1...
- Page 2 MyPlace User Manual This manual covers all of the MyPlace product line. You can jump to a relevant product using the tabs on the right had side. MyPlace consists of: Smart Air Conditioning Smart Air Conditioning for systems with multiple aircon units Smart Home Lighting Installation Guide V1.1...
-
Page 3: Table Of Contents
MyPlace User Manual Contents 1 - MYPLACE TABLET 2 - SMART DEVICE CONTROL 3 - APPLE DEVICES 4 - ANDROID DEVICES 5 - REMOTE ACCESS 6 - NETWORK TROUBLESHOOTING 7 - COMPATIBILITY user guide user guide user guide Installation Guide V1.1... -
Page 4: Myplace Tablet
1 - MYPLACE TABLET The MyPlace app runs on its own dedicated wall mounted touch screen. This touch screen creates a hub for control of your MyPlace system. 12:45 System Plans Help Plan 1 Enable Disable Back Here’s the Plan... Run Time Select Days Daikin... -
Page 5: Smart Device Control
2 - SMART DEVICE CONTROL MyPlace allows you to control your MyPlace system from your Android or Apple phone, after installing the MyPlace app on your phone. Smart Phone control can be used inside your home via your personal WiFi network or remotely using your phones internet connection. - Page 6 SMART DEVICE CONTROL 7. Find your home WiFi network in the 8. Enter your home WiFi network list then press it. password then press CONNECT. 9. Once you have connected successfully (may take up to 2 minutes) you will see the word CONNECTED below your home WiFi network name.
-
Page 7: Apple Devices
Type “MyPlace” into the search box. d. Press Search. e. Select the MyPlace App by Advantage Air (It’s Free). f. To install, press the blue GET button, and then Green INSTALL button. g. Enter your Apple ID password (it’s case sensitive). -
Page 8: Android Devices
4 - ANDROID DEVICES The MyPlace Android app requires your device to be running Android OS v4.2 or greater, please check to ensure you device meets this requirement before continuing below. To start downloading items on the Google Play Store app, you need to add a Google Account to your device. -
Page 9: Remote Access
5 - REMOTE ACCESS MyPlace has the ability to control your system from your Android or Apple smart phone when you are outside of the home WiFi network using your phones internet connection (eg 3G/4G). Remote Access requires a reliable WiFi connection between your modem/router & your wall mounted MyPlace tablet. - Page 10 REMOTE ACCESS 5. It can take up to 5 minutes before remote access is enabled. While your system is enabling remote access you will notice the status will change numerous times. Once remote access has been successfully enabled, the status will change to AA26.
-
Page 11: Network Troubleshooting
6 - NETWORK TROUBLESHOOTING Assistance for the Homeowner’s I.T. professional: 1. Verify that the smartphone/tablet device is connected to the home WiFi (not using the phones internet connection (eg. 4G).) Also ensure, the phones WiFi signal strength is strong. 2. Check that the MyPlace wall mounted touch screen is connected to the same home WiFi network (SSID) as your smartphone or tablet. - Page 12 MyAir User Manual Contents 1 - INTRODUCTION 2 - MODE SCREEN 3 - ZONES SCREEN 4 - MYZONE (OPTIONAL) 5 - MOTION ZONE (OPTIONAL) 6 - CONSTANT ZONES 5 - FRESH AIR (OPTIONAL) 6 - PLANS SCREEN 7 - PLANS EDIT SCREEN...
-
Page 13: Introduction
1 - INTRODUCTION Welcome to your new MyAir smart air conditioning system. The information provided in this user manual will help you to get the most from your new air conditioning system. Upon first power up, the system will take a few minutes to initialise. -
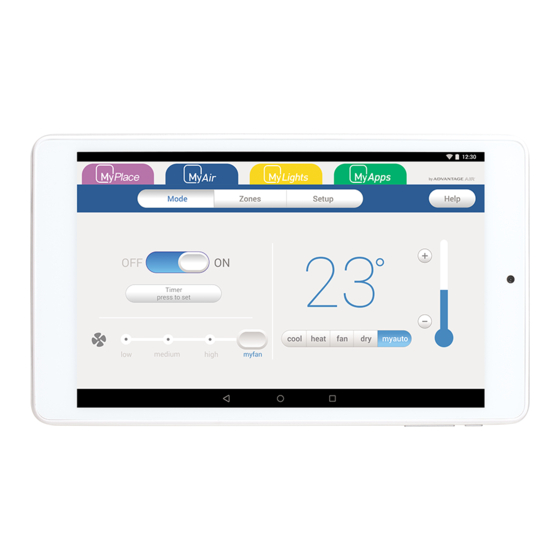
Page 14: Mode Screen
2 - MODE SCREEN The Mode Screen on the MyAir tab allows you to control your Air-conditioner’s operation mode. From the Mode Screen you can perform the following actions: • Turn the air-con unit ON or OFF; • Set an ON or OFF Timer;... - Page 15 MODE SCREEN Simple Timer The Simple Timer can be used to turn the air- con unit ON or OFF after a set time. Each press of the timer button increases the time by 30mins (up to 12hours.) Pressing the Trash icon clears the timer. Note: This is a once-only timer that does not repeat each day.
-
Page 16: Zones Screen
Pressing a Zone name toggles that Zone between ON and OFF. Zones are ON when they are the blue colour. There are four different types of zones in MyAir depending on the option you selected when purchasing your system. Airflow Zone If there is no sensor installed in a particular zone then it will be shown as an AIRFLOW zone. -
Page 17: Myzone (Optional
4 - MYZONE (OPTIONAL) The MyZone feature makes that particular zone the “information center” for the air conditioning unit. That means the set-point for that zone becomes the set- point the air conditioning unit will work toward. The actual measured temperature of that zone is the temperature sent to the unit for it to make its decisions about whether to start/stop or speed up/down to effectively achieve the set-point while maintaining constant airflow in the MyZone. -
Page 18: Motion Zone (Optional
10 minutes it will increase the target temperature by 1 C. Then after a further 10 minutes of being empty MyAir will increase the temperature again by C, making the new target temperature 26°C. As soon as motion is detected in the room the target temperature returns to normal. -
Page 19: Constant Zones
6 - CONSTANT ZONES Depending on your specific installation, your MyAir system may be set up with electronic Constant Zones. These are pre-programmed zones that open up to relieve excess air pressure in your air-conditioning system if insufficient zones are open. -
Page 20: Fresh Air (Optional
5 - FRESH AIR (OPTIONAL) If your system is fitted with the optional fresh air feature, you will find a button at the bottom of your zones screen as pictured below. Turning ON fresh air will enable your system to draw in air from outside the home. This feature is particularly useful when the outside temperature is pleasant such as in the evenings. -
Page 21: Plans Screen
6 - PLANS SCREEN Plans allow you to set your air conditioner up just the way you like it, this even includes which Zones to have turned ON and their air flow or target temperature setting. Once your Plan is captured you can have it activated automatically at any time on any day. -
Page 22: Plans Edit Screen
7 - PLANS EDIT SCREEN You will enter the Plans Edit Screen after pressing the + button to add a new Plan or if you press on an existing Plan. 12:45 System Plans Help Plan 1 Enable Disable Back Here’s the Plan... Run Time Select Days Daikin... - Page 23 06:30 AM - 08:45 AM Times Plan will start / stop Set up new Plan 1. Configure Aircon(s) and Zones to the required setup*. PLANS EDIT SCREEN Then press to add a new Plan. *See other help pages for Aircon and Zone setup. Review the Capture Here’s the Plan...
-
Page 24: Setup Screen
8 - SETUP SCREEN Rename Zones Press this button to change the zone names, you will be presented with a list of all your zones press any zone to edit the name. You can use the symbols & or . plus any combination of letters, numbers or spaces. -
Page 25: Troubleshooting
SETUP SCREEN Tech Setup This button is used by your air conditioning professional to configure and commission your system on the day of installation; there are no user settings in this menu. Status Window Warnings about your air conditioning system will be displayed here such as low battery warnings for your temperature sensors or air conditioning unit error codes. - Page 26 MyAir+ User Manual Contents 1 - INTRODUCTION 2 - HOME SCREEN 3 - MYAIR+ PLANS 4 - NAMING AIR-CON UNITS Installation Guide V1.1...
- Page 27 1 - INTRODUCTION Welcome to MyAir+. MyAir+ has all the same features as MyAir with the added benefit of being able to control up to four air-con units from the same MyPlace wall mount touch screen. 2 - HOME SCREEN When the MyPlace app is started the MyAir+ tab will display the home screen as shown above.
- Page 28 For more information on setting up a plan please see the Plans page in the MyAir section of the this manual.
- Page 29 MyLights User Manual Contents 1 - INTRODUCTION 2 - CONTROLS 3 - HOME SCREEN 4 - GROUP SCREEN 5 - SCENES SCREEN 5 - SETUP SCREEN 6 - LIGHTS WIZARD Installation Guide V1.1...
- Page 30 1 - INTRODUCTION Welcome to your new MyLights smart lighting system. The information provided in this user manual will help you to get the most from your new lights. Upon first power up, the system will take a few minutes to initialise. If you walk away from your screen it will go to sleep, to wake the screen simply touch anywhere on the screen.
- Page 31 2 - CONTROLS Kitchen Dinning Room The following explains the types of buttons or switches that are found in the MyLights system. Light Switch (Dimmable) Light Name Brightness Brightness when switched Kitchen Dinning Room Living Security Brighter Dimmer ON / OFF All Off All On All Off...
- Page 32 3 - HOME SCREEN Master Scenes These are pre-configured Scenes that come pre-set on your MyPlace system, pressing one of these buttons will run that scene. User configured Scenes can be created in the Scenes screen. Turns all lights Turns all lights Saves energy! Tips: •...
- Page 33 4 - GROUP SCREEN The Groups screen enables you to group lights into useful groups, such as creating a group for all of the lights in your bedrooms. This allows you to control all of the grouped lights from a single button. Favorite button Bedrooms All Off...
- Page 34 5 - SCENES SCREEN Scenes allow you to take a snapshot and save the current light settings for your whole home and assign this snapshot to a single Scenes button. For example: You may have a weekly movie night and want all your lights dimmed in the open planned lounge and kitchen.
- Page 35 5 - SETUP SCREEN The Setup Screen allows you to configure your MyLights system. From this screen you can perform the following actions: • Name and Group lights using the Lights Wizard; • Manage Groups (create & rename); • Set the System Time; •...
- Page 36 6 - LIGHTS WIZARD 1. Press the 2. Press the yellow 3. Press the LIGHTS located on the MyLights tab and WIZARD button. home screen of then press the your MyLights Setup button in tablet. the menu. 4. Flick the wall light 5.
- Page 37 E: warranty@advantageair.com.au E: service@advantageair.com.au Advantage Air Aust Pty Ltd reserves the right to change specifications, modify designs and discontinue items without obligation. Whilst every effort is made to ensure that descriptions, specifications and other information in this document are correct, no warranty is given in respect thereof and the company shall not be liable for any error therein.
Need help?
Do you have a question about the MyAir and is the answer not in the manual?
Questions and answers