Ecco C2013B Installation Instructions
7 inch color camera system
Hide thumbs
Also See for C2013B:
- Installation and operation instructions manual (16 pages) ,
- Manual (21 pages)
Advertisement
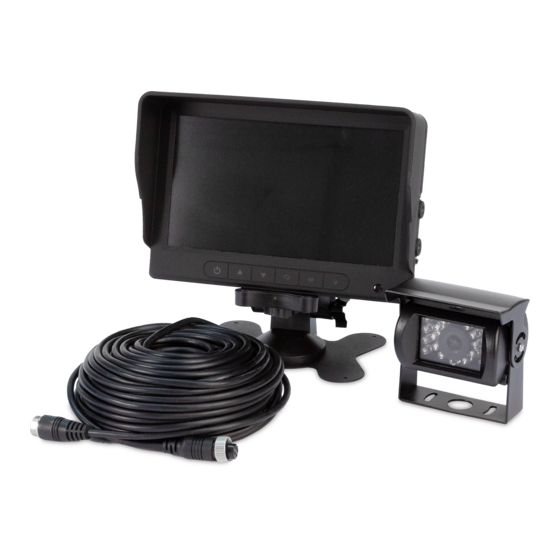
Comprising a feature packed 7.0" LCD high
resolution color monitor and color infrared
camera the K7000B delivers excellent picture
quality even in low light conditions. The
compact monitor allows for unobtrusive
installation without compromising viewable
screen area. Kit is expandable up to 2 cameras
(C2013B only).
IMPORTANT!
Read all instructions before installing and using. Installer: This manual must be
delivered to the end user.
!
WARNING!
Failure to install or use this product according to manufacturers recommendations may result in property
damage, serious bodily/personal injury, and/or death to you and those you are seeking to protect!
Do not install and/or operate this safety product unless you have read and understand the safety
information contained in this manual.
1. Proper installation combined with operator training in the use, care, and maintenance of safety products are essential to ensure the
safety of you and those you are trying to protect.
2. Exercise caution when working with live electrical connections.
3. This product must be properly grounded. Inadequate grounding and/or shorting of electrical connections can cause high
current arcing, which can cause personal injury and/or severe vehicle damage, including fire.
4. Proper placement and installation are vital to the performance of this safety product. Install this product so that the
performance of the system is maximized and the controls are placed within convenient reach of the operator so that
s/he can operate the system without losing eye contact with the roadway.
5. It is the responsibility of the vehicle operator to ensure during use that all features of this product work correctly. In use,
the vehicle operator should ensure the field-of-view of the camera/monitor is not blocked by vehicle components (i.e., open
trunks or compartment doors), people, vehicles, or other obstructions.
6. Never take the right-of-way for granted. It is your responsibility to be sure you can proceed safely before entering an
intersection, driving against traffic, responding at a high rate of speed, walking on or around traffic lanes.
7. This equipment is intended for use by authorized personnel only. The user is responsible for understanding and
obeying all laws regarding safety products. Therefore, the user should check all applicable city, state, and federal laws and regula-
tions. The manufacturer assumes no liability for any loss resulting from the use of this safety product.
Installation Instructions
7 Inch Color Camera System
Advertisement
Table of Contents

Related Manuals for Ecco C2013B


Summary of Contents for Ecco C2013B
-
Page 1: Installation Instructions
The compact monitor allows for unobtrusive installation without compromising viewable screen area. Kit is expandable up to 2 cameras (C2013B only). IMPORTANT! Read all instructions before installing and using. Installer: This manual must be delivered to the end user. -
Page 2: Specifications
Specifications: CAMERA C2013B MONITOR M7000B Image CMOS Screen Size 7” (4:3) and (16:9) 2 Camera Voltage Requirement Controller 725 x 488 12-24 VDC Effective Pixels Voltage Power Consumption Power Approximate: 5W Lens Size 1/4” Mirror Imaging Yes (via Camera and Monitor Switch) Lens Angle 120°... - Page 3 Installation, Wiring and Function Installation: Camera Model C2013B Important! Mount the camera at a location that provides the best view of the area immediately behind the vehicle. Generally, mounting locations toward the top of the vehicle provide the best field of view. Lower mounting locations reduce the field of view and increase the likelihood of damage from road spray.
- Page 4 Monitor: Model M7000B WARNING! To prevent accidental shock, DO NOT OPEN THE MONITOR CASE. Opening the monitor case will expose the inside of the monitor to conditions that could adversely affect performance. Any evidence of tampering with sealed components will void the warranty. Important! Do not expose the monitor to water, it is not waterproof.
-
Page 5: Menu Operations
Menu Operations: Press the Menu button on the remote control or the Menu button on the monitor to get to the Menu selection. Use the CH up & CH down on the remote control or CH button on the monitor to toggle between menus. Use the Volume Up on the remote control or Analog Increase on the monitor to select highlighted menu.
Need help?
Do you have a question about the C2013B and is the answer not in the manual?
Questions and answers