Table of Contents
Advertisement
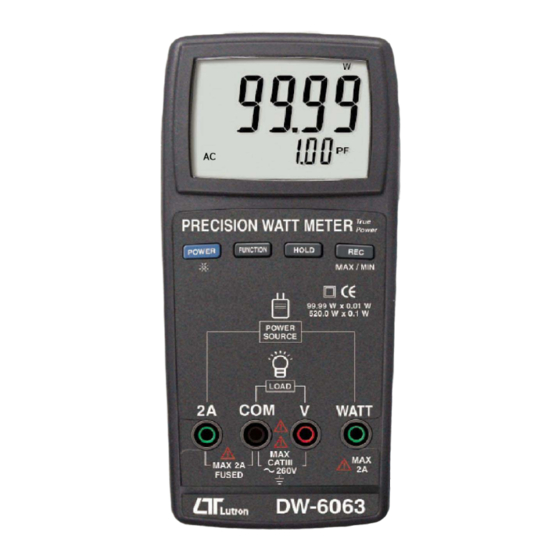
99.99 W x 0.01 W, 520.0 W x 0.1 W
Power factor, ACV, ACA
WATT METER
Model : DW-6063
OPERATION MANUAL
Your purchase of this
WATT METER marks a
step forward for you
into
the
field
precision measurement.
Although this METER is
a complex and delicate
instrument, its durable
structure
will
many years of use if
p r o p e r
o p e r a t i n g
t e c h n i q u e s
developed. Please read
t h e
f o l l o w i n g
instructions
and always keep this
manual
within
reach.
of
allow
a r e
carefully
easy
Advertisement
Table of Contents

Related Manuals for Lutron Electronics DW-6063


Summary of Contents for Lutron Electronics DW-6063
- Page 1 99.99 W x 0.01 W, 520.0 W x 0.1 W Power factor, ACV, ACA WATT METER Model : DW-6063 Your purchase of this WATT METER marks a step forward for you into field precision measurement. Although this METER is a complex and delicate...
- Page 2 Caution Symbol Caution : * Risk of electric shock ! Caution : * Do not apply the overload voltage, current to the input terminal ! * Remove test leads before open the battery cover ! * Cleaning - Only use the dry cloth to clean the plastic case ! Environment Conditions * Installation Categories III-260V.
-
Page 3: Table Of Contents
TABLE OF CONTENTS 1. FEATURES..............1 2. SPECIFICATIONS............1 2-1 General specifications..........1 2-2 Electrical specifications.......... 3 3. FRONT PANEL DESCRIPTION........4 3-1 Display..............4 3-2 POWER/Backlight button........4 3-3 FUNCTION button..........4 3-4 HOLD button............4 3-5 RECORD button ( MAX. / MIN. )......4 3-6 LOAD terminal............4 3-7 POWER SOURCE terminal........4 3-8 RS-232 output terminal..........4... -
Page 4: Features
1. FEATURES * 0.01 W resolution, precision Watt meter is special for low power measurement. * Designed for the high resolution low power measurement. * LSI - circuit provides high reliability and durability. * Directly operation. * Measurement : WATT ( AC ) : 99.99 W x 0.01 W, 520 W x 0.1 W ACV : 260V x 0.1 V. - Page 5 Over input " ---- " mark indication . Zero Automatic adjustment Sampling Time Approx. 1 second . Data Hold Freeze the display reading . Memory Recall Maximum & Minimum value . Data output RS232 / USB PC Computer interface. * Connect the optional RS232 cable UPCB - 02 will get the RS232 plug.
-
Page 6: Electrical Specifications
2-2 Electrical Specifications (23± 5 ℃ WATT ( TRUE POWER ) Range Resolution Accuracy 520 W 0.1 W ± ( 1% + 0.5 W ) 0 to 99.99 W 0.01 W * Auto range. * Measuring Signal come from the front LOAD plug terminals. * Accuracy is test under input signal is sine wave , 50 / 60 Hz. -
Page 7: Front Panel Description
3. FRONT PANEL DESCRIPTION Fig. 1 3-1 Display 3-2 POWER / Backlight button 3-3 FUNCTION button 3-4 HOLD button 3-5 RECORD button ( MAX. / MIN. ) 3-6 LOAD terminal 3-7 POWER SOURCE terminal 3-8 RS-232 output terminal 3-9 DC 9V Power Adapter input socket 3-10 Battery Cover / Compartment 3-11 STAND... -
Page 8: Measureing Procedures
4. MEASURING PROCEDURE 4-1 Power ON/OFF 1)Press the POWER button ( 3-2, Fig. 1 ) more than 1.5 sec to Turn ON the meter. 2)Press the POWER button ( 3-2, Fig. 1 ) more than 1.5 sec to Turn OFF themeter. 4-2 ACV measurement procedure 1)Press the POWER button ( 3-2, Fig.1 ) more than 1.5 sec to Turn ON the meter. -
Page 9: Watt Measurement Procedure
4-4 Watt measurement procedure 1)Press the POWER button ( 3-2, Fig. 1 ) more than 1.5 sec to Turn ON the meter. 2)Make sure your equipment work voltage, such as 110 V or 220 V. 3)Turn off the POWER SOURCE. 4)Plug in the LOAD ( equipment ) to V terminal and COM terminal. -
Page 10: Backlight On/Off
2)With the " REC. " symbol on the display : a) Press the " REC Button " ( 3-5, Fig. 1 ) once, the " REC. MAX. " symbol along with the maximum value will appear on the display. If intend to delete the maximum value, just press the "... -
Page 11: Maintenance
5. MAINTENANCE 1)This WATT METER is intended for measuring the TURE RMS POWER CONSUMPTION. At the same , It can let you know .how many effect from your equipment. 2)When measuring POWER CONSUMPTION. Equipment working voltage must be recheck again, before turn on the equipment power switch. - Page 12 Meter (9W 'D" Connector) Center Pin......Pin 4 (3.5 mm jack plug) Ground/shield.......Pin 2 2.2 K resistor Pin 5 The 16 digits data stream will be displayed in the following format : D15 D14 D13 D12 D11 D10 D9 D8 D7 D6 D5 D4 D3 D2 D1 D0 Each digit indicates the following status : End Word D1 &...
-
Page 13: Battery Replacement
RS232 FORMAT : 9600, N, 8, 1 Baud rate 9600 Parity No parity Data bit no. 8 Data bits Stop bit 1 Stop bit 7. BATTERY REPLACEMENT 1)When the Top of left corner on LCD display show " " , it is necessary to replace the battery , However in -spec.
Need help?
Do you have a question about the DW-6063 and is the answer not in the manual?
Questions and answers