Table of Contents
Advertisement
Quick Links
Advertisement
Table of Contents

Related Manuals for Hobo Micro Station


Summary of Contents for Hobo Micro Station
- Page 1 ® HOBO Micro Station User’s Guide 7645-L...
- Page 2 WARNING: Do not climb on or around the tripod (if using). The Micro Station and any of its associated hardware, towers, poles, etc. are not designed to support the weight of a person. Injury may result.
-
Page 3: Table Of Contents
Guidelines for a tripod system setup ....................18 Guidelines for installing sensors ...................... 18 Mounting instructions for a flat surface ..................19 Using Micro Station accessories ....................20 Mounting the logger with the Mast Mounting Kit ................20 Connecting the External Grounding Wire Adapter Cable ..............21 Connecting the External Communications Port Adapter Cable ............ -
Page 5: Chapter 1 Introduction
Micro Station is a four-sensor data logger designed for applications requiring multi-channel monitoring of microclimates in one or more locations. Part of the HOBO Weather Station family, the Micro Station uses a network of smart sensors for taking measurements. Key features of the smart sensors include: •... -
Page 6: How To Use This Manual
The CE Marking identifies this product as complying with all relevant directives in the European Union (EU). How to use this manual This manual covers the steps to set up, operate, and maintain the Micro Station, including: • Assembling the logger and perform an initial test •... -
Page 7: Chapter 2 Assembly And Testing
Chapter 2: Assembly and testing Chapter 2 Assembly and testing The HOBO Micro Station is shipped partially assembled. This section explains how to assemble the logger, connect the smart sensors, and perform a quick test. Items required To configure the Micro Station you will need the following: •... - Page 8 If the connector does not fit through the stuffing gland, you will need to trim the anti-snag device with a knife so that the connector looks like the one below. Anti-snag device removed from the external sensor connector HOBO Micro Station User’s Manual...
- Page 9 14. Apply silicone grease to the outside rim of the case where the cover meets up with the housing. The grease should be applied sparingly in this location. 15. Screw the clear cover back onto the case. Use a Phillips-head screwdriver to tighten the four cover screws. HOBO Micro Station User’s Guide...
-
Page 10: Testing The Logger
7. Check the data and make sure it appears normal for all sensors. For more details on launching and logger operation, see Chapter 3. For information on mounting the logger and setting it up in the field, see Chapter 4. HOBO Micro Station User’s Manual... -
Page 11: Configuring Hoboware For A Keyspan Usb-To-Serial Adapter
Step 2 (in this example, it is COM4). Note: On a Mac, the Keyspan adapter will be listed as something similar to “USA19H1d1P1.1.” Click OK in the Preferences window to save these settings. HOBOware should now be configured to work with the Keyspan USB-to-serial adapter. HOBO Micro Station User’s Guide... -
Page 12: Chapter 3 Logger Operation
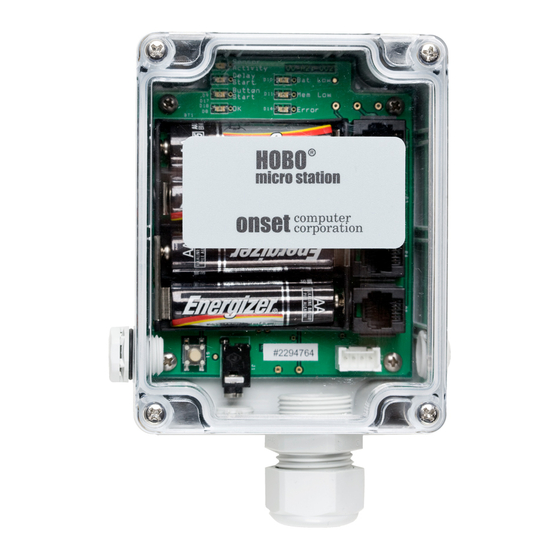
• Time accuracy of the logger • Logger memory Logger components The following diagram explains the key parts of the Micro Station. Status lights, see table in this section for details on each of the seven lights Battery holder, with... -
Page 13: Status Lights
Communicating with the logger You can launch, read out, or check the status of the Micro Station with a computer or HOBO U-Shuttle (U-DT-1). 1. Use a slotted screwdriver or small coin to unscrew the data access port cover. -
Page 14: Launching
See the following sections for general information on launching and reading out. ® Refer to the HOBOware user’s guide for detailed information. Refer to the HOBO U-Shuttle manual for instructions on launching, reading out, or checking status with a HOBO U-Shuttle. Launching To launch the logger with HOBOware: 1. -
Page 15: Selecting And Installing Batteries
3. After the readout is complete, you can plot the data. Note that readout speed depends on the method used to connect to the logger and the device being used. Typically, a readout via PC interface cable with the computer will take about six minutes for a full Micro Station (512K of data). -
Page 16: Estimating Battery Life
Do not expose the contents of the battery to water. Estimating battery life Battery life will vary with: • Logging and sampling intervals in use (most important factor) • Number of sensors • Battery type • Operating environment HOBO Micro Station User’s Manual... -
Page 17: Checking Battery Status
It is always recommended that you read out the logger before replacing batteries. If you replace the batteries while the Micro Station is logging, it will stop recording data. The data will not be overwritten, however, until the next launch. -
Page 18: Time Accuracy
Upon launch, the Micro Station’s clock is set in Coordinated Universal Time (UTC), which is determined from the clock on your computer. Once the Micro Station is logging, it will keep fairly accurate time. However, there are three main sources of errors with time reporting. -
Page 19: Logger Memory
The following figure shows the expected run time for several logging intervals based on the total number of bits in place, which is determined by adding together the bits per sample for each sensor measurement parameter in your system. For example, a Micro Station with the following sensors is using 56 total bits. 1 Temperature... - Page 20 Chapter 3: Logger operation At a logging interval of 5 minutes, the memory run time for a Micro Station using 56 bits would be approximately 250 days (based on the following figure). See the sensor’s manual for the number of bits each type of sensor uses.
-
Page 21: Chapter 4 Field Setup And Mounting
Chapter 4: Field setup and mounting Chapter 4 Field setup and mounting This chapter explains how to set up the Micro Station in the field, both with and without the optional accessories. This includes: • Guidelines for typical field setup •... -
Page 22: Guidelines For A Tripod System Setup
Onset offers a 1.5 meter mast (Part # M-MPB), which is especially useful when you are trying to minimize the size and visibility of the Micro Station. Guidelines for a tripod system setup In addition to the guidelines above, adhere to the following guidelines for using the Micro Station with a tripod: •... -
Page 23: Mounting Instructions For A Flat Surface
Mounting instructions for a flat surface You can mount the Micro Station to a flat surface without any optional accessories. IMPORTANT: The logger must be mounted vertically so that cables hang down (preventing moisture from entering the connection) and to allow for proper ventilation of the case through the Gore Vent. -
Page 24: Using Micro Station Accessories
Chapter 4: Field setup and mounting Using Micro Station accessories This section explains how to use the following accessories with the Micro Station: • Mast Mounting Kit • External Grounding Wire Adapter Cable • External Communications Port Adapter Cable Mounting the logger with the Mast Mounting Kit An optional Mast Mounting Kit (Part # M-MKA) is available for mounting the logger to a 4.1 cm (1 5/8... -
Page 25: Connecting The External Grounding Wire Adapter Cable
Hand-tighten the dome nut and then tighten an additional ½ turn with a crescent wrench. Insert the cable through the hole and then screw in this fitting as shown here Dome nut Plug grounding wire into this connector Grounding wire plugged into logger HOBO Micro Station User’s Guide... -
Page 26: Connecting The External Communications Port Adapter Cable
2. Apply silicone grease to the o-ring on the fitting to be inserted. 3. Insert the cable through the external connection access port. Screw in the fitting to seal the hole. Hand-tighten the fitting and then tighten an additional ½ to ¾ turn with a crescent wrench. HOBO Micro Station User’s Manual... -
Page 27: Field Preparation Checklist
Station with accessories from the HOBO Weather Station family of products. Task Check that you received all the parts for your Micro Station system as ordered. Configure the logger. Set up the logger for launch; install batteries and battery strap. For details, see Chapters 2 and 3. - Page 28 Micro Station and its components. Gather the tools required for setup. Use the following checklists to make sure you have the necessary tools to set up the Micro Station in the field. The items marked “optional” depend on your site needs. Logger Rain Gauge Sensor ...
- Page 29 Medium size wire cutters Medium size wire cutters Crescent wrench Solar Radiation Shield (M-RSA) Light Sensor Bracket (M-LBB) Item Item 1/2 inch wrench 1/2 inch wrench Phillips head screwdriver #1 (if sensors aren’t already installed) HOBO Micro Station User’s Guide...
-
Page 30: Set Up The Tripod, Cross Arm, And Sensors
Chapter 4: Field setup and mounting Set up the tripod, cross arm, and sensors You can mount the HOBO Micro Station on a tripod with a cross arm. Follow this general procedure. Refer to the Tripod Setup Guide and sensor manuals for detailed steps. - Page 31 14. Screw on the logger cover if you removed it earlier, making sure the desiccant pack is inside the logger enclosure to minimize internal condensation (remove desiccant pack from its foil pouch before installing). Make sure all logger openings are covered and the sensor dome nut is secure. HOBO Micro Station User’s Guide...
-
Page 32: Chapter 5 Troubleshooting
Chapter 5: Troubleshooting Chapter 5 Troubleshooting The following chart lists common problems you may encounter with the HOBO Micro Station and possible resolutions. Problem Resolution • Individual sensors are not If a sensor is removed and then immediately re-inserted, it may not be found or are missing in the auto-detected and therefore will not appear in the Launch Logger window. - Page 33 Offload the logger again and try opening the file again. If that does not work, contact your Onset dealer or Onset Computer Corporation. Logger is not found • Check and replace the batteries. • Check communications cable connections. HOBO Micro Station User’s Guide...
-
Page 34: Chapter 6 Maintenance
Minimize the impact of any damage found This is particularly important if the Micro Station is being deployed for a long period of time, such as several months or a year. Regular checkups will help ensure that you are continuing to gather data as expected. -
Page 35: Checking The Desiccant Pack
Checking the desiccant pack The desiccant pack included with the Micro Station is an indicating desiccant pack, which means it changes color from blue to pink when it is no longer absorbing moisture. If the desiccant pack is blue, it is still good.
Need help?
Do you have a question about the Micro Station and is the answer not in the manual?
Questions and answers