Bellman & Symfon BE1431 Installer's Manual
Telephone
Hide thumbs
Also See for BE1431:
- User manual (82 pages) ,
- Manual (40 pages) ,
- Installer's manual (39 pages)
Table of Contents
Advertisement
Quick Links
Download this manual
See also:
User Manual
Advertisement
Table of Contents

Related Manuals for Bellman & Symfon BE1431


Summary of Contents for Bellman & Symfon BE1431
- Page 2 Montera Testa 1 Dra bort batterilappen för att starta telefonsändaren. Rengör väggytan med 1 Be en vän att ringa upp din fasta telefon eller använd mobiltelefon. våtservett och ta bort skyddsplasten från kardborrebandet. 2 När din fasta telefon ringer, indikerar Visitmottagaren med ljud, ljus eller 2 Klistra upp telefonsändaren på...
-
Page 3: Teknisk Information
Tillbehör Teknisk information Telefonsändaren kan kompletteras med följande tillbehör: Strömförsörjning Batteridrift: 2 x 1,5 V AA (LR6) litium eller alkaliska batterier Strömförbrukning Aktiv < 70 mA, Viloläge < 15 μA 1 Trampmatta – Aktiveras när någon trampar på den Drifttid Alkaliskt batteri ~ 5 år, Litiumbatteri ~ 10 år 2 Mobilsensor –... - Page 4 Felsökning Gör så här Gör så här Lysdioderna blinkar • Byt batterier. Använd endast 1,5 V AA (LR6) litium Lysdioden tänds inte • Byt batterier. Använd endast 1,5 V AA (LR6) litium orange en gång per eller alkaliska batterier. när jag trycker på eller alkaliska batterier. Om lysdioden fortfarande inte minut test-knapparna tänds, Kontakta din återförsäljare för information om garanti och service.
-
Page 5: Installer's Guide
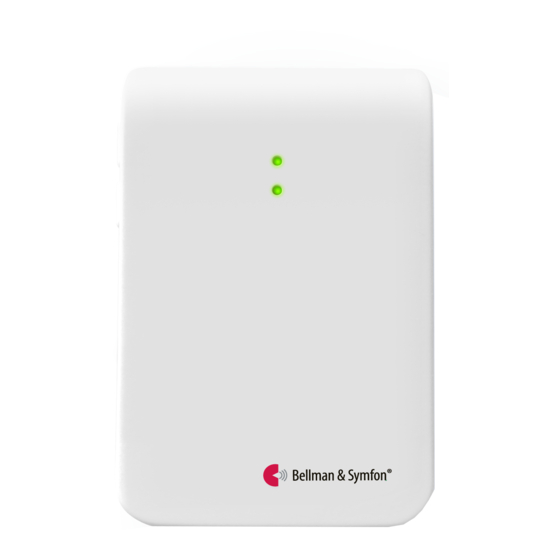
Installer’s Guide Introduction Installation Testing Advanced testing Customizing the signal Trouble shooting Trigger input Technical information... - Page 6 Introduction Overview Function Test buttons LED lights 3.5 mm ext trig Contact mat Magnetic switch The telehone transmitter is part of the Visit alerting system that helps people with hearing loss to notice signals in their home. It detects landline phones by default but can also detect a number of other sources.
-
Page 7: Installation
Installation Testing 1 Remove the battery pull tag to start the telephone transmitter. Clean the 1 Use your mobile phone to call the landline telephone. wall with the wet wipe and remove the protective film from the Velcro. 2 When the landline telephone rings, the Visit receiver lights up a telephone 2 Mount the telephone transmitter on the wall. -
Page 8: Advanced Testing
Advanced testing Default indication and signal Transmitter indication Testing the telephone transmitter is easy. First, make sure that the telephone When the transmitter is activated, the LED lights up in green. This means that transmitter is installed properly. For instructions, read the section Installation. the batteries are in good condition. - Page 9 Customizing the signal The telephone transmitter controls the signal pattern on the receiver. Use the signal switches to customize the signal pattern. How to customize the signal pattern Move the signal switches on the Telephone transmitter according to Signal switches Up = On the tables on the following spreads.
- Page 10 Signal output for 868 MHz and 315 MHz Test button 1 and Mobile phone Test button 1 and Mobile phone Dip switch Output External trigger Dip switch Output External trigger 2 Landline phone sensor 2 Landline phone sensor Light Yellow light Blinking in yellow Green light Light...
- Page 11 Signal output for 868 MHz and 315 MHz Test button 1 and Mobile phone Test button 1 and Mobile phone Dip switch Output External trigger Dip switch Output External trigger 2 Landline phone sensor 2 Landline phone sensor Light Blinking in yellow Yellow light Green light Light...
- Page 12 Signal output for 433 MHz Test button 1 and Mobile phone Test button 1 and Mobile phone Dip switch Output External trigger Dip switch Output External trigger 2 Landline phone sensor 2 Landline phone sensor Light Yellow light Yellow light Green light Light Yellow light...
- Page 13 Signal output for 433 MHz Test button 1 and Mobile phone Test button 1 and Mobile phone Dip switch Output External trigger Dip switch Output External trigger 2 Landline phone sensor 2 Landline phone sensor Light Yellow light Yellow light Green light Light Yellow light...
-
Page 14: Troubleshooting
Trouble shooting Try this Try this Two orange lights No green light appears • Change batteries. Only use 1.5 V AA (LR6) lithium or • Change batteries. Only use 1.5 V AA (LR6) lithium appear every minute alkaline batteries. on the transmitter when or alkaline batteries. -
Page 15: Trigger Input
Trigger input Technical information Power supply Battery power: 2 x 1.5 V AA (LR6) lithium or alkaline You can use both stereo and mono plugs. The 3.5 mm input is located on the Power consumption Active < 70 mA, Idle position < 15 μA top right side and the 2.5 mm input under the lid. - Page 16 (1) this device may not cause Hereby, Bellman & Symfon decla- Use and disposal of batteries interference, and (2) this device res that this Telephone trans- Replace only with the same or equi- must accept any interference, including interference that may mitter is in compliance with valent type recommended by the cause undesired operation of...
- Page 17 DESIGN FOR EARS ™ bellman.com...
Need help?
Do you have a question about the BE1431 and is the answer not in the manual?
Questions and answers