JVC SR-VS30U Service Manual
Double cassette deck
Hide thumbs
Also See for SR-VS30U:
- Instructions manual (84 pages) ,
- Brochure & specs (4 pages) ,
- Service manual (136 pages)
Table of Contents
Advertisement
Quick Links
SERVICE MANUAL
12
2003
MB061
1
PRECAUTION. . . . . . . . . . . . . . . . . . . . . . . . . . . . . . . . . . . . . . . . . . . . . . . . . . . . . . . . . . . . . . . . . . . . . . . . . 1-3
2
SPECIFIC SERVICE INSTRUCTIONS . . . . . . . . . . . . . . . . . . . . . . . . . . . . . . . . . . . . . . . . . . . . . . . . . . . . . . 1-4
3
DISASSEMBLY . . . . . . . . . . . . . . . . . . . . . . . . . . . . . . . . . . . . . . . . . . . . . . . . . . . . . . . . . . . . . . . . . . . . . . . 1-5
4
ADJUSTMENT . . . . . . . . . . . . . . . . . . . . . . . . . . . . . . . . . . . . . . . . . . . . . . . . . . . . . . . . . . . . . . . . . . . . . . . 1-13
5
TROUBLESHOOTING . . . . . . . . . . . . . . . . . . . . . . . . . . . . . . . . . . . . . . . . . . . . . . . . . . . . . . . . . . . . . . . . . 1-19
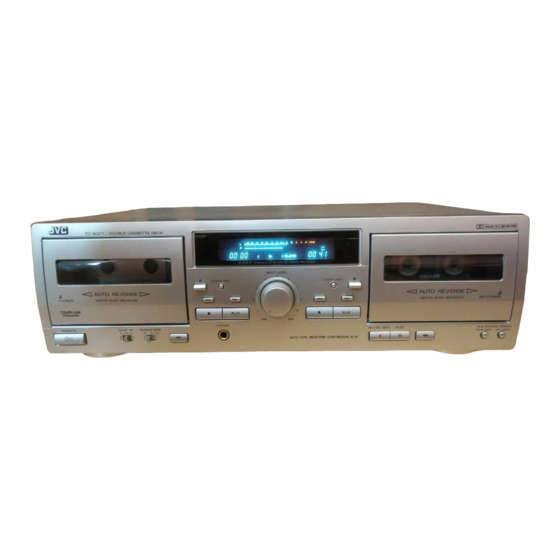
DOUBLE CASSETTE DECK
TD-W271
DOUBLE CASSETTE DECK
STANDBY
COUNTER RESET
AUTO REVERSE
A
3MOTOR SILENT MECHANISM
PLAYBACK
DOLBY NR
REVERSE MODE
PHONES
POWER
B OFF C
STANDBY/ON
ON
OFF
TABLE OF CONTENTS
INPUT LEVEL
5
COUNTER RESET
4
6
3
7
2
8
1
9
PLAY
PLAY
MIN
MAX
REC / REC MUTE PAUSE
AUTO TAPE SELECTOR / CONTINUOUS PLAY
UF -------------- China
U -------- Other Areas
DOLBY B-C NR HX PRO
AUTO REVERSE
B
3MOTOR SILENT MECHANISM
REC/PLAYBACK
A
B SYNCHRO DUBBING
NORM SPEED HIGH SPEED
Area Suffix
Advertisement
Table of Contents

Subscribe to Our Youtube Channel
Related Manuals for JVC SR-VS30U


Summary of Contents for JVC SR-VS30U
-
Page 1: Table Of Contents
SERVICE MANUAL DOUBLE CASSETTE DECK MB061 2003 TD-W271 DOLBY B-C NR HX PRO DOUBLE CASSETTE DECK STANDBY INPUT LEVEL COUNTER RESET COUNTER RESET AUTO REVERSE AUTO REVERSE 3MOTOR SILENT MECHANISM 3MOTOR SILENT MECHANISM PLAYBACK REC/PLAYBACK PLAY PLAY DOLBY NR REVERSE MODE PHONES POWER B SYNCHRO DUBBING... - Page 2 SPECIFICATION Type Double cassette deck Track system 4-track, 2-channel Tape speed 4.8 cm/sec (1-7/8 inch/sec) (Normal) 9.5 cm/sec (3-3/4 inch/sec) (High) Frequency response Type IV tape 20-17000Hz (-20 dB recording) 30-16000 Hz (±3dB) Type II tape 20-16000 Hz 30-15000 Hz (±3dB) Type I tape 20-16000 Hz 30-15000 Hz (±3dB)
-
Page 3: Precaution
SECTION 1 PRECAUTION Safety Precautions (1) This design of this product contains special hardware and voltmeter. many circuits and components specially for safety purpos- Move the resistor connection to each exposed metal es. For continued protection, no changes should be made part, particularly any exposed metal part having a return to the original design unless authorized in writing by the path to the chassis, and measure the AC voltage across... -
Page 4: Specific Service Instructions
SECTION 2 SPECIFIC SERVICE INSTRUCTIONS This service manual does not describe SPECIFIC SERVICE INSTRUCTIONS. 1-4 (No.MB061) -
Page 5: Disassembly
SECTION 3 DISASSEMBLY Enclosure section 3.1.1 Removing the top cover Top cover (See Fig.1) (1) Remove four screws A retaining the top cover from both side. (2) Remove two screws B retaining the top cover from the back side. (3) To remove the top cover, slide in direction of arrow and lift away (refer to Fig.1). - Page 6 3.1.3 Removing the mechanism assembly Main board • Although the mechanism assembly can be removed without detaching the front panel assembly, it is recommended to de- tach the front panel assembly to do the work with ease. (1) Remove the two screws D or two screws E from the cor- ners of the mechanism.
- Page 7 3.1.5 Removing the mechanism holder and door assembly How to remove damper (Fig.7, 8) (1) Remove four screws H retaining the mechanism holder. (2) Remove the damper assembly (for easy reassembling Pawl work). Insert an originary (-) screwdriver or the like in to the gap between the damper and the front panel to disengage the pawl, and draw the damper assembly outwards.
- Page 8 3.1.6 Removing the switch & volume board (Fig.9) (1) After removing the mechanism holder, proceed to the fol- Mechanism control board lowing steps. (2) Pull out the INPUT volume knob. (3) Remove four screws J, one screw N and cap retaining the switch/volume board.
- Page 9 Cassette mechanism section 3.2.1 Removing the head mount assembly Mechanism A (Fig.10 and 11) (1) Remove the FPC holder from the mechanism frame in the direction indicated by the arrow (A). (2) Remove three screws A retaining the head mount assem- bly.
- Page 10 3.2.3 Removing the FM bracket/Capstan motor assembly Connector FM (Mechanism A and B) (1) Remove soldering of connector FM on reel motor board. Reel motor board Capstan motor (Fig.13) (2) Remove three screws B and disengage two pawls, and then the FM bracket and the capstan belt can be removed. (Fig.13 and 14) Pawl (3) Remove two screws C retaining the capstan motor from the...
- Page 11 3.2.6 Removing the reel motor assembly Actuator motor assembly (Fig.16) Reel motor assembly (1) Remove two screws E from rear of chassis and remove the reel motor assembly toward upward. 3.2.7 Removing the actuator motor assembly (Fig.16) (1) Remove two screws F from rear of chassis and remove the actuator motor assembly toward upward.
- Page 12 3.2.9 Removing the control cam Control cam (Fig.18 and 19) (chassis side) (1) Release the control cam from two pawls. (Fig.18) (2) For assembling the control cam, fits a zone (groove) of con- trol cam to a position of pinch lever and b zone (groove) to zone b position of head base shaft.
-
Page 13: Adjustment
SECTION 4 ADJUSTMENT Measuring instruments required for adjustment Measurement conditions (1) Low - frequency oscillator (oscillation frequency 50 Hz - 20 (1) Power supply voltage (your local voltage) kHz, 0 dB output with 600 Ω impedance) AC230 V 50 Hz : B/E/EN version (2) Attenuator (600 Ω... - Page 14 Mechanism adjustment Before using test tapes, tape transporting past should be demagnetized. * Adjustments required after head replacement are marked with an asterisk(*). Item Conditions Adjustment and Confirmation Standard value Adjust point * Adjusting Test tape : VT704 Connect an electronic voltmeter to the LINE Maximum Screws Head...
- Page 15 Electrical adjustment procedure Item Check and Adjustment Input signal Output raise value, Checking (Frequency, level) deviation value DOLBY Signal input: LINE IN Cal. level : 1 kHz, Cal. - 40 dB +5.7 dB 2 dB circuit DOLBY B 400 Hz, -8 dBs (Rec.
- Page 16 Item Conditions Adjustment and Confirmation Standard value Adjust point Checking Measuring point: Connect 100 ohm resistor to the R/P head in Reference values recording Both ends of series, and measure voltage at both ends of the Metal tape:1150 uA bias current 100 ohm resistor resistor to check to see if measured voltage tape: 700 uA...
- Page 17 Item Conditions Adjustment and Confirmation Standard value Adjust point Checking Test tape : VT742 Insert test tape VT742 into deck A and -28 dBs +1.5/-2 dB dubbing Normal tape : AC-225 into deck B. calibration AC-225 Dubbing the 1kHz signal of VT742 to AC-225 during high speed mode.
- Page 18 Item Conditions Adjustment and Confirmation Standard value Adjust point Checking Signal input: Connect an electronic voltmeter and 19 kHz level: MPX filter LINE IN oscilloscope to the LINE OUT terminals. -30 dB (including effect Input level: Set the INPUT volume to the maximum 18.99 to 19.01 kHz) Maximum position.
-
Page 19: Troubleshooting
SECTION 5 TROUBLESHOOTING This service manual does not describe TROUBLESHOOTING. (No.MB061)1-19... - Page 20 VICTOR COMPANY OF JAPAN, LIMITED AV & MULTIMEDIA COMPANY AUDIO/VIDEO SYSTEMS CATEGORY 10-1,1chome,Ohwatari-machi,Maebashi-city,371-8543,Japan (No.MB061) Printed in Japan...
-
Page 21: Schematic Diagrams
SCHEMATIC DIAGRAMS DOUBLE CASSETTE DECK TD-W271 CD-ROM No.SML200401 Area suffix UF ---------------------------- China U ---------------------- Other Areas DOUBLE CASSETTE DECK DOLBY B-C NR HX PRO STANDBY INPUT LEVEL COUNTER RESET COUNTER RESET AUTO REVERSE AUTO REVERSE 3MOTOR SILENT MECHANISM 3MOTOR SILENT MECHANISM PLAYBACK REC/PLAYBACK PLAY... - Page 22 In regard with component parts appearing on the silk-screen printed side (parts side) of the PWB diagrams, the parts that are printed over with black such as the resistor ( ), diode ( ) and ICP ( ) or identified by the " " mark nearby are critical for safety.
- Page 23 Block diagram REC IN PB OUT IC851 LINE OUT VOL. CONTROL LINE IN & DD RP IC835 DOLBY NR HEADPHONES VR601 Input Level PB IN PB IN DECK A PB HEAD AMP J8601 IC861 H. P. JACK IC811 IC818 PB SIGNAL Q1101 IC852 SELECT...
- Page 24 Standard schematic diagrams System control / FL display / Key section (SHEET 2) Parts are safety assurance parts. When replacing those parts make sure to use the specified one. SHEET 1...
- Page 25 Head amplifier section Parts are safety assurance parts. When replacing those parts make sure to use the specified one. SHEET 2...
- Page 26 Amplifier / Power supply section Parts are safety assurance parts. When replacing those parts make SHEET 3 sure to use the specified one.
- Page 27 Printed circuit boards Main board R1155 Q8501 Q8504 Q8503 R1165 R2504 C2501 C1155 R8504 VR116 C1501 R1159 C8152 VR117 VR216 R8505 R2165 R2155 VR217 R8502 C8503 R2159 C2155 C8483 C1453 R8486 L8402 R8482 R8451 CN845 Q8482 C1454 VR146 R8152 C1456 Q8481 C8481 R8485...
- Page 28 Sub board (Switch/Volume board) (B:Key switch board) CN602 CN614 R621 S608 R627 R628 S629 S621 S622 S628 R607 S627 S605 VR601 S606 R623 R626 S604 S623 S607 CN601 (A:Key switch board) CN603 CN604 (Headphone jack board) (Standby LED board) C1601 J8601 C2601 DI701...
- Page 29 Mechanism board (Cam switch board) (Motor board)
- Page 30 VICTOR COMPANY OF JAPAN, LIMITED AV & MULTIMEDIA COMPANY AUDIO/VIDEO SYSTEMS CATEGORY 10-1,1chome,Ohwatari-machi,Maebashi-city,371-8543,Japan Printed in Japan (No.MB061SCH)
-
Page 31: Parts List
PARTS LIST [ TD-W271 ] * All printed circuit boards and its assemblies are not available as service parts. Area suffix UF ---------------------------- China U ---------------------- Other Areas - Contents - 3- 2 Exploded view of general assembly and parts list (Block No.M1) 3- 5 Cassette mechanism assembly and parts list (Block No.MP) 3- 7... - Page 32 Exploded view of general assembly and parts list Block No. A:Mechanism Mechanism control Ass'y board Ass'y Switch/Volume board Ass'y Head phone jack boad A:Key switch board Ass'y...
- Page 33 Main boad Ass'y UF Version Power swich board ass'y witch/Volume board Ass'y B:Mechanism Ass'y B:Key swich board Ass'y...
- Page 34 QUQ412-0612CJ FFC WIRE QUQ412-0612CJ FFC WIRE QUQ412-2021CJ FCC WIRE VJG1458-013 FRONT PANEL W271U VJG1458-014 FRONT PANEL W271UF VJD5429-002SS JVC MARK VYSA1R4-110 SPACER (x2) QYSBSF3010Z TAP SCREW 3mm x 10mm(x4) QYSBST3006N TAP SCREW M3 x 6mm(x3) QYSBSF2610Z SCREW 2.6mm x 10mm(x6)
- Page 35 Cassette mechanism assembly and parts list Block No. NY1000-T1A NY1000-T1B DECK A DECK B 46 13 DECK B DECK A 6.2 + - 0.2 4.8~5.2...
- Page 36 Cassette mechanism Block No. [M][P][M][M] Symbol No. Part No. Part Name Description Local VKS3626-00E H.MOUNT ASSY A MECHA VKS3629-00E H.MOUNT ASSY B MECHA MSN5D257A-SA1 D.C MOTOR ASSY MSI5B2LW-SA2 CAPSTAN MOTOR VKS1126-00B CHASSIS BASE VKS5428-00B T-UP REEL ASSY VKW5043-001 B.T. SPRING VKS3617-002 REEL VKW5043-001...
-
Page 37: Electrical Parts List
C901 QCF31HZ-103Z C CAPACITOR 0.01uF 50V Z Q905 2SB647/CD/-T TRANSISTOR C902 QCF31HZ-103Z C CAPACITOR 0.01uF 50V Z Q907 2SC3576-JVC-T TRANSISTOR C903 QETM1EM-228 E CAPACITOR 2200uF 25V M Q908 2SC3576-JVC-T TRANSISTOR C904 QETM1EM-228 E CAPACITOR 2200uF 25V M ... - Page 38 Symbol No. Part No. Part Name Description Local Symbol No. Part No. Part Name Description Local C1357 QFN31HJ-222Z M CAPACITOR 2200pF 50V J C8491 QFP32AJ-103Z PP CAPACITOR 0.01uF 100V J C1358 QETN1HM-104Z E CAPACITOR 0.1uF 50V M C8492 QETN1EM-476Z E CAPACITOR 47uF 25V M...
- Page 39 Symbol No. Part No. Part Name Description Local Symbol No. Part No. Part Name Description Local R1356 QRE141J-223Y C RESISTOR 22kΩ 1/4W J R2516 QRE141J-102Y C RESISTOR 1kΩ 1/4W J R1357 QRE141J-561Y C RESISTOR 560Ω 1/4W J R2517 QRE141J-222Y C RESISTOR 2.2kΩ...
- Page 40 Symbol No. Part No. Part Name Description Local Symbol No. Part No. Part Name Description Local CN845 QGA2512C1-05Z CONNECTOR W-B (1-5) C1601 QCF31HZ-223Z C CAPACITOR 0.022uF 50V Z CN861 QGB2003L1-05 CONNECTOR B-B (1-5) C2601 QCF31HZ-223Z C CAPACITOR 0.022uF 50V Z ...
- Page 41 Trans board Symbol No. Part No. Part Name Description Local Block No. [0][3][0][0] R753 QRE141J-224Y C RESISTOR 220kΩ 1/4W J R754 QRE141J-224Y C RESISTOR 220kΩ 1/4W J Symbol No. Part No. Part Name Description Local R755 QRZ9031-4R7 FUSI RESISTOR 4.7Ω...
- Page 42 Packing materials and accessories parts list Block No. A2,A3, A5,A6,A7 3-12...
- Page 43 Packing and accessories Block No. [M][3][M][M] Symbol No. Part No. Part Name Description Local LVT1089-001B INST BOOK W271U LVT1089-002A INST BOOK W271U LVT1089-003A INST BOOK CHI(PEKIN) W271UF QAM0223-001 PLUG CORD A 4 QAM0027-002 CONVERSION PLUG W271U VMP0088-001JW PIN CORD BT-59019-1 WARRANTY CARD W271UF...
Need help?
Do you have a question about the SR-VS30U and is the answer not in the manual?
Questions and answers