Table of Contents
Advertisement
Quick Links
A S E A S Y A S I T G E T S .
1-800-562-4257
If you have any questions, or you're
missing parts, call our customer
care department.
MONDAY – FRIDAY
8AM TO 5PM EST
Si tienes alguna pregunta o te falta
alguna pieza, comunícate con
nuestro departamento de servicio
al cliente.
LUNES A VIERNES
8AM A 5PM HORA
DEL ESTE
Si vous avez des questions ou s'il
manque des pièces, communiquez
avec notre service à la clientèle.
DU LUNDI AU VENDREDI
DE 8 H À 17 H, HNE
For design ideas and answers to
frequently asked questions, visit our
Web site, www.easytrack.com.
Para obtener ideas y respuestas a las
preguntas frecuentes, consulta nuestro
sitio Web, www.easytrack.com.
Pour des idées conceptuelles et une
foire aux questions, visiter notre site
Web à l'adresse www.easytrack.com.
LOOK INSIDE • MIRA EL INTERIOR • CONTENU DE LA BOÎTE
PARTS INCLUDED
PIEZAS INCLUIDAS
PIÈCES INCLUSES
48" vertical panels (4)
1
48" paneles verticales (4)
48" panneaux verticaux (4)
23
⁄
" shelves (2)
7
2
8
23
⁄
" estantes (2)
7
8
23
⁄
" tablettes (2)
7
8
34
⁄
" wardrobe rods (4)
5
3
8
34
⁄
" varillas para guardarropa (4)
5
8
34
⁄
" barres de penderie (4)
5
8
23
⁄
" wardrobe rods (1)
5
4
8
23
⁄
" varillas para guardarropa (1)
5
8
23
⁄
" barres de penderie (1)
5
8
48" Easy Track tracks (2)
5
48" rieles de Easy Track (2)
48" traverses Easy Track (2)
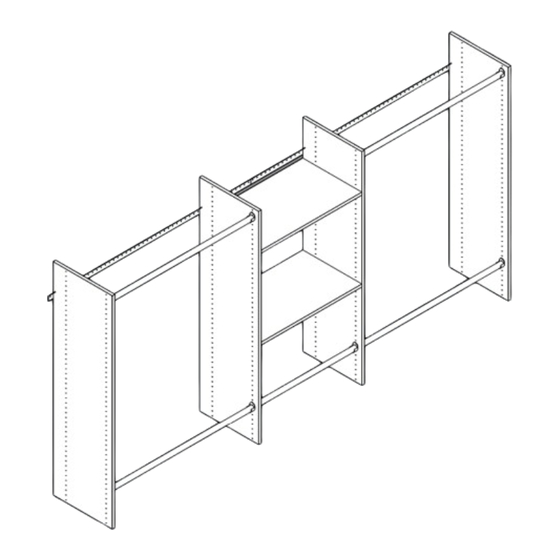
4'-8' wide Basic Starter Closet
Armario Inicial Básico de 4-8 pies de ancho
Unité de départ de base - 4 pi à 8 pi de large
HARDWARE INCLUDED
INCLUYE HERRAJES
PIÈCES DE FIXATION COMPRISES
rod holders (10)
porta varillas (10)
supports de tige (10)
shelf pins (8)
clavijas para estantes (8)
supports de tablette (8)
toggle bolts with screws (2)
pernos acodados con tornillos (2)
boulons à ailettes avec vis (2)
screw covers (16)
cubiertas para tornillos (16)
cache-vis (16)
#8 x 50mm screws (16)
#8 x 50mm tornillos (16)
#8 x 50mm vis (16)
#6 x ½" zinc screws (8)
#6 x ½" tornillos zinc (8)
#6 x ½" vis en zinc (8)
1
3
4
5
RB1448
2
Advertisement
Table of Contents

Related Manuals for Easy Track RB1448


Summary of Contents for Easy Track RB1448
- Page 1 " barres de penderie (1) cache-vis (16) 48" Easy Track tracks (2) #8 x 50mm screws (16) 48" rieles de Easy Track (2) #8 x 50mm tornillos (16) 48" traverses Easy Track (2) #8 x 50mm vis (16) #6 x ½" zinc screws (8) #6 x ½"...
- Page 2 GARANTIE LIMITÉE À VIE LES PRODUITS EASY TRACK SONT FABRIQUÉS DE MATÉRIAUX DE LA PLUS HAUTE QUALITÉ DANS LES Lee estas instrucciones para la instalación. Verifica que tienes todas las piezas MARGES DE TOLÉRANCE EXACTES. NOS PRODUITS SONT ASSUJETTIS À UNE GARANTIE LIMITÉE À...
- Page 3 Mark locations of studs. Studs are often 16" apart. Decide where to locate the top of the vertical panel. Mark a hang line for the track 8.5" down from the top of the Marca las ubicaciones de las vigas. Normalmente se deja vertical panel.
- Page 4 Position track slightly past outside panels. Make sure bottom Mark locations of vertical panels with masking tape. of track lines up with hang line and screw into the stud Marca las ubicaciones de los paneles verticales con la that's nearest to the center of the track. Place vertical panel cinta adhesiva protectora.
- Page 5 Level the track and mark a line along its bottom edge. Drill IMPORTANT. If a vertical will be more than 3" from a stud, ⁄ " pilot holes into each stud location and in the last hole of you'll need to use a toggle to support that panel. Mark the track on both ends of the wall.
- Page 6 Install toggle channels. Rotate track back into position. Bolt and screw track to wall Instala los canales para los vástagos. using #8 x 50mm screw and toggle bolts if needed. Insure Installez les chevilles. the track is level when attaching it to the wall. Gira el riel hasta quedar en su lugar.
- Page 7 To create the center unit on the floor, attach Hang assembled center unit and shorter vertical two shelves to longer vertical panels using panels in their marked positions. #8 x 50mm screws. If desired, attach screw Cuelga el centre ensamblada y los paneles verticales covers onto screw heads.
- Page 8 Visser dans les tiges de penderie en passant par le trou existant, à l'aide d'une vis Nº 6 x ⁄ po en zinc. The Stow Company 3311 Windquest Drive Holland, MI 49424 © The Stow Company Printed in U.S.A. p: 800.562.4257 616.399.3311 f: 616.399.8784 www.easytrack.com Item # RB1448-INS 09/16...
Need help?
Do you have a question about the RB1448 and is the answer not in the manual?
Questions and answers