Table of Contents
Advertisement
Quick Links
Advertisement
Table of Contents

Subscribe to Our Youtube Channel
Related Manuals for SportDOG TEK-V2L


Summary of Contents for SportDOG TEK-V2L
- Page 1 OPERATING GUIDE PLEASE READ THIS ENTIRE GUIDE BEFORE BEGINNING...
- Page 2 • Never connect a leash/lead to the Collar Receiver; it will cause excessive pressure on the contacts. • When using a separate collar for a leash/lead, don’t put pressure on the electronic collar. • Wash the dog’s neck area and the contacts of the collar weekly with a damp cloth. SPORTDOG.COM...
- Page 3 • If the condition persists beyond 48 hours, see your veterinarian. For additional information on bed sores and pressure necrosis, please visit the Support section for remote trainers at www.sportdog.com. These steps will help keep your dog safe and comfortable. Millions of dogs are comfortable while they wear stainless steel contacts.
-
Page 4: Table Of Contents
To get the most protection out of your Two-Year Warranty, please register your product within 30 days at www.sportdog.com. By registering, and keeping your receipt you will enjoy the product’s full warranty and should you ever need to call the Customer Care Center, we will be able to help you faster. Most importantly, your valuable information will never be given or sold to anyone. -
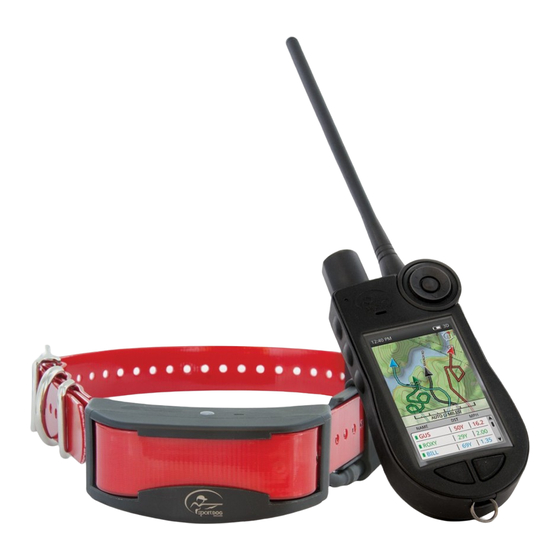
Page 5: Components
™ levels so you can tailor the stimulation level to your dog’s temperament, eliminating the risk of over-correction. TEK-V2LT and TEK-2AD have E-Collar functionality. To add E-Collar functionality to your TEK-V2L, you must purchase the TEK-2T E-Collar Module. IMPORTANT: THE TEK SERIES 2.0 SYSTEM HAS A RANGE OF UP TO 10 MILES LINE OF SIGHT. -
Page 6: Key Definitions
INDICATOR LIGHT: Indicates when the GPS module has been turned on or off, whether a GPS Lock has been attained, is in pairing mode, and also serves as a low-battery indicator. CHARGING JACK: For connecting the GPS module to the charge cradle. SPORTDOG.COM... -
Page 7: Icons Definitions
DOG DIRECTION INDICATOR COMMUNICATION LOST: Display if communications to the Collar Receiver is lost. DOG ON POINT / TREED INDICATOR: Indicates the location of your dog when the dog is stationary. SCALE INDICATOR: Shows the current map scale. Scales range from 45 yards to 1,989 miles SPORTDOG.COM... -
Page 8: Home Page Icons
WAY POINTS: view, add, change, or remove way points from the system (Page 55). JOURNAL: view all the journal notes, waypoints, and tracks created (Page 51). SUN/MOON: view information about rising and setting time for the sun and moon, as well as predictions for hunting conditions (Page 57). SPORTDOG.COM... -
Page 9: Operating The Tek Series 2.0 Handheld Handheld
• The up/down arrow moves through the dog data area at the bottom of the tracking screen. • The up/down arrow moves the cursor on the map page. • The up/down arrow changes stimulation levels on the training screen. • The left/right arrow moves through the active dog list on the training screen. SPORTDOG.COM... -
Page 10: Prepare The Gps Collar/E-Collar Module
TO CHARGE THE GPS COLLAR/E-COLLAR MODULE: 1. Attach the supplied Charge Cradle so that the SportDOG Brand ® logo on the Charge Cradle covers the SportDOG Brand logo on the GPS Collar. 2. Connect the appropriate charger connector to the charging jack. - Page 11 Unit is delivering vibration stimulation Unit has attained GPS Green or Red Single blink every lock depending on 3 seconds battery status Unit has lost GPS lock Green or Red Double blink depending on every 3 seconds battery status SPORTDOG.COM...
-
Page 12: How To Change A Gps Collar To A Gps Collar With E-Collar Module
6. Install the E-Collar Module onto the collar’s front housing. Ensure that the E-Collar module is fully seated before replacing the screws (E). 7. Replace the two outer screws being careful not to over-tighten (F). SPORTDOG.COM... - Page 13 If the condition persists beyond 48 hours, see your veterinarian. For additional information on bed sores and pressure necrosis, please visit the Support Section for remote trainers at www.sportdog.com. These steps will help keep your dog safe and comfortable. Millions of dogs are comfortable while they wear stainless steel contacts.
-
Page 14: Prepare The Tek Series 2.0 Handheld
TO TURN THE HANDHELD DEVICE ON: Firmly press and release the On/Off button. The unit will vibrate and the start-up screen will display. TO TURN THE HANDHELD DEVICE OFF: Firmly press and hold the On/Off button. Release when the display goes blank. SPORTDOG.COM... -
Page 15: Tek 2.0 Setup Wizard
• Final Device Settings LANGUAGE First, the Setup Wizard will ask you to select the language for your SportDOG Brand® TEK 2.0. The default selection is English, and there are 10 additional languages available. Use the up/down arrow keys to highlight your choice, then press select Next. - Page 16 • (P2) User Programmable Static Stimulation 2 Select Next to move to the Next screen. STIM RANGE This screen lets you set the current dog’s stim range. Select Low, Medium, or High, then select Next to move to the Next screen. SPORTDOG.COM...
- Page 17 This screen will let you choose how often the current collar sends updates to the Handheld. Select your Update Rate, then select Next to move on. NOTE: Upon changing the update rate, collars will need to be paired again. SPORTDOG.COM...
- Page 18 To calibrate the handheld’s compass, you’ll need to rotate the Handheld in all three dimensions until all the circles shown on the screen are as close as possible to the center of the bars. When you have successfully calibrated the handheld, the screen will notify you by displaying “Calibration Successful.” Select Next to move on. SPORTDOG.COM...
-
Page 19: Home Page
• When you are finished customizing your home page, press Menu and select the “Done” option. CANCEL Highlight and select Cancel to close the menu without making any changes to the page. SPORTDOG.COM... -
Page 20: My Dogs
Follow the same steps to choose Stim settings for Button 2 and Button 3. Select Next to move on. STIM RANGE This screen lets you set the current dog’s Stim range. Select Low, Medium, or High, then select Next to move on. SPORTDOG.COM... - Page 21 CHANGE NAME... Press Enter or the right arrow key to bring up the keyboard, then Enter the name.* To return to the settings menu, highlight and select the checkbox. *Remember that the TEK 2.0 does not allow duplicate dog names. SPORTDOG.COM...
- Page 22 For P1 and P2 Level – Press Enter or the right arrow key to bring up a numeric keypad and select a level 1-20. Select the checkbox to return to the Stim button settings menu. Press the left arrow to return to the Dog Details menu. SPORTDOG.COM...
-
Page 23: My Collars
• Select Done to return to the My Collars menu. This collar’s set-up is complete. *The Owner ID and Collar ID are found on the trip computer of the other Handheld. Be sure your GPS Codes match (see page 44). SPORTDOG.COM... - Page 24 *If you try to deactivate a color that is currently assigned to a dog, a warning will appear to let you know that the collar is assigned. Use the right arrow to choose Deactivate or Cancel. UPDATE RATE Press Enter or the right arrow key to select the Update Rate. SPORTDOG.COM...
-
Page 25: Sharing
• Waypoint 1 (to share only Waypoint 1) • Waypoint 2 (to share only Waypoint 2) DOG/HUNTERS To share dogs or hunters, highlight and select one of the following options: • All • Dog 1 • Dog 2 • Hunter 1 • Hunter 2 SPORTDOG.COM... -
Page 26: Traning
If you press and hold the button, the E-Collar will deliver Continuous Static Stimulation until you release the button, up to a maximum of 10 seconds. After 10 seconds, the static stimulation will “time out” for 5 seconds and you’ll need to release the button and press again to deliver additional static stimulation. SPORTDOG.COM... - Page 27 To display the Training Menu, press the Menu button while on the Training page. Home Select Home to see the Home page. Cancel Select Cancel to leave the menu without taking any action. To exit the Training page, press the Menu button and select Home. SPORTDOG.COM...
-
Page 28: Tracking
That icon will not update until the dog is back in range. HUNTERS Each hunter who shares his/her Handheld information will also be represented with a color-coded icon and breadcrumb trail. When moving, the hunter’s icon will appear as a triangle that rotates to show direction of travel. SPORTDOG.COM... - Page 29 GPS collar or hunter’s Handheld. DISTANCE The Distance column shows you the distance between you and the dog you are tracking.* SPEED The Speed column shows you the current speed of the dog you are tracking.* SPORTDOG.COM...
- Page 30 Select Orientation to control the way the map is oriented. Options include North Up and Heading Up. DISPLAY INFO... Select Display Info to see options for the content that goes in the Name List SHOW SPEED Select Yes to display the speed of the dog or hunter being tracked. SPORTDOG.COM...
-
Page 31: Map
NOTE: You cannot pan the map in the Tracking view; all zooming is based on the user’s current GPS location or items being tracked using Menu-View Dog. *The map is shown in the units you selected in Setup. You can changes this at anytime by going to the Settings menu. SPORTDOG.COM... - Page 32 Stops navigation and clears route content from screen (this option is only visible when a route is active) Stop Panning Exits pan mode and re-centers on your current GPS location (this option is only visible when the you are panning the map) SPORTDOG.COM...
- Page 33 If you want to change any of the Info Fields, first choose the arrangement you want by selecting Menu – Arrange Info Fields. Then scroll through and select from these Info Field arrangements: • 1 Wide, 2 Narrow • 4 Narrow • 2 Wide • 2 Narrow • 1 Wide SPORTDOG.COM...
-
Page 34: Voice
• Direction from Handheld – in front of, behind you, left of you, right of you. • Distance from Handheld – Yards/ Miles, Meters/Kilometer • Speed – MPH, KPH UPDATE RATE The Voice feature will report update rates every 2 minutes. SPORTDOG.COM... -
Page 35: Compass
STIMULATION SOFT BUTTONS The three buttons on the left side of the screen display the stimulation level for each of the tracked objects. Objects that do not support stimulation are still color-coded, but show a dash instead of a Stim level. SPORTDOG.COM... - Page 36 Press Menu. Select Home to go to the Home page. Select Done to exit the Change Info Fields mode. Select Cancel to close the menu and return to Change Info Fields. Cancel Select Cancel to leave the menu without taking any action To exit the Compass page, press the Menu button and select Home. SPORTDOG.COM...
-
Page 37: Settings
NOTE: if the GPS Setting is set to Disabled or Demo when it is turned off, it will be reset to Normal when it is turned back on. NOTE: during demonstrations all other GPS functions perform as though a 3D satellite fix has been achieved. SPORTDOG.COM... - Page 38 Default settings are indicated. Coordinates • Degrees • DEGREES, MINUTES ( DEFAULT ) • Deg, Min, Sec • UTM/UPS (Universal Transverse Mercator/Universal Polar Stereographic) • USNG/MGRS (United States National Grid/Military Grid Reference System) SPORTDOG.COM...
- Page 39 • GDA94 • NAD27 San Sal • Geod Datum ‘49 • NAD83 *Recommended because it is a global reference system. Distance • Miles/Yards (DEFAULT) • Kilometers/Meters Speed • MPH (DEFAULT) • KM/H Bearing • True North (DEFAULT) • Magnetic North SPORTDOG.COM...
- Page 40 Highlight and press Enter. A warning message will appear – “Are you sure you want to restore the default settings?” Select Restore Defaults to revert back to the original factory settings or Cancel. Cancel Highlight and select Cancel to return to the main Settings menu. SPORTDOG.COM...
- Page 41 • Beep (default) • Ring • Tone • Alarm • Long Beep • Long Ring • Long Tone Fence/Lost Dog Alert • Off • Beep • Ring (default) • Tone • Alarm • Long Beep • Long Ring • Long Tone SPORTDOG.COM...
- Page 42 Default: 50% *You can also bring up a Backlight Intensity slider from any screen by pressing and holding the Power button for one second. NOTE: Higher brightness levels may decrease battery life between charges. SPORTDOG.COM...
- Page 43 Are you sure you want to reset to factory defaults?” Select Restore Defaults to revert back to the original factory settings or Cancel. ABOUT: Highlight and press Enter to view the following information about the SportDOG TEK 2.0. • Device Name • User Name • User ID •...
-
Page 44: Hunters
Assign Color To assign a collar to the selected hunter, press the right arrow button to bring up a palette of colors, and then use the arrow buttons or wheel to select a color. SPORTDOG.COM... - Page 45 Press the right arrow to delete this hunter and its details. You will receive a message “you are deleting this hunter from the system.” Select Confirm or Cancel. Press the left arrow key to return to the Hunters menu. To exit the Hunters menu, press the Menu button and select Home. SPORTDOG.COM...
-
Page 46: Trip Computer
Press the left or right arrow buttons to change the display to show a different tracked object. The first page shows the Trip Computer statistics for the owner. Press the right arrow key to show dogs and hunters in the same order as they appear on the Tracking page. SPORTDOG.COM... -
Page 47: Journal
Use the arrow and enter buttons to enter a new name. When you have finished entering the name, select the checkbox to return to the Journals menu. Save Select Save to end an Active Journal on a hunt. View Select View to display details about the Active Journal. SPORTDOG.COM... - Page 48 Clear – Use the right arrow button to choose to clear “All,” “None,” or “Selected” breadcrumbs of the available Dogs and Hunters. CANCEL Select Cancel to leave the menu without taking any action. To exit the Journals page, press the Menu button and select Home. SPORTDOG.COM...
-
Page 49: Geofences
• Press Enter to place a geofence point at the cursor location. This will be the very center of your geofence. • Use any of the arrow buttons (the cursor will also adjust automatically with your body movements) to expand the circle to the size you want and press Enter. SPORTDOG.COM... - Page 50 • After all editing, press Menu and select Finish Geofence. Color Highlight Color and press the right arrow button or Enter to select a color. NOTE: the same color can be assigned to more than one geofence, because only one geofence can be viewed at a time. SPORTDOG.COM...
-
Page 51: Waypoints
Use the arrows to scroll through and make your selections. When you’re done, select the checkbox to return to the details page. NOTE: When the keyboard dialog is first accessed the existing text label is highlighted. Entering in new characters overwrites the existing label. SPORTDOG.COM... - Page 52 Enter. The first character will be highlighted. Use the wheel or the up/down arrows to change the character. Use the right/left arrows to move to the Next character you want to change, then use the up/down arrows to change that one. When you’re done, press Enter to move on to another field. SPORTDOG.COM...
- Page 53 This option lets you delete a set of existing waypoint types without removing all of the waypoints. Delete All Waypoints Select Delete All Waypoints and press Enter to delete all of the waypoints on the Handheld. Cancel Select Cancel and press Enter to dismiss the menu without taking any action. SPORTDOG.COM...
-
Page 54: Sun/Moon
• Reset Time and Date – select Reset Time and Date and press Enter to reset these fields to display the current time and date based on the GPS information • Cancel – select Cancel and press Enter to dismiss the menu without taking any action SPORTDOG.COM... -
Page 55: Accessories
ACCESSORIES To purchase additional accessories for your SportDOG Brand TEK Series 2.0 Systems, contact the Customer Care ® Center at 1-800-732-0144 or visit our website at www.sportdog.com. Component Part Number E-collar SDT52-14790 GPS collar (includes whip and patch antennas) SDT52-14792... -
Page 56: Frequently Asked Questions
Can I attach a leash to the collar receiver? DO NOT attach a leash to the collar receiver. You may put a separate non-metallic collar on your dog’s neck and attach a leash. Be sure the extra collar does not interfere with the contact points. SPORTDOG.COM... -
Page 57: Troubleshooting
TROUBLESHOOTING The answers to these questions should help you solve any problem you have with this system. If they do not, please contact the Customer Care Center at 1-800-732-0144 or visit our website at www.sportdog.com. PROBLEM SOLUTION My handheld transceiver does not turn on. -
Page 58: Warranty
TWO YEAR NON-TRANSFERRABLE LIMITED WARRANTY This Product has the benefit of a limited manufacturer’s warranty. Complete details of the warranty applicable to this Product and its terms can be found at www.sportdog.com and/or are available by contacting your local Customer Care Center. -
Page 59: Terms Of Use And Limitation Of Liability
Product. Buyer assumes all risks and liability from the use of this Product. 5. MODIFICATION OF TERMS AND CONDITIONS Radio Systems Corporation reserves the right to change the terms, conditions, and notices under which this Product is offered. SPORTDOG.COM... - Page 60 Radio Systems Corporation reserves the right to change the terms, conditions, and notices governing this Product from time to time. If such changes have been notified to you prior to your use of this Product, they shall be binding on you as if incorporated herein. SPORTDOG.COM...
-
Page 61: Compliance
Ce dispositif a été conçu pour fonctionner avec les antennes fournies avec ce produit. L’utilisation d’autres antennes peut enfreindre les règles industrielles du Canada et annuler l’autorité de l’utilisateur quant au fonctionnement de l’équipement. AUSTRALIA This device complies with the applicable EMC requirements specified by the ACMA (Australian Communications and Media Authority). SPORTDOG.COM... -
Page 62: Customer Care Center/Service Clientèle
Handheld Device). Call the Customer Care Center if your battery needs to be replaced. For a listing of Customer Care Center telephone numbers, visit our website at www.sportdog.com. AT END OF PRODUCT LIFE, USE THESE BATTERY REMOVAL INSTRUCTIONS FOR FINAL... - Page 63 SPORTDOG.COM...
-
Page 64: Tek Series 2.O Add-A-Dog® Collars
TEK::2T ADD-A-DOG TEK 2.0 GPS TRACKING + E-COLLAR TEK::2AD ADD-A-DOG NOT COMPATIBLE WITH TEK 1.0 OR OTHER SPORTDOG BRAND SYSTEM. GEAR THE WAY YOU’D DESIGN IT® ©2014 RADIO SYSTEMS® CORPORATION Radio Systems Corporation • 10427 PetSafe Way • Knoxville, TN 37932 • 1-800-732-0144...
Need help?
Do you have a question about the TEK-V2L and is the answer not in the manual?
Questions and answers