
Subscribe to Our Youtube Channel
Related Manuals for SportDOG SD-105


Summary of Contents for SportDOG SD-105
- Page 1 YardTrainer SD-105 Operating Guide Please read this entire guide before beginning...
-
Page 2: Table Of Contents
Thank you for choosing SportDOG Brand™. Used properly, this product will help you train your dog effi ciently and safely. To ensure your satisfaction, please review this owner’s manual thoroughly. If you have questions regarding this product’s operation, please see this manual’s Frequently Asked Questions or Troubleshooting section, contact our Customer Care Center at 1-800-732-0144, or visit our website at www.sportdogbrand.com. -
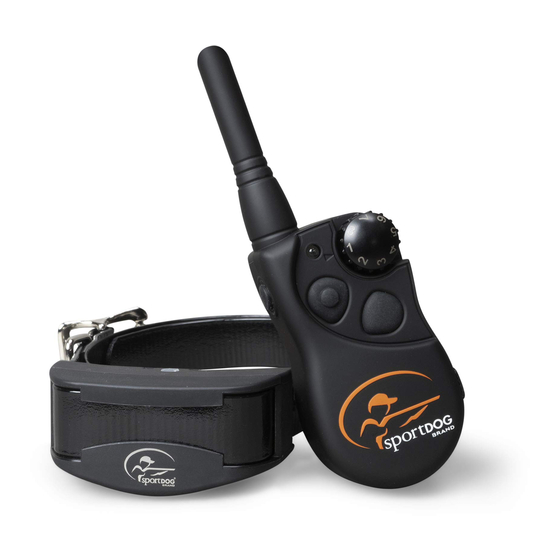
Page 3: Components
Components How the System Works The SportDOG YardTrainer SD-105 has been proven safe, comfortable and effective for all dogs over 8 pounds. Consistent, correct use of this product allows you to reinforce commands and correct misbehavior from up to 100 yards. The Remote Transmitter sends a signal, activating the Collar Receiver to deliver a harmless stimulation. -
Page 4: Key Defi Nitions
Key Defi nitions Remote Transmitter: Transmits the radio signal to the Collar Receiver. It is weatherproof and cannot be submerged in water. Intensity Dial: Provides multiple levels of stimulation so you can match the correction to your dog’s temperament. Transmitter Indicator Light: Indicates that a button is pressed and also serves as a low battery indicator. Upper Button: This button is factory-set to deliver Continuous Stimulation. -
Page 5: Prepare The Remote Transmitter
Step Prepare the Remote Transmitter Inserting 3-Volt Batteries 1. Remove the battery cover from the back of the Remote Transmitter by using a coin and turning it counter-clockwise. 2. Insert 3-volt batteries and secure the battery cover. Note: Approximate battery life will be 3 months, depending upon frequency of use. -
Page 6: Prepare The Collar Receiver
Step Prepare the Collar Receiver Inserting 3-Volt Batteries 1. Use a small Philips screwdriver to remove the two screws on the receiver. 2. Press the battery door up in the direction of the arrows on the door. It will move up slightly and the door will release. -
Page 7: Fit The Collar Receiver
Fit the Collar Receiver Step Important: The proper fi t and placement of the Collar Receiver is important for effective training. The Contact Points must have direct contact with your dog’s skin. To ensure a proper fi t, follow these steps: 1. -
Page 8: Find The Best Intensity Level For Your Dog
Find the Best Intensity Level for Your Dog Step The YardTrainer SD-105 has multiple intensity levels. This allows you to choose the stimulation that is best for your dog. Note: Always start at the lowest level and work your way up. -
Page 9: Reset The Collar Receiver
_________________________________________ General Training Tips Now you are ready to use the YardTrainer SD-105 and begin training your dog. Please keep the following training tips in mind. • Eliminate one misbehavior or teach one obedience command at a time. If you move too fast with the training, your dog may become confused. -
Page 10: Frequently Asked Questions
Will I get exactly 100 yards of The range you get with your YardTrainer SD-105 will range with the YardTrainer vary according to terrain, weather, vegetation, as well SD-105? as transmission from other radio devices. -
Page 11: Troubleshooting
Remote Transmitter or Collar Receiver. • Many factors can impact the range you have with the YardTrainer SD-105. For a list of these factors, please refer to “How the System Works”. • You can verify the Collar Receiver is delivering stimulation to your dog by placing the test light, enclosed in your kit, on the Collar Receiver. -
Page 12: Test Light Instructions
Test Light Instructions 1. Hold the Test Light Contacts to the Contact Points. 2. Press a Stimulation Button on the Remote Transmitter. 3. The Test Light will fl ash. Note: At higher Intensity Levels the Test Light will fl ash brighter. Save the Test Light for future testing. -
Page 13: Fcc Compliance
FCC COMPLIANCE This equipment has been tested and found to comply with the limits for a Class B digital device, pursuant to Part 15 of the FCC Rules. These limits are designed to provide reasonable protection against harmful interference when the equipment is operated in a residential environment. This equipment generates, uses, and can radiate radio frequency energy and, if not installed and used in accordance with the instruction guide, may cause harmful interference to radio communications. - Page 14 1-800-732-0144...
- Page 15 www.sportdogbrand.com...
- Page 16 This device complies with part 15 of the FCC Tested To Comply Rules. Operation is subject to the following With FCC Standards two conditions: (1) This device may not cause harmful interference, and (2) this device must FOR HOME OR OFFICE USE accept any interference received, including interference that may cause undesired operation.
Need help?
Do you have a question about the SD-105 and is the answer not in the manual?
Questions and answers