Table of Contents
Advertisement
Gold
Gold
Magnetic
Magnetic
Gold
Gold Magnetic
Magnetic Bike
Assembly & & & & User
Assembly
Assembly
Assembly
User
User Instruction
User
Instruction
Instruction – – – – Please
Instruction
Important
Important – – – – Please
Please
Important
Important
Please read
Please
These Instructions contain important information which will help you get best from your
equipment and ensure safe and correct assembly, use and maintenance.
If you need help or have damaged or missing parts, call the Customer
Please
Please keep
Please
read
these
instructions
read these
read
these
these instructions
instructions fully
instructions
Bike
Bike
Bike
keep
keep for
keep
for
for
for future
future
future
future reference
reference
reference
reference
fully
before
assembly
assembly or or or or using
fully
fully before
before assembly
before
assembly
Customer
Customer
Customer Helpline
1
901
901
901 / / / / 7609
901
7609
7609
7609
using
using
using
Helpline
Helpline: 0845
Helpline
0845
0845 600
0845
600 0464
600
600
0464
0464
0464
Advertisement
Table of Contents

Subscribe to Our Youtube Channel
Related Manuals for Rogerblack Gold Magnetic Bike


Summary of Contents for Rogerblack Gold Magnetic Bike
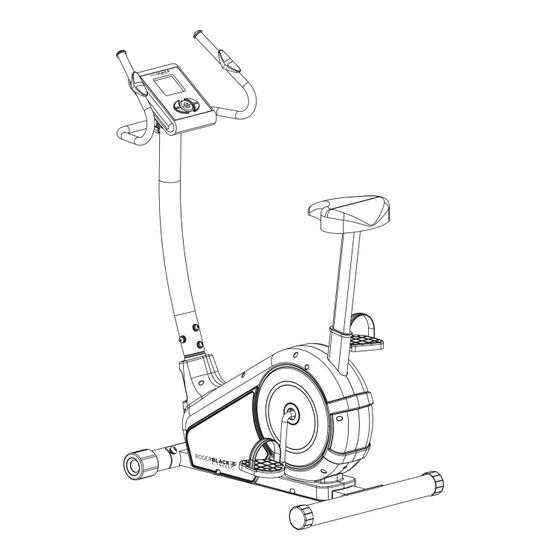
- Page 1 Gold Gold Magnetic Magnetic Bike Bike Gold Gold Magnetic Magnetic Bike Bike Assembly Assembly Assembly Assembly & & & & User User User User Instruction Instruction Instruction Instruction – – – – Please Please Please Please keep keep keep keep for for future future future...
-
Page 2: Table Of Contents
Contents Contents Contents Contents Safety Safety Safety Safety Information Information Information Information 3 3 3 3 Components Components Components - - - - Parts Parts Parts 4 4 4 4 Components Parts Components Components Components – – – – Fixing Fixing Fixing 5 5 5 5... - Page 3 To reduce the risk of serious injury, read the entire manual before you assemble or operate the Roger Black Gold Magnetic Bike. In particular, note the following safety precautions: Assembly Assembly Assembly Assembly • Keep hands away from all moving parts.
- Page 4 If you have any damaged or missing parts, Please Components-parts Components-parts Components-parts Components-parts 0845 0845 6000 6000 Call the Customer Helpline: 0845 0845 6000 6000 464 Please Please Please Please check check check check you you have have have have all all parts parts parts...
- Page 5 Components Components Components – – – – Fixings Fixings Fixings Components Fixings Please Please Please Please check check check check you you have have have have all all fixings fixings fixings fixings listed listed listed listed below below below below NOTE NOTE NOTE : : : : Some of the fixings are pre-fitted to the larger components.
- Page 6 A A A A ss embly embly Instruction Instruction ssembly embly Instruction Instruction Recommend Recommend Recommend Recommend the the assembly assembly assembly assembly if if if if this this this this equipment equipment equipment equipment is is is is carried carried carried carried by...
- Page 7 A A A A ss embly embly Instruction Instruction ssembly embly Instruction Instruction a a a a Step Step Step 2 2 2 2 Step a. a. a. a. Connect Foot pedal ( ( ( ( 52 52 R R R R & & & & 52L 52L) ) ) ) to crank on the Main body (1) (1) as shown.
- Page 8 A A A A ss embly embly Instruction Instruction ssembly embly Instruction Instruction Step Step Step 3 3 3 3 Step a. a. a. a. Connect Main wire (A A A A ) from Main body (1) b. b. b. b. Attach Front poster (10) (10) (10) (10) to Main body (1)
- Page 9 A A A A ss embly embly Instruction Instruction ssembly embly Instruction Instruction Step Step Step 4 4 4 4 Step a. a. a. a. Insert two Wire holder (71) (71) (71) c. c. c. c. Connect Main wire (A (A (A (A’...
-
Page 10: Assembly Assembly Instruction Instruction
Assembly Assembly Instruction Instruction Assembly Assembly Instruction Instruction Step Step Step 5 5 5 5 Step a. a. a. a. Loosing the three M8 Aircraft nuts (14) (14) (14) (14) and c. c. c. c. Insert the Saddle poster (15) (15) (15) (15) into the Main... - Page 11 A A A A ss embly embly Instruction Instruction ssembly embly Instruction Instruction Step Step Step 6 6 6 6 Step a. a. a. a. Insert the connector of the Charger (72) (72) (72) (72) into b b b b . Attach the Charger (72) (72) (72) (72) to the Power outlet...
-
Page 12: Computer Computer Operation Operation
Computer Operation Computer Operation Computer Computer Operation Operation Function Function Function Function and and operations operations operations operations Display Mode Start/Stop Body Fat Pulse Recovery Key Functions: Functions: Functions: Functions: PULSE PULSE R R R R ECOV. ECOV. Key: MODE Key: : : : PULSE PULSE... - Page 13 Computer Operation Computer Operation Computer Computer Operation Operation Computer Computer Computer Computer display display display display and and specifications specifications specifications specifications COMPUTER COMPUTER DISPLAY DISPLAY DISPLAY ..COMPUTER COMPUTER DISPLAY beeps a long sound, and turn on the 1.
- Page 14 Computer Operation Computer Operation Computer Computer Operation Operation Computer Computer Computer Computer operation operation operation operation Choose Choose Choose Choose workout workout workout workout program: program: program: program: MANUAL By pressing the ▲ ▲ ▲ ▲ or ▼ The message reads “MANUAL MANUAL MANUAL”...
- Page 15 Computer Operation Computer Operation Computer Computer Operation Operation Computer Computer Computer Computer operation operation operation operation Special Special Special Special Operations: Operations: Operations: Operations: U1-U4 Custom Profile: U1-U4 U1-U4 U1-U4 Custom Custom Custom Profile: Profile: Profile: There is a Custom Profile stored for each User (U1-U4). To modify the Custom profile the user must hold MODE MODE MODE...
- Page 16 Computer Operation Computer Operation Computer Computer Operation Operation Computer Computer Computer Computer operation operation operation operation 6. 6. 6. 6. HRS Workout Workout Program: Program: HRS Workout Workout Program: Program: MODE ● If Press MODE MODE MODE button to accept H.R.S Program(C1~C3) The message reads “C1 C1”...
- Page 17 Computer Operation Computer Operation Computer Computer Operation Operation Computer Computer Computer Computer operation operation operation operation ● If 10 seconds after the heart rate value is not equal to zero. Time starts counting from 00:25 - 00:24 - - to 00:00. As soon as 00:00 is reached, the computer will show your FAT % status with the grade .
- Page 18 Computer Operation Computer Operation Computer Computer Operation Operation Computer Computer Computer Computer operation operation operation operation 7. 7. 7. 7. RECOVERY RECOVERY RECOVERY TEST: TEST: RECOVERY TEST: TEST: � During the START or PAUSE stage, leave the hands holding on grips or leave the chest transmitter attached and then press PULSE PULSE...
- Page 19 Computer Operation Computer Operation Computer Computer Operation Operation Pre-defined Pre-defined Pre-defined Pre-defined program program program program profile profile profile profile MANUAL MANUAL MANUAL MANUAL ● ● ● ● P2 ● ● ● ● P3 ● ● ● ● P4 ● ● ● ● P5 ●...
- Page 20 Computer Operation Computer Operation Computer Computer Operation Operation Pre-defined Pre-defined Pre-defined Pre-defined program program program program profile profile profile profile ● ● ● ● P P P P 7 7 7 7 ● ● ● ● P P P P 8 8 8 8 ●...
- Page 21 Computer Operation Computer Operation Computer Computer Operation Operation Pre-defined Pre-defined Pre-defined Pre-defined program program program program profile profile profile profile ● ● ● ● HRC HRC 60% ● ● ● ● HRC HRC 70% ● ● ● ● HRC ● ● ● ● T.H.R T.H.R T.H.R HRC 85%...
-
Page 22: Exercising Exercising Information Information
Exercising Information Exercising Information Exercising Exercising Information Information Before Before Before Before starting starting starting starting to to to to exercise exercise exercise exercise How you begin your exercise will vary from person to person. If you have not exercised for a long period of time, or are severely overweight, you MUST MUST MUST... - Page 23 Exercise Information Exercise Information Exercise Exercise Information Information Users Users Uncond Uncond Uncondi i i i tioned tioned tioned Conditioned Conditioned Users Users age Uncond tioned Conditioned Conditioned (years) (Target (Target (Target (Target Zone Zone Zone Zone A A A A ) ) ) ) (Target (Target (Target...
-
Page 24: Muscle Muscle Chart Chart
Exercise Exercise Information Information Exercise Exercise Information Information Muscle Muscle Chart Chart Muscle Muscle Chart Chart T T T T argeted argeted Muscle Groups argeted argeted Muscle Muscle Muscle Groups Groups Groups The exercise routines performed on the preacher pad and barbell will develop primarily upper body muscle groups shown in white. -
Page 25: Warming Warming Up Up Up And And And Cooling Cooling Cooling Down Down
Exercise Exercise Information Information Exercise Exercise Information Information Warming Cooling Down exercises Warming Warming Warming up up and and Cooling Cooling Cooling Down Down Down exercises exercises exercises A successful exercise session begins with warming up exercises and ends with exercise for cooling down and relaxing. - Page 26 Exercising Exercising Exercising I I I I nformation nformation nformation Exercising nformation Calf Calf Calf / / / / Achilles Achilles Achilles Stretch Stretch Calf Achilles Stretch Stretch Calf/achilles stretch With one hand against the wall for balance, reach back and grasp one foot with your other hand.
- Page 27 Care Care Maintenance Maintenance Care Care and and Maintenance Maintenance Exercising I nformation Exercising I nformation Exercising I Exercising Information nformation 1. Examine the equipment periodically in 5. Do not attempt to repair this equipment order to detect any damage or wear yourself.
-
Page 28: Exploded Exploded Parts Parts Parts Diagram Diagram
Exploded Exploded Parts Parts Diagram Diagram Exploded Exploded Parts Parts Diagram Diagram... -
Page 29: Exploded Exploded Parts Parts Parts List List
Exploded Exploded Parts Parts List List Exploded Exploded Parts Parts List List Description Description Ф28×586mm Handle grip Main frame ST4.2×15mm Dome head Philips Ф5mm Washer Screw Ф22×1.5mm Cone End Cap Ф5mm Spring Washer Handle Pulse Sensor M5×15mm Philips Bolt Handle Motor M8×40mm Allen bolt M3×15mm Philips Bolt... - Page 30 Exploded Exploded Parts Parts List List Exploded Exploded Parts Parts List List M10×20mm Allen bolt Bearing M6 Hex nut Axle Bushing M6/T10 Hex nut Big Washer U- shaped Bracket Belt wheel M6×45mm Adjustable bolt Crank Flywheel Magnetic Sensor Belt M10×1.25mm Flange Nut Ф10mm Washer 30×70mm Plastic Sleeve Ф18×Ф3×60mm Spring...
-
Page 31: Guarantee
Guarantee Guarantee Guarantee Guarantee Product Product Product Product Guarantee Guarantee Guarantee Guarantee This product is guaranteed against manufacturing defects from a period of YEAR YEAR YEAR YEAR This product is guaranteed against for one year from the date of original purchase Any defect that arises due to faulty materials or workmanship will either be replaced refunded or repaired free of charge where possible during this period by the dealer from whom you purchased the unit.
Need help?
Do you have a question about the Gold Magnetic Bike and is the answer not in the manual?
Questions and answers