Advertisement
Quick Links
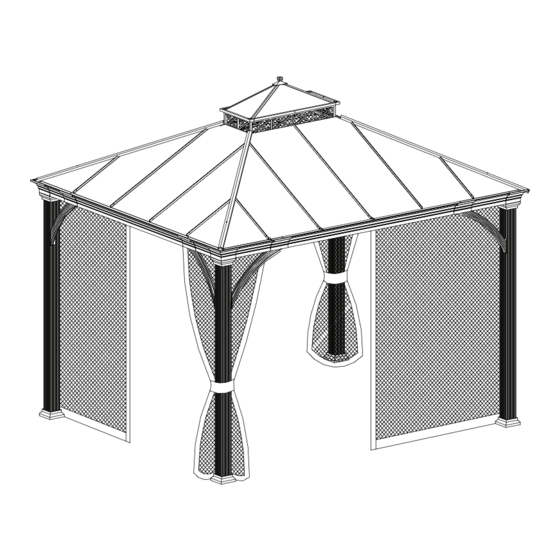
Congratulations on your purchase of our Sonoma Hardtop Gazebo. Our clear, easy to follow,
step-by-step instructions will guide you through the assembly process from start to finish.
WARNING:
THIS UNIT IS HEAVY! For safety, DO NOT assemble this item alone. Six to eight people are
recommended for safe assembly.
Keep all children and pets away from assembly area. Children and pets should be supervised
when they are in the assembly area of the gazebo.
Do not assemble less than 6 ft / 1.8 m from any obstruction such as a fence, garage, house,
overhanging branches, laundry line or electrical wires.
Some parts may contain sharp edges. Wear protective gloves.
When assembling and using this product, basic safety precautions should always be followed to
reduce the risk of personal injury and damage to equipment. Please read all instructions before
assembly and usage.
For outdoor use only. Install on level ground.
Check all bolts for tightness before and during usage.
Please take time to read these instructions thoroughly and follow each step carefully for safe and
easy operation. Keep this manual for future reference.
We would like to hear from you with any comments or suggestions. In the continental U.S., you can
call us toll-free at 1-888-301-0332 from 8 a.m. to 5 p.m. CST Monday – Friday. You can also send us
an email using the feedback icon at SamsClub.com.
Call centre for missing parts: 1-866-578-6569 from 8:00 a.m. EST to 8:00 p.m. PST.
Sonoma Hardtop Gazebo 10' X 12'
Owner's Manual
IMPORTANT
Advertisement

Related Manuals for Members Mark Sonoma


Summary of Contents for Members Mark Sonoma
- Page 1 Sonoma Hardtop Gazebo 10’ X 12’ Owner’s Manual Congratulations on your purchase of our Sonoma Hardtop Gazebo. Our clear, easy to follow, step-by-step instructions will guide you through the assembly process from start to finish. WARNING: THIS UNIT IS HEAVY! For safety, DO NOT assemble this item alone. Six to eight people are ...
- Page 2 Parts List Step 1 A1 (x2) Long Decorative Gutter B1 (x2) Short Decorative Gutter Corner Decorative Gutter C1(X2) D1(x2) Corner Decorative Gutter 2 E1(x4) Middle Beam Connector F1(x8) Decorative Gutter Connector G1(X4) Corner Connector H1(x4) Long Mosquito Netting Tube Short Mosquito Netting I1(x4) Tube...
- Page 3 Step 2 A2(x4) Top Slanting Bar B2 (x1) Big Top Frame Middle Beam of Left Long Support Beam of D2 (x2) C2 (x4) Big Top Big Top Long Side Right Long Support Beam Left Short Support Beam of E2 (x2) F2 (x2) of Big Top Long Side Big Top Long Side...
- Page 4 Step 5 Left Long Big Top A5(x2) B5 (x2) Right Long Big Top Cover Cover Left Middle Big Top Right Middle Big Top C5 (x4) D5(x4) Cover Cover Left Small Big Top E5 (x4) F5 (x4) Right Small Big Top Cover Cover G5 (x2) Short Big Top Cover...
- Page 5 Fig. 2: Attach Middle Beam Connectors (E1) to Long Decorative Gutters (A1) and Short Decorative Gutters(B1) using Short Bolts (CC) and Flat Washers (BB). Tighten with Wrench (LL). Fig.3: Attach Corner Connectors (G1) to Corner Decorative Gutter 1 (C1&D1) using Short Bolts (CC) and Flat Washers (BB). Tighten with wrench (LL) Fig.
- Page 6 Fig.5: Fix the lower end of Top Slanting Bars (A2) onto the Corner Connectors (G1) using Long Screws (EE), Flat Washer (BB) and Nuts (FF). Fig.6: Assemble the top end of Top Slanting Bars (A2) to Big Top Frames (B2) using Bolts (CC) and Flat Washers (BB).
- Page 7 Fig.11 Fig.11 KK KK G3 G3 Fig.13-1 Fig.13-1 Fig.13-2 Fig.13-2 BB BB D3 D3 D3 D3 CC CC BB BB C3 C3 E3 E3 A3(F3) A3(F3) G3 G3 CC CC A3 A3 J3 J3 BB BB Fig.11 Fig.11 B2 B2 A3 A3 E3 E3 F3 F3...
- Page 8 Fig.15: Insert the Posts (C4) into the Base Covers (B4), then install the Post Bases (A4) to the bottom of Posts (C4) using Small Screws (DD) and Flat Washers (BB). Fig.16: Attach the Top Blocks (D4) to the top of Posts (C4) using Long Bolts (MM) and Flat Washers (BB). Tighten with Wrench (LL).
- Page 9 Fig.22: Press Left Long Big Top Cover (A5) to Right Long Big Top Cover (B5) Fig.22-1: Insert the assemblies into the U groove of Big Top Frame (B2). Repeat the steps for Short Big Top Cover (G5). Fig.23: Attach Left Long Big Top Covers (A5) and Short Big Top Covers (G5) to Top Slanting Bars (A2) using Small Screws (DD) and Flat Washers (BB).
- Page 10 Mosquito NCetting (J5) correctly. Attach 6 hooks to Short Tubes (I1) and 7 hooks to Long Tubes (H1). Now, your Sonoma Pavilion is ready for use. Back up hardware pack...
- Page 11 IMPORTANT: 1. Keep all children and pets away from assembly area. Children and pets should be supervised when they are in the area of pavilion construction. 2. The area for assembly should not be less than 6 feet from any obstruction such as fence, garage, house, overhanging branches, laundry line or electrical wires.
Need help?
Do you have a question about the Sonoma and is the answer not in the manual?
Questions and answers
need replacement screening for Sonoma 10x12