Advertisement
Advertisement
Table of Contents

Subscribe to Our Youtube Channel
Related Manuals for Extech Instruments TB400


Summary of Contents for Extech Instruments TB400
- Page 1 USER GUIDE Turbidity Meter Model TB400 800.561.8187 information@itm.com www. .com...
-
Page 2: Meter Description
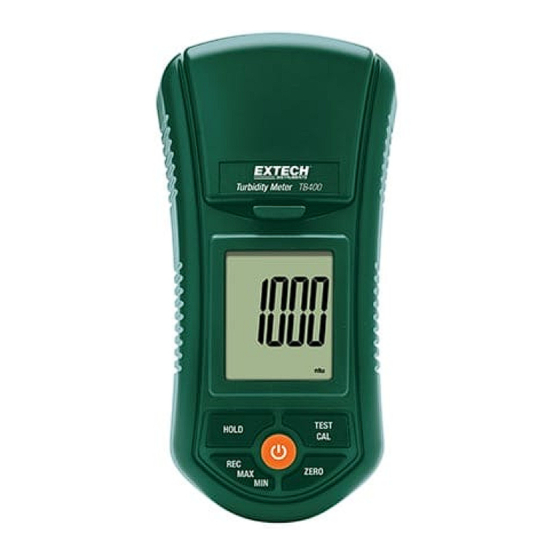
Congratulations on your purchase of the TB400 Turbidity tester. The TB400 measures turbidity up to 1000 NTU. The advantages of the TB400 to the user include: Easy to use and maintain, high accuracy, self‐calibration, and fast response. This meter is shipped fully tested and calibrated and, with proper use, will provide years of reliable service. Please visit our website (www.extech.com) to check for the latest version of this User Guide, Product Updates, and Customer Support. Applications Typical applications include the measurement of municipal water, food and beverage water, or other aqueous solutions where fluid clarity is important. Meter Description 1. LCD Display 2. HOLD button 3. REC‐MAX‐MIN button 4. POWER button 5. ZERO button 6. TEST‐CAL button 7. Test bottle chamber latch 8. Test bottle chamber 9. Test bottle Battery compartment on rear of meter TB400-en-GB_V1.3 8/16 800.561.8187 information@itm.com www. .com... -
Page 3: Measurement Procedure
Sample Preparation Place the testing liquid into the supplied sample bottle up to the 10mL line and secure the cap to the bottle. Clean and dry the outside of the sample cup to ensure a clean surface. Measurement The meter should be switched OFF. Open the test chamber cover and Insert the testing bottle completely into the chamber. Line up the white mark of the testing bottle with the white mark on the edge of the test chamber. Close the chamber cover and lock it in place. Press the “POWER” button to turn on the meter. Momentarily press the “TEST” button. The display will flash "tESt" for approximately 10 seconds and then the turbidity value, in NTU units, will be displayed. Momentarily press the OFF button to turn off the meter. Data HOLD Press the “HOLD” button once while taking a measurement to freeze the value on the display. Press “HOLD” again to release the Data Hold function. Data Record (MAX/MIN Readings) 1. The data record function records the MAX and Min readings. Press "REC" button once to begin data recording. The LCD will display the "REC" symbol. 2. In recording mode press "REC" once. The display will show the maximum reading and "REC MAX" will appear on the LCD display. 3. Press "REC" button once again and "REC MIN" will appear on the LCD along with the minimum reading. 4. To delete the MAX or MIN value press "HOLD" once. The LCD will display "REC". Auto‐Power OFF The Auto Power OFF feature automatically switches the TB400 OFF 10 minutes after the last key press. TB400-en-GB_V1.3 8/16 800.561.8187 information@itm.com www. .com... - Page 4 1. Insert the Zero NTU solution bottle into the testing chamber, line up the white marks, and close and latch the cover. Turn on the meter and Press and hold the "CAL" button until the LCD displays "CAL" then release the “CAL” button. 2. Wait one second and then the LCD will display: 0.00 Note: If the LCD does not display zero when using "0 NTU" liquid, press the "ZERO" button continuously until the LCD displays a zero value. 3. The meter is now ready for "0 NTU" calibration. 4. Momentarily press "CAL" button. The LCD will flash CAL for about 10 seconds and then show the following display: 0.00 5. The LCD will then display: Lift the lid on the test chamber and remove the 0 NTU test solution bottle. TB400-en-GB_V1.3 8/16 800.561.8187 information@itm.com www. .com...
- Page 5 Gently shake the 100 NTU test solution bottle, Line up the white mark on the bottle and insert it into the test chamber and close and lock the cover. Momentarily press the "CAL" button. The LCD will flash CAL for 10 seconds. When calibration is complete the LCD will return to normal operating mode. NOTE: If the following error message appears "Error cannot be calibrated..." check the value of the standard solution. If error message still appears complete the "Calibration Clear" procedure. TB400-en-GB_V1.3 8/16 800.561.8187 information@itm.com www. .com...
- Page 6 Power ON the meter with the cover closed but no testing bottle in the chamber. Press the "CAL" button continuously until the LCD displays "CAL" Wait one second; the LCD will then display: 0.00 Momentarily press the "HOLD" button. The LCD will display: Momentarily press the "HOLD" button again. The LCD will display: Momentarily Press the "CAL" button. The LCD will flash "CAL" for 10 seconds: The calibration data clear is complete. The meter will return to normal operating mode. TB400-en-GB_V1.3 8/16 800.561.8187 information@itm.com www. .com...
-
Page 7: Maintenance
Maintenance Low Battery Indication When the batteries become weak the “ ” icon will appear in the display. Refer to the Battery Replacement section for battery replacement information. Battery Replacement Remove the two (2) screws on the back of meter and remove the battery cover. Replace the six (6) AAA batteries observing polarity. Close the battery cover and replace the screws. Battery Safety Reminders Never dispose of batteries in a fire. Batteries may explode or leak. Never mix battery types. Always install new batteries of the same type. Never dispose of used batteries or rechargeable batteries in household waste. As consumers, users are legally required to take used batteries to appropriate collection sites, the retail store where the batteries were purchased, or wherever batteries are sold. Disposal: Do not dispose of this instrument in household waste. The user is obligated to take end‐of‐life devices to a designated collection point for the disposal of electrical and electronic equipment. Cleaning Wipe the meter housing with a damp cloth. Do not use abrasives or solvents. TB400-en-GB_V1.3 8/16 800.561.8187 information@itm.com www. .com... -
Page 8: Specifications
Accuracy Range 0 to 49.99: ±5% reading or ± 0.5 NTU whichever is greater Range 50 to 1000: ±5% reading Operating Temperature 0 to 50 C (32 to 122 F) Operating Humidity Less than 85% RH Light Source LED, 850 nm Light Detector Photo Diode Response Time Less than 10 seconds Sample Volume 10mL minimum Power Six 1.5V AAA batteries Power consumption Standby Mode: approx. 3.5mADC; Testing Mode: approx. 36mADC Dimensions/Weight 155 x 76 x 62mm (6.1 x 3.0 x 2.4”) ; 320g (0.70lbs) Auto Power OFF Automatically switches off 10 minutes after the last key press Standard Meets ISO 7027 Copyright © 2013‐2016 FLIR Systems, Inc. All rights reserved including the right of reproduction in whole or in part in any form ISO‐9001 Certified www.extech.com TB400-en-GB_V1.3 8/16 800.561.8187 information@itm.com www. .com...
Need help?
Do you have a question about the TB400 and is the answer not in the manual?
Questions and answers