
Related Manuals for Peter Lynn 4-Line Series

Summary of Contents for Peter Lynn 4-Line Series
- Page 1 MANUEL D´UTILISATION POUR TOUTES LES AILES 4 LIGNES • GEBRAUCHSANLEITUNG FÜR 4-LEINER FIXED BRIDLE KITES...
- Page 2 Peter Lynn is here to help you pursue your dream, making you go beyond yourself. Are you ready to achieve your ultimate challenge? Peter Lynn has been there taking challenges from the early days of the sport.
- Page 3 Schnee. Peter Lynn ist hier um Ihnen zu helfen, Ihren Traum zu verfolgen, so dass Sie über sich selbst herauswachsen können. Sind Sie bereit? Peter Lynn relève le défi du powerkite depuis les premiers jours du sport en développant sans cesse de nouveaux concepts et en améliorant ses produits Peter Lynn hat Herausforderungen seit den frühen Tagen dieses Sports...
- Page 4 • Do not alter, modify or change this product. Repairs should be done by a profes- • Stop kiting immediately when a (thunder)storm is approaching. sional kite repair shop, sail repair shop, or by the Peter Lynn company. • Make sure you are familiar with the location and local customs and laws before attempting any kind of kite sports. Safe traction kiting: • A traction kite is not a toy and should not be flown by inexperienced persons and certainly not by children.
- Page 5 à la prise de médicaments. • N’utilisez pas votre aile si les conditions météorologiques sont amenées à • Ne modifiez jamais ce produit. Les réparations doivent être effectuées par un changer radicalement. professionnel ou par la marque Peter Lynn. • Assurez-vous de respecter les réglementations applicables à votre zone de pra- tique avant de commencer à piloter votre aile. • N’utilisez pas une aile qui est trop puissante vis-à-vis de votre poids, de votre expérience et des conditions de vent. N’hésitez pas à demander conseil à un utilisateur expérimenté...
- Page 6 • Verwenden Sie dieses Produkt ausschließlich für Power-Kiting, Buggy fahren, Landboarding und Snowkiting. • Verwenden Sie dieses Produkt nur, wenn Sie in einer guten gesundheitlichen Verfassung sind. Verwenden Sie dieses Produkt niemals, wenn Sie unter dem Einfluss von Alkohol, Drogen oder Medikamenten stehen. • Verändern oder modifizieren Sie das Produkt nicht. Reparaturen sollten nur von einer professionellen Kite- oder Segel-Werkstatt oder durch die Firma Peter Lynn durchgeführt werden.
- Page 7 N I T N I T N I T THE WIND WINDOW Before flying your kite it is very important to understand the ‘wind window’. The image shows where the kite will create the most power (straight downwind, also known as the ‘power zone’) and where the kite will create the least power (edge of the window and zenith). LA FENÊTRE DU VENT Avant de décoller votre aile, il est très important de comprendre ce qu’est la fenêtre du vent. L’image ci-contre explique dans quelles conditions l’aile pro- duira le plus de puissance (en pleine fenêtre) ainsi que là où elle en produira le moins (bord de fenêtre et zénith).
- Page 8 OVERVIEW & TERMINOLOGY - VUE D’ENSEMBLE ET TERMINOLOGIE - FLYING YOUR KITE ON HANDLES AILE DE TRACTION AVEC POIGNÉES 1. Top skin 1. Extrados 2. Lower skin (foil kites only) 2. Intrados (seulement des ailes) 3. Air inlets (foil kites only) 3. Entrées d’air (seulement des ailes) 4. Velcro bridle loop 4. Velcro 5. Leading edge 5.
- Page 9 Loop over handle ÜBERSICHT UND TERMINOLOGIE - ATTACHING HARNESS LINE TO HANDLES Boucle sur la poignée DEN KITE MIT HANDLES STEUERN If you want to fly your kite on handles with a harness line, attach the harness line using a Schlaufe mit der Schlaufe der Handles 1.
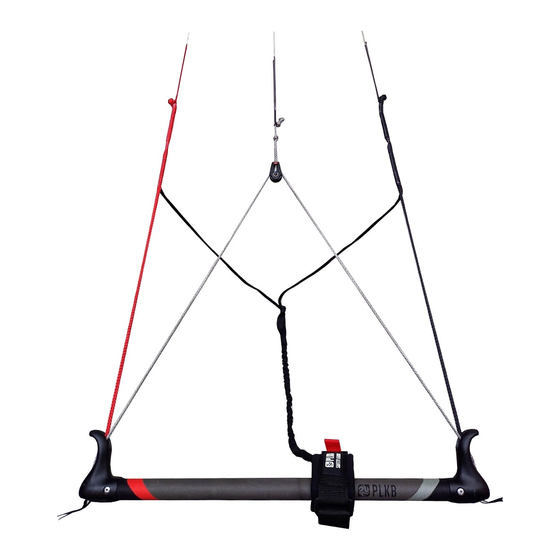
- Page 10 OVERVIEW & TERMINOLOGY - VUE D’ENSEMBLE ET TERMINOLOGIE - FLYING YOUR KITE ON CONTROL BAR AILE DE TRACTION AVEC BARRE 1. Top skin 1. Extrados 2. Lower skin (foil kites only) 2. Intrados (seulement des ailes) 3. Air inlets (foil kites only) 3. Entrées d’air (seulement des ailes) 4. Velcro bridle loop 4. Velcro 5. Leading edge 5.
- Page 11 ÜBERSICHT UND TERMINOLOGIE - LARKSHEAD KNOTS DEN KITE MIT EINER KONTROLBAR STEUERN Take the sleeve of the flying line, and make a larkshead. Slide it over the knot on the end of the bridle loop or leader line. Pull 1. Obere Fläche the larkshead tight and slide it towards the knot on the end of 2. Untere Fläche (nur Matten) the bridle loop / leader line.
- Page 12 STEP 1. FINDING THE RIGHT LOCATION TO LAUNCH YOUR KITE Find a spot to setup, away from airports, powerlines, trees and buildings. When launching, the area should be free of kiteflyers or other people. Also make sure there are no sharp objects on the ground, to prevent any damage to your kite. ETAPE 1.
- Page 13 REAR REAR LINE LINE LINE LINE STEP 2. PREPARING YOUR KITE AND BRIDLES Take the kite out of the bag and The bridle is secured together in the Remove the bridle loops from the Place the bridle flat on the ground. unfold the kite.
- Page 14 STEP 3. SETTING UP YOUR 4-LINE HANDLES AND LINES Starting at the kite, slowly walk Place your handles flat on the ground, Attach the correct flying line to each Attach the flying lines one by one us- backwards while unwinding your red handle on the left, black handle leader line using larkshead knots.
- Page 15 STEP 3. SETTING UP YOUR 4-LINE CONTROL BAR AND LINES After unwinding your flying lines, Attach the correct flying line to each First attach the rear flying lines to the Now attach the top flying lines, by place your bar flat on the ground with leader line using larkshead knots.
- Page 16 LAUNCHING - SELF LAUNCH Make sure the kite is still secured Grab your handles or control bar. Stand at a position so your flying lines Check again if the area is clear of from blowing away by some sand or Check again you are holding the are at about 45 degrees to the wind people.
- Page 17 LAUNCHING - LAUNCH WITH HELPER As an alternative to the self-launch, Stand at a position so your flying lines The helper now guides the kite Steer the kite towards the edge of the you may also ask someone to hold the are at about 45 degrees to the wind upward.
- Page 18 STEERING WITH 4-LINE HANDLES STEERING WITH A CONTROL BAR Normal steering Faster steering To make the kite turn, simply pull on To make the kite turn, pull one handle For faster steering, twist your handle one end of the control bar. The kite towards you to make the kite steer in while pulling it, to ensure more ten- will turn in this direction.
- Page 19 LOOPING YOUR KITE To loop the kite, pull on one handle To untwist your flying lines, loop the or one side of the bar and hold this kite in the other direction. position until the kite has made a full loop.
- Page 20 KITE KILLER / SAFETY SYSTEM KITEKILLER / SYSTÈME DE SÉCURITÉ KITE KILLER / SAFETY SYSTEM You can instantly loose all power of the kite without Vous pouvez perdre instantanément toute puis- Mit dem Kite Killer an den Handle oder der Safety loosing the kite itself when using kitekillers on your sance sans perdre l’aile grâce aux kitekillers ou au Leash an der Bar können Sie jederzeit den Druck aus...
- Page 21 USING THE SAFETY SYSTEM ON THE CONTROL BAR With the safety wrist strap attached The kite will fly backwards with little To recover your kite, grab the bar Undo any twists in the flying lines to your wrist, let go of the bar. power and will slowly move towards while holding the self landing handle before relaunching your kite.
- Page 22 REVERSE RELAUNCHING YOUR KITE WITH 4-LINE HANDLES To relaunch your kite with the The kite will fly up backwards. Once it is in the air, twist one handle When the kite has completely turned leading edge down, pull the bottom to release the tension on the rear line.
- Page 23 REVERSE RELAUNCHING YOUR KITE WITH CONTROL BAR To relaunch your kite with the The kite will fly up backwards. Once it is in the air, pull in one side of When the kite has turned around, let leading edge down, pull on the the bar.
- Page 24 SELF LANDING (HANDLES) SELF LANDING (CONTROL BAR) First check if the area is clear of Secure the handles by placing the First check if the area is clear of Secure the relaunch handle to the people. Fly the kite to the ground at groundstake through the loops on the people.
- Page 25 LANDING WITH A HELPER PACKING UP First check if the area is clear of Secure it with some sand or other Wind the flying lines in figure-eights Fold the kite, starting from the tips people. Fly the kite to the ground at suitable weight.
- Page 26 TOP/REAR LINE ADJUSTMENTS In the long term your top lines may stretch differently from your rear lines. To get the best performance from you kite, it is important to have the difference between the top and rear lines set correctly. RÉGLER VOTRE AILE Avec le temps, les lignes avant peuvent s’étirer différemment des lignes arrière.
- Page 27 ADJUSTING TOP/REAR LINE ON HANDLES ADJUSTING TOP/REAR LINE ON CONTROL BAR If the rear lines are too loose, make If the rear lines are too tight, make If the rear lines are too loose, pull in If the rear lines are too tight, sheet extra knots in the rear leader lines extra knots in the top leader lines and the adjuster in the center of the bar.
-
Page 28: Troubleshooting
TROUBLESHOOTING Problem Probable cause Explanation Solution Kite does not want Is there sufficient wind? Your kite needs a bit of wind to get going. If the wind is too light it is very Fly your kite with more wind. to fly difficult to fly your kite properly. - Page 29 ANOMALIES Problème Cause probable Explication Solution L’aile ne décolle pas ou Est-ce qu’il y a suffisamment de vent ? Votre aile a besoin d’un minimum de vent pour voler. Un vent trop faible Utilisez votre aile dans un vent plus peut rendre son utilisation difficile. fort. si elle a des difficultés à voler normalement Est-ce qu’il y a des obstacles qui peu- De gros obstacles comme des bâtiments, des arbres, des collines ou des Changez votre lieu de pratique ou vent perturber le vent ?
-
Page 30: Fehlerbehebung
FEHLERBEHEBUNG Problem Möglicher Grund Erklärung Lösung Kite will nicht fliegen Ist genug Wind? Der Kite braucht mehr Wind. Wenn der Wind nicht ausreicht ist es sehr Fliegen Sie den Kite in mehr Wind schwierig den Kite zu fliegen. Wird der Wind von irgendwelchen Der Wind kann sehr leicht von großen Hindernissen, wie Gebäude, Wählen Sie einen besseren Platz aus Hindernissen blockiert? - Page 31 REMOVING SAND OR OTHER DIRT FROM YOUR KITE (FOIL KITES ONLY) If there is any sand, mud or grass in the kite, remove it to keep your kite flying properly and prevent damages. When the dirt in your kite is wet, remove as much as possible; then dry your kite and repeat the action as described.
- Page 32 • Regularly check your bridles for wear and tear. Regularly check if the lines are still intact and that loops are free of wear. If there are problems with your kite or your bar, please contact your Peter Lynn • Do not rig on rough terrain. Stay far away from sharp items that could dam- dealer. age your kite, such as seashells, trees, washed up wood or fences.
- Page 33 ENTRETIEN ET NETTOYAGE Les ailes Peter Lynn sont conçues à partir des meilleurs matériaux. Pour assurer une durée de vie maximale à votre aile, veillez toutefois à respecter les points suivants : Entretien de l’aile Entretien des poignées et de la barre • Rangez toujours votre aile dans un endroit sec.
- Page 34 WARTUNG UND PFLEGE Alle Peter Lynn Produkte sind designed um bei höchsten Anforderungen lange zu bestehen. Der Kitesport ist ein extremer Sport, der das Material sehr stark beansprucht. Bei guter Pflege des Materials lässt sich die Abnutzung minimieren. Wartung des Kites Wartung der Bar • Kontrollieren Sie Ihr Equipment vor dem Start auf Risse, Abreibungen, offene...
-
Page 36: Warranty
Peter Lynn will not be responsible for any as to third parties. Before setting up and using this Peter Lynn product you agree to assume costs, losses, or damages incurred as a result of loss of use of this product. This warranty... - Page 37 GARANTIE RESPONSABILITE Peter Lynn garantit ce produit, s’il est acheté chez l’un de nos revendeurs agréés, pour tous Peter Lynn / Vliegerop Ltd - Release of Liability défauts majeurs constatés sur le matériel ou malfaçons, pour une période de six (6) mois à compter de la date d’achat par le client. Cette garantie est sujette aux limitations suivantes: Avertissement • La garantie est applicable uniquement à l’acheteur original et ne peut être transmise.
- Page 38 Ganzen getroffen haben. Postgebühr). Alternativ können Sie sich an die Generalvertretung von Peter Lynn in Ihrem Land wenden. Dem Benutzer der Peter Lynn Produkte muss klar sein, dass es durch den Powerkite Sport • Sollte ein Produkt von Peter Lynn als fehlerhaft anerkannt werden, wird durch die zu schweren und sogar tödlichen Verletzungen, bei dem Ausführenden oder bei Dritten, Garantie lediglich die Reparatur oder der Ersatz des fehlerhaften Produkts abgedeckt.
Need help?
Do you have a question about the 4-Line Series and is the answer not in the manual?
Questions and answers