
Related Manuals for Uniden G455


Summary of Contents for Uniden G455
- Page 1 Digital Wireless Surveillance System User’s Guide...
-
Page 2: Table Of Contents
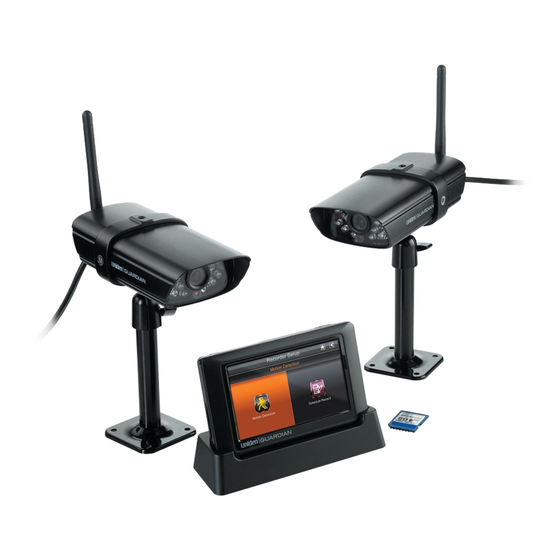
This software does not incorporate any Hardware Locking or other intrusive licensing schemes. This software is distributed AS-IS and offers no warranty whatsoever. You install this software at your own risk. Uniden assumes no responsibility or liability for any negative effects of the software’s use, mis-use, installation, uninstallation, etc. - Page 3 You should have the following items: G4 Receiver and Base GC43 Camera (2) Antenna (2) AC Adapter (3)
- Page 5 This manual is set up in six main sections: Getting Started. This section describes your hardware and how to physically set it up. You will find Operations Overview. This section lists basic operations in an abbreviated format. It references screen details in the third section. Screen Descriptions.
-
Page 6: Front View
Receiver Power Power Dock On/Off Data Cable Connection SD slot AC Power Connection AC Power Pull-Out Connection Stand Front view Back view Power status Link status Light sensor Light State What it means The camera is on. Power status The camera is off. - Page 7 2. Connect the other end of the adapter to a 120 volt AC (standard indoor) power outlet. 3. Press the button on the top of the receiver for 2 seconds to power it up. 4. The receiver displays the Uniden screen for a few seconds and then transitions to the LIVE view.
-
Page 8: Attach The Camera
Attach the camera Tighten the brace against to the mounting 1. For each camera, the camera to screw and turn it attach the camera secure it to the desired in place. direction. bracket to the mounting screw. You can attach the stand to the top or the bottom of the camera as needed. - Page 9 You can now set your cameras and system to your preferred settings. . Brightness (page ___) Motion Detection (page ___) Schedule Recordings (page ___) Alarms (page ___) Power Saving (page ___) Screen Auto Lock (page ___) Time (page ___) Language (default language is English; see page ___) Motion Detection (page ___) Schedule Recordings (page ___)
- Page 10 Your receiver’s Guardian software operates through a series of screens that let you choose groups of operations. For example, when you tap on the camera icon in the Pop-up menus, you can set how you want the main viewing screen - called the Live screen - to display images from the paired cameras.
- Page 11 Icon What it does Select how you want the Main screen to display camera input: CAMERA MODE - Scan between cameras (in 5 second intervals up to 20 seconds?) - Quad view (all paired cameras display) - Single camera selection (1 camera displays) VOLUME Adjust the volume level for notification tones and alerts.
- Page 12 Icon What it does ZOOM - Zooms into a specific area of the image. Tap a second time to return to normal screen. POP UP MENU TAB Opens and closes the pop up menu display.
- Page 13 From the pop-up menu, tap the This screen should display: following icons as they appear on the screens:...
-
Page 14: Camera Setup
Main Screen Sub Screens What it Does Camera Setup Pairing Enables the cameras and the monitor to com- municate with each other Camera on Makes the cameras visible to the monitor Brightness Brightens or darkens the display Recorder Setup Motion Detection Records when something moves in front of the camera. - Page 15 Your cameras are paired to the receiver at the factory. When you add a camera, you have to pair it to the receiver (that is, you have “introduce” the camera and receiver so they can communicate). If a camera is already assigned to the selected channel, the receiver overwrites that camera link with the new one.
- Page 16 From the pop-up menus, tap This screen should display: the following icons as they appear on the screens: 1. Tap the camera image you want to pair. A processing icon displays. 2. Press and release the Pairing button on that camera’s power cord. A check mark appears on the receiver for that camera when pairing completes.
- Page 17 From the pop-up menu, tap the This screen should display: following icons as they appear on the screens: Tap the camera whose brightness level you want to change. The default brightness is 0, and the range is from -2 through 2.
- Page 18 From the pop-up menus, tap This screen should display: the following icons as they appear on the screens: 1. You can set the motion detection level to Off, Normal, of High. Tap on the camera to cycle through these choices. Default = Low. 2.
- Page 19 1. Tap the camera number you want to record (1 - 4). 2. Set the recording start time. Tap the hour and number boxes separately and use the UP and DOWN arrows to scroll through the times. 3. Tap the AM/PM block to toggle between them. 4.
-
Page 20: Network Setup Screen
The Network Setup screen allows you to select your internet type and set a security code. You can also display system default configuration. From the pop-up menu, tap the The Network Setup screen displays: following icons as they appear on the screens: 1. - Page 21 2. Tap on your selection and fill in the fields requested. Tap OK. Selection Fields Static IM - IP Address - Subnet Mask - Default Gateway - DNS Server DHCP None PPPOE - User Name - Password 3. Tap OK on the system reboot screen. The Network Setup screen displays. 1.
-
Page 22: Alarm Setup Screen
3. Enter your security code. You can switch the keyboard from alphabetical characters to numbers/ symbols and back by tapping the field to the left of the space bar. Tap Return. The Security Code screen displays again. 4. Repeat your security code to confirm it. Tap Return again. 5. - Page 23 This selection allows you to select the length of time the siren will sound. 1. Tap Period. The Set Siren Duration screen displays. 2. Tap the duration you want the siren to last (2, 10, or 30 seconds) or tap None to turn sirens off. 3.
- Page 24 1. Tap Volume. The Set Siren Volume screen displays. 2. Tap + or - to increase or decrease the siren volume. 3. Tap the BACK arrow to return to the previous screen. This selection allows you to select a melody for the siren. How do you hear samples of the melody? 1.
-
Page 25: Default
2. A check mark appears on the melody you tap. 3. Tap the BACK arrow to return to the previous screen. When you turn on Power Saving mode, the monitor goes into sleep mode after it is idle for 30 seconds. - Page 26 2. A check mark appears on your selection. 3. Tap the BACK arrow to return to the previous screen. When you turn on Auto Lock mode, the monitor ???????. . What is auto lock again? And why doesn’t the following screen say Screen Auto Lock? It’s too wordy.
- Page 27 2. Tap your selection; a check mark displays. 3. Tap the BACK arrow to return to the previous screen. The Time screen lets you set up clock alarms, set the time, and set a timer. From the pop-up menu, tap the The following screen displays: following icons as they appear on the screens:...
- Page 28 3. Tap on the hour block. The UP/DOWN arrows move to the hour block. Set the hour. 4. Tap on the minute block. The UP/DOWN arrows move to the minute block. Set the minute. 5. Tap on AM/PM to toggle between the two. 6.
- Page 29 Timer 1. Tap to display the Time Setting screen. 2. Tap on each field to set it. The UP/DOWN arrows shift to that field. Use UP/DOWN to set the field. 3. Tap START to begin the timer. When the timer reaches 00:00, an alarm beeps until you tap OK. From the pop-up menu, tap the The Reformat Storage screen displays: following icons as they appear...
- Page 30 From the pop-up menu, tap the This screen should display: following icons as they appear on the screens: English is the default language. When you change languages, all system settings default to the original factory settings. You will have to reenter any specialized setting you have made. From the pop up menus, tap This screen should display: the following icons as they...
- Page 31 once on the LIVE screen. The icon flashes while the camera records. Tap it again to stop recording. If you are in Quad view, tap on one camera image. The screen displays that camera in Full Screen view. If you are in Full Screen view, tap on the screen to change back to Quad view.
- Page 32 From the pop-up menus, tap The Record List screen displays. the following icons as they appear on the screens: 1. Tap on the highlighted day containing the recording you want to view. The Record List screen displays that day’s recordings listed in a folder. 2.
- Page 33 If a camera is already assigned to the selected channel, the receiver overwrites that camera link with the new one. Only pair one camera at a time! The receiver links to the first camera it detects. If two or more cameras are in pairing mode, you can't control which camera the receiver will detect first.
- Page 34 How do you connect the monitor to the computer? What are the things you can do with it? I have NOTHING AT ALL on this. Does the system automatically delete recordings after a set time period? Can you set the time frame for deletion? How DO you delete Recordings?
- Page 35 How to clean the receiver How to clean the cameras...
- Page 36 If you have any trouble with your system, try these simple steps. If you are still having a problem with your camera, check the manual that came with your camera. If you still have a question, call our Customer Care Line listed on the front cover.
- Page 37 If… Try.. - making sure the camera is plugged in and the red LED is on. The camera won’t pair with - pressing and releasing the pairing button quickly. Do not press and the receiver hold the pairing button. When I power up my receiver and cameras for - tapping the Power button on top of the receiver.
- Page 40 FCC NOTE This equipment has been tested and found to comply with the limits for a Class B digital device, pursuant to Part 15 of the FCC Rules. These limits are designed to provide reasonable protection against harmful interference in a residential installation.
Need help?
Do you have a question about the G455 and is the answer not in the manual?
Questions and answers