Table of Contents
Advertisement
Quick Links
Download this manual
See also:
User Manual
Advertisement
Table of Contents

Related Manuals for Albrecht Tectalk Float


Summary of Contents for Albrecht Tectalk Float
- Page 1 Tectalk Float Manual English...
-
Page 2: Table Of Contents
Content Caution ....................19 Scope of Delivery ................20 Installation ..................21 Controls and Indicators ..............22 LC Display ..................23 Operation ..................24 Additional Functions ................25 Troubleshooting ................. 29 Warranty and Recycling Information ..........31 Technical Specifications ..............32 English... -
Page 3: Caution
ALWAYS switch off your radio where notices restrict the use of two- way radio or mobile telephones. ALWAYS replace the accessory jack cover when the jack is not in use. ONLY use ALBRECHT approved rechargeable batteries with the supplied charger. AVOID charging your radio or battery pack while is it wet. -
Page 4: Scope Of Delivery
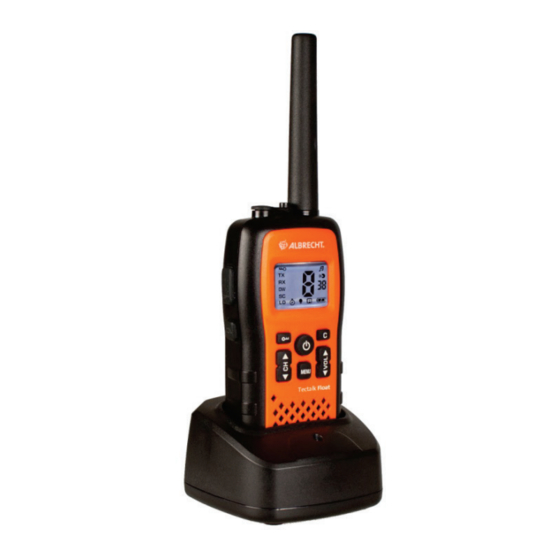
Scope of Delivery • Tectalk Float Radio with Antenna • Li-Ion battery pack • Desktop charger • Power adaptor • Belt Clip • Adapter for ALBRECHT headsets English... -
Page 5: Installation
Installation Removing the belt clip a. Pull the belt clip latch away from the unit b. While pulling the belt clip latch, push up the belt clip as shown in Figure 1 Installing the belt clip Figure1 Figure2 a. Slide the belt clip into the slot as shown in Figure 2 b. -
Page 6: Controls And Indicators
Controls and Indicators 1. High efficiency antenna 2. Belt Clip 3. Battery door 4. PTT (Push-To-Talk) button 5. Lamp/Monitor button 6. External earset-microphone jack 7. Key Lock button 8. Channel UP button 9. Channel DOWN button 10. Built-in Microphone 11. Backlighted LC Display 12. -
Page 7: Lc Display
LC Display A. Keypad LOCK icon - is lighted when buttons are locked. B. TX icon - is lighted on when the radio is in transmit mode. C. RX icon - is lighted on when the radio is in receive mode. D. -
Page 8: Operation
Operation Power ON-OFF 1. To turn on the unit, press and hold the ON-OFF button, the LC Display will show the channel number and the CTCSS code number. 2. To turn off the unit, press and hold again the ON-OFF button. Using the radio The unit has 8 main channels and 38 CTCSS codes for each channel. -
Page 9: Additional Functions
Channel Selection Press the CH UP or CH DOWN to select the desired channel (1-8). The factory default start up channel is channel 1 and sub-channel 00. Before selecting a channel for communication, always listen on it to ensure it is not already being used. Always avoid selecting a busy channel when the unit keeps on receiving signal from unknown parties. - Page 10 To confirm the selection and exit the Menu mode, press the LOCK button or MENU button to move to the next function. CTCSS Code Selection The radio has 38 CTCSS private codes available. Different CTCSS tones may be associated to different channels. Selecting a CTCSS code of 00 will disable the CTCSS feature.
- Page 11 set the last used channel. When SCAN feature is on, the SC icon will appear on the LC Display and the Channel number is flashing. CTCSS tone Scanning This function allows CTCSS tone scanning on the selected channel. Select the desired channel number and activate the CTCSS tone scanning.
-
Page 12: Monitor Function
This will prompt any receiving unit that your transmission has ended. When the Roger Beep tone is enabled, the tone icon appears on the LC Display. Keypad Program Tone Setting When a key is pressed, a beep tone is heard to confirm your command. -
Page 13: Troubleshooting
background noise and possible weak signal from the unit. Release MONITOR button within 2 seconds to return. Automatic Power Save The radio has an Automatic Power Save circuit designed to extend battery life. If it senses no signal within 10 seconds, it automatically switches to the Power Save mode. - Page 14 Sound Distortion problems. • If you are transmitting, speak in a normal tone of voice, 2 to 3 inches away from the microphone. • If you are receiving, lower the volume to a comfortable level. • Radios must be at least 5 feet apart, otherwise you have to increase the distance between the radios •...
-
Page 15: Warranty And Recycling Information
Warranty and Recycling Information We are legally obliged to include disposal and warranty information as well as EU declaration of conformity with the use instructions in different countries for every unit. Please find this information on the following pages. 2-Year warranty from date of purchase The manufacturer/retailer guarantees this product for two years from date of purchase. -
Page 16: Technical Specifications
Technical Specifications General Frequency Range 446,00625~446,09375 MHz Frequency Tolerance 2,5 PPM (bei 25 °C) Operation Temperature 0 °C to +55 °C Antenna Integral Antenna Microphone Integral Built-in Electret type Display Liquid Crystal Display Speaker 1 Watt, 8 Ω Power Source Rechargeable Li-ion Battery pack 3.7V 950mAh Dimensions...
Need help?
Do you have a question about the Tectalk Float and is the answer not in the manual?
Questions and answers