Table of Contents
Advertisement
Quick Links
Advertisement
Table of Contents

Related Manuals for Albrecht AE86H


Summary of Contents for Albrecht AE86H
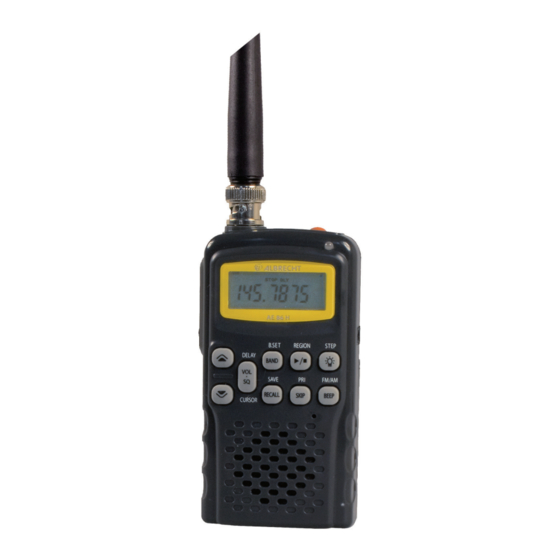
- Page 1 Hand Held Scanning Receiver AE 86 H User Manual...
-
Page 2: Table Of Contents
Index Features .........................2 The user manual contains the description of:..............2 Frequency Band Plan.....................3 European Frequency Band Plan ..................3 Frequency table of ALL BAND start setting..............3 German Frequency Band Plan..................4 Frequency table of German Band Plan start setting............4 Display Functions ......................5 Top Panel........................6 Detailed side views ......................7 Monitor key MON ......................8... -
Page 3: Features
AE 86 H Hand Held Scanner Features • Albrecht AE 86 H is a hand held scanning receiver with 5 bands in the low and high VHF frequency ranges between 25 and 174 MHz. • The scanner is designed to receive 2 way radio communications in the standard... -
Page 4: Frequency Band Plan
Frequency Band Plan European Frequency Band Plan This band plan can be used in all regions of Europe. The default settings of this band plan are suitable for many regions, but it can be necessary to select other frequency steps in certain regions. -
Page 5: German Frequency Band Plan
German Frequency Band Plan This is the specially pre programmed band plan with typical German radio communication network settings. Especially the VHF LOW Band parameters (4 m Band) in Germany use a 20 kHz channel spacing system with an offset of + 15 kHz compared to not shifted generic 20 kHz systems of other countries. -
Page 6: Display Functions
Display Functions "VHF" Indicates that the 2m VHF band 136…174 MHz) is selected. "AIR" Indicates that the AIR band 108- 136 MHz in AM is selected. "WFM" Indicates that the wideband FM band (broadcast radio) 87.5-108 MHz is selected. "CB10" Indicates that the CB radio band with 10 kHz steps is selected. -
Page 7: Top Panel
Top Panel Antenna Socket (BNC type 50 Ohms) The antenna socket allows connection of the supplied rubber antenna or another suitable external or plug-in scanner antenna. The supplied antenna provides good receiver performance over the whole receiving frequency range. To attach the BNC antenna plug to the socket on the top of your scanner, align the slots around the antenna plug with the tabs on the scanner's BNC socket. -
Page 8: Detailed Side Views
Detailed side views External DC socket Charger & Operation Pull to unlock belt clip Battery Slide Cover Slide down to open Switch up when using Alkaline batteries Switch down when using NiMH batteries... -
Page 9: Monitor Key Mon
Monitor key MON While pressing and holding monitor key MON, the speaker is turned on (squelch is opened), everything can be heard, the actual squelch setting is disregarded. To exit monitor mode, release MON Second Function key F Second key functions (printed above the keys) can be activated by pressing the F key first and then the desired key. -
Page 10: Front Panel Key Functions
Front panel Key Functions Busy Display General description of the key functions: • All functions printed directly on the buttons can be reached directly by pressing the button • Functions which are printed above or below a button are secondary functions and can be reached by pressing the F (function) button on the left side first and then the button near to the printing. -
Page 11: Operation - In Details
Function – short description F + Pri selects priority channels (if programmed) SKIP: If you do not want the scanner to stop at the displayed frequency or channel, press SKIP to lock-out (mark) the frequency. During next scan or search process the scanner will not stop there. F + Step selects the channel spacing in the present band. -
Page 12: Adjusting The Squelch Level
Adjusting the squelch level The squelch of a two way radio shall suppress undesired noise on channels or frequencies where just no receiver signal is present. As soon as a signal will be received, the squelch opens and the loudspeaker will reproduce the audio signal. The squelch can be adjusted from very sensitive (or even open) to more tight levels, where the radio has a certain immunity against interference or far away signals. -
Page 13: Selection Of The Band (S)
Selection of the Band (s) As factory default, all 5 bands are activated. These are: Air Band VHF Band (2 m Band) CB 10 Band VLB Band (4 m Band) WFM Band (FM broadcast) You can choose whether all bands should remain active or whether you do not need all the bands. •... -
Page 14: Normal Search Mode
Normal Search Mode So you first search, find frequencies, put them into memory locations and later you recall or scan the memorized “channels” means: starting and stopping the search process at any time manually. Starting Frequency Search If the squelch is adjusted correctly, the radio will also stop automatically as soon as it finds a station talking on the just checked frequency. -
Page 15: Direct Editor For Known Frequencies
You have now 2 choices: You can accept the proposed memory location number or you select another location number by using the UP/DOWN buttons. The memory location number will change to the desired value If you accept the proposed or selected memory location number, you accept the setting by pressing 1 x the SAVE / RECALL button again. -
Page 16: Memory Scanning
The scanner allows you to skip undesired frequencies from search or scanning. • Just press SKIP on such a frequency and the frequency will be marked on the ´display with “SKIP” • During next search cycle the scanner will not any more stop on this frequency. •... -
Page 17: Activating Priority Mode
Activating Priority Mode • First store one or more frequencies into memory on memory locations P1 …..P5 • Press F + PRI • In the display appears PRI To deactivate the PRI mode, repeat the same procedure. In that case PRI will disappear from display. If you start now the scanning process, the radio will also check the PRI channels P1..P5 with a higher priority (more often) than the other channels 1…..200. -
Page 18: Memory Reset
Memory Reset It may be useful to erase the memories completely in one step, if necessary. To reset the memory and keep all other settings • Press F • Release F and then keep BEEP pressed for at least 2 seconds •... -
Page 19: Other Useful Information
Other useful information Service Address & Download Here you find the details where to download our collection of service hints and documentation. Our technical documentation is updated regularly. You can download the latest versions of user manuals, technical documents and also the dual language original Declaration of Conformity, as well as service hints or FAQ’s from: http://service.alan-electronics.de Service Address (for scanners sold in Germany) -
Page 20: Ce Declaration Of Conformity
CE Declaration of Conformity CE Konformitätserklärung / Declaration of Conformity Hiermit wird erklärt, dass unser Produkt / herewith we declare that our product Empfangsgerät für Funkdienste und UKW Rundfunk (Scanner) Radio Receiver for communications and FM broadcast services AE 86 H den folgenden europäischen Normen entspricht: / is in conformity to following European Standards EU-Richtlinien / EU directives 73/23/EEC (LVD);...
Need help?
Do you have a question about the AE86H and is the answer not in the manual?
Questions and answers