Advertisement
Available languages
Available languages
DBF 4XLT
Dryer Booster Fan
Ventilateur d'appoint pour sécheuse
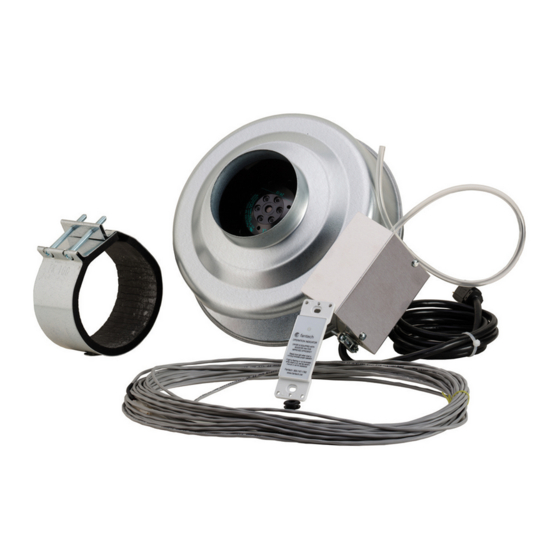
DBF4XLT Kit Includes:
Dryer Booster Fan, 1 pc
Fan Mounting Bracket and Hardware, 1 pc
Indicator Panel w/ 50' (15.4 m) of cable, 1 pc
FC4 Duct Clamp, 1 pc
Tubing & Grommet, 1 pc
La trousse du DBF4XLT inclus:
Ventilateur d'appoint pour sécheuse, 1 pc
Support de montage du ventilateur avec matériel, 1 pc
Panneau indicateur avec câble de 50pi (15.4 m), 1 pc
Brides de fixation FC4, 1 pc
Tuyau et oeillet, 1 pc
United States / États-Unis
10048 Industrial Blvd., Lenexa, KS, 66215
Tel.: 800.747.1762 • Fax: 800.487.9915
Canada
50 Kanalflakt Way, Bouctouche, NB, E4S 3M5
Tel.: 800.565.3548 • Fax: 877.747.8116
Installation and Operation Manual
Manuel d'installation et d'opération
Item #: 401456
Rev Date: 2015-05-27
fantech
Advertisement
Table of Contents

Related Manuals for Fantech DBF 4XLT


Summary of Contents for Fantech DBF 4XLT
- Page 1 Item #: 401456 Installation and Operation Manual Rev Date: 2015-05-27 Manuel d'installation et d'opération DBF 4XLT Dryer Booster Fan Ventilateur d'appoint pour sécheuse DBF4XLT Kit Includes: Dryer Booster Fan, 1 pc Fan Mounting Bracket and Hardware, 1 pc Indicator Panel w/ 50' (15.4 m) of cable, 1 pc FC4 Duct Clamp, 1 pc Tubing &...
- Page 2 CAUTION: A secondary lint trap must be installed between the clothes dryer and the clothes dryer booster fan if the booster fan is located less than 15 linear feet (4.6 linear meters) from the exhaust of the clothes dryer. fantech...
-
Page 3: Indicator Panel
This will continue until the dryer has stopped and the timer delay period has lapsed. Drying cycles, the booster fan, the delay timer and the pressure switch are not adversely affected by the starting/stopping intervals. fantech... -
Page 4: Fan Installation
Step 4. Connect Indicator Panel Cable (using the wrong length screws will damage the fan impeller) Connect the end of the 50 foot cable that has a two position connector to the receptacle located on the dryer booster fan control box. fantech... - Page 5 Make a mark a distance of 1/2 inch from the other end of the tubing. Slide this end Duct Wall Duct Wall of the tubing through the center of the grommet up to the mark as illustrated. fantech...
-
Page 6: Recommended Maintenance
If the LED flashes or does not illuminate, check the list below for error indication and likely sources of the problem. Should your DBF4XLT show an error other than what is listed, or if these help topics do not solve the problem, please contact Fantech's Technical Assistance Department for further assistance. - Page 7 ATTENTION: Destiné à un usage domestique. Ne pas utiliser pour N’utilisez ce dispositif que de la manière préconisée par le l’évacuation de matières et vapeurs dangereuses ou fabricant. Pour toutes questions, veuillez contacter Fantech au explosives. numéro ci-bas. b. Avant tout entretien ou nettoyage, coupez le courant au tableau ATTENTION: Ne pas installer à...
-
Page 8: Directives D'installation
L’alimentation électrique au ventilateur d’évacuation est fourni par le cordon d’alimentation de 120VAC ci-joint. Lorsque l’opération de séchage commence, la pression positive dans le conduit provoque l’ouverture du diaphragme qui provoque alors la mise en marche du ventilateur d’appoint. fantech... -
Page 9: Installation Du Ventilateur
Étape 4. Connexion du câblage du panneau indicateur Branché le bout du câble de 50 pieds (15.2 mètres) qui a un connecteur à deux positions à la prise située sur le boîtier de commande du ventilateur d’appoint. fantech... - Page 10 Ensuite, forcez un bout du tuyau sur le raccord sur le contrôle. Faites une marque sur une distance de 1/2 Mur du conduit Duct Wall po de l’autre bout du tuyau. Faites glisser cette extrémité du tuyau à travers le centre de la rondelle à la marque, tel qu’illustré. fantech...
- Page 11 Si l’indicateur DEL ne s’allume pas, vérifier la liste ci-dessous pour diagnostiquer la source du problème. Si votre DBF4XLT affiche une erreur autre que ce qui est indiqué, ou si ces rubriques d’aide ne règle pas le problème, s’il vous plaît contactez le Service d’assistance technique de Fantech pour obtenir de l’aide.
-
Page 12: Warranty
DURING ENTIRE WARRANTY PERIOD: END USER, AS CREDIT TO DISTRIBUTOR’S ACCOUNT WILL BE Fantech will repair or replace any part which has a factory defect in PENDING INSPECTION AND VERIFICATION OF ACTUAL DEFECT BY workmanship or material. Product may need to be returned to the FANTECH. -
Page 13: Garantie
DISTRIBUTEUR NE DOIT PAS REMPLACER SANS FRAIS POUR Limites de garanties et de responsabilités Cette garantie ne s’applique à aucun produit de Fantech ou à aucune des dommages dut à la négligence ou a des conseils incorrects ou pièce détachée dont la défectuosité relève d’une erreur d’installation ou autres causes, Fantech ne pourra être tenu pour responsable des... - Page 14 Notes fantech...
- Page 15 Notes fantech...
- Page 16 Fantech reserves the right to make technical changes. Fantech se réserve le droit de faire des changements tech- For updated documentation please refer to www.fantech.net niques. Pour de la documentation à jour, s'il vous plaît se référer au www.fantech.net Fantech®...
Need help?
Do you have a question about the DBF 4XLT and is the answer not in the manual?
Questions and answers