
Related Manuals for Extremis kosmos


Summary of Contents for Extremis kosmos
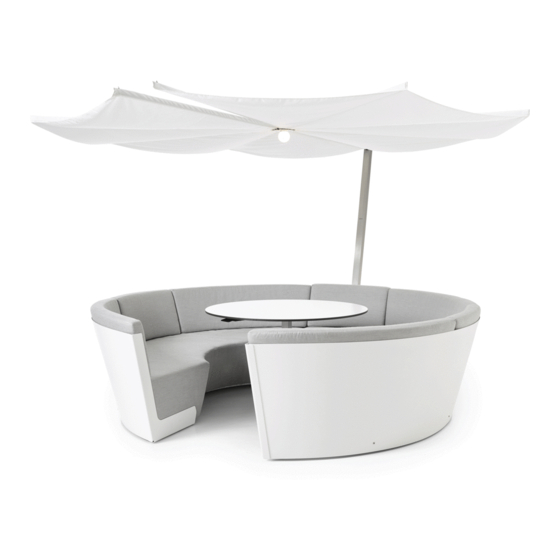
- Page 1 K 20141029 design by dirk wynants for extremis © 2008...
-
Page 2: Verklaring Van Conformiteit
° 110-220 V ~ 50/60 Hz specificaties en voorschriften vermeld in ° 1 x 7 W deze handleiding. ° type lamp: Extremis KLED lamp ° IP 65 WAARSCHUWING De geleverde stekker (onderdeel van KPR) is van het EU-type (Type C CEE 7/16 of Europlug). - Page 3 nederlands 1 x linkse zetelhelft 1 x rechtse zetelhelft 1 x zetelframe klein 1 x rugsteun 2 x groot zitkussen 4 x groot rugkussen 1 x klein zitkussen 3 x klein rugkussen 1 x tafelblad 1 x tafelkussen 1 x plastic plaat 1 x dop 50*50 1 x dop 60*60 1 x parasolframe met doek 60*60...
-
Page 4: Montage
KOSMOS www.extremis.be montage (in geval van vaste tafelpoot: monteer eerst de lange rechthoekige buis op het kleine zetelframe en de tafelbladconnectie er bovenop, met bijgeleverde M6* 30mm bouten) - Page 5 nederlands 1. Plaats het kleine zetelframe (3) op de 2. Koppel nu de beide zetelhelften (1 & 2) gewenste plaats met de tafelkoppeling in aan het kleine zetelframe (3) met het centrum en wijzend in de richting behulp van telkens drie bouten (A) van waaruit de wind het grootste deel en drie moeren (a).
- Page 6 KOSMOS www.extremis.be montage 4. Schroef het tafelblad (9) vast met de verzonken bouten (E). Het bedieningselement voor de hoogte- instelling wordt met 4 bouten (C) bevestigd onderaan het blad. Dit bedieningselement moet naar de zetelopening wijzen. 5. Steek langs de binnenkant van het...
- Page 7 nederlands 6. Neem het parasolframe met doek (14) en ga met het snoer zo dicht mogelijk bij het uiteinde van de parasolpaal (15). Laat het snoer door de opening zakken tot het onderaan tevoorschijn komt. Na de montage dient een erkend elektriciën het uiteinde van de kabel te voorzien van een gepaste stekker.
- Page 8 KOSMOS www.extremis.be montage 8. Plaats nu de passende doppen (12 & 13) op het parasolframe (14) en de vertikale buis (15). 9. De kussens worden in het meubel geplaatst zoals te zien in de configuratie op de tekening.
- Page 9 nederlands 10. Open nu de parasol. Houdt de Dit riempje kan ook gebruikt worden om magneetsluiting het niet, maak dan de parasol open te houden: eerst de velcroband los en open de parasol opnieuw. Pas nu mag je de A) bij regen: creëert afvoerkanalen velcroband opnieuw sluiten.
- Page 10 KOSMOS www.extremis.be bijregelen verstelbare tafel 1. Demonteer de klep door de schroeven 2. Draai de klep om. 3. Controleer of er speling tussen de kabel uit de draaien. & de bevestigingsschroef zit. 4. Zo ja, draai de schroef uit tot de speling 5.
- Page 11 TAFELHOES breekt. 2. Leg de zetelhoes over de Kosmos met de 3. Trek de zijflap overal mooi strak tot aan ZETELHOES taartvormige opening in de inkom van de onderzijde van het meubel.
- Page 12 ° Spuit de parasol nooit af met een hoge ventilatie redenen niet 100% waterdicht Laat de Kosmos parasol niet gesloten zijn. als ze niet volledig droog is. Laat ze drukreiniger.
-
Page 13: Lamp Vervangen
nederlands lamp vervangen 1. Verwijder de buisdop met schakelaar en 2. Haal het rode en het zwarte kabeltje uit 3. Verwijder de buisdop in het centrum van haal de LED adapter uit de parasolbuis. de adapter de parasol, trek het snoer doorheen de buis en draai de moer van de verlichtingssokkel los. - Page 14 KOSMOS www.extremis.be kosmos vrijstaande tafel 1 x tafelblad 1 x buis 1 x voetplaat 3 x verzonken binnenzeskantbout 8 x binnenzeskantbout M6 x 12 M6 x 25 montage benodigdheden min. 1 persoon inbussleutel nr. 4 +/- 15 min. 1. Neem de voetplaat en monteer deze 2.
- Page 15 www.extremis.be...
-
Page 16: Parts List
The assembly and the replacement of the requirements of European LED light bulbs may only be carried out Directives 2006/95/EC and 2004/108/ by a qualified electrician. Extremis shall not be liable in any way for any damage caused by incorrect assembly, improper SPECIFICATIONS or unforeseeable use, taking account of °... - Page 17 english 1 x left half of the seat 1 x right half of the seat 1 x small seat frame 1 x backrest 2 x large seat cushion 4 x large back cushion 1 x small seat cushion 3 x small back cushioin 1 x tabletop 1 x tablecushion 1 x plastic spacer...
- Page 18 KOSMOS www.extremis.be assembly (in case you bought a fixed table, first mount the aluminium profile to the small seat frame and the tabletop connection on top of it, with M6*30mm bolts)
- Page 19 nederlands 1. Put the small seat frame (3) in its 2. Attach the two seat halves (1 & 2) to desired position. Make sure that the the small seat frame (3) using three coupling bar is facing the prevailing bolts (A) and three nuts (a) on each wind direction.
- Page 20 4 bolts (C). Make sure the height adjustment lever is facing the open section of the Kosmos. 5. Insert four bolts (D) in the pre-drilled The parasol pole has to be be slightly...
- Page 21 nederlands 6. Take the parasol frame with its fabric (14) and bring the cable as closely as possible to the top of the vertical parasol pole (15). Insert the cable in the hole in the parasol pole and lower it down until it appears at the bottom.
- Page 22 KOSMOS www.extremis.be assembly 8. Put the protective caps (12 & 13) onto the parasolframe (14) and the vertical parasol pole (15). 9. Arrange the cushions as shown in the diagram.
- Page 23 11. To switch your Kosmos into lounge bed, push the table downward with your right hand, while squeezing the handle underneath the tabletop with your left hand. 12. To use the table, squeeze the handle underneath the tabletop again, and pull the table with the other hand.
- Page 24 KOSMOS www.extremis.be adjust adjustable table 1. Demount the valve by screwing the 2. Turn the valve around. 3. Check if there is any space between the bolts out. cable and the fastening screw. 4. If so, screw the bolts out until there is 5.
- Page 25 Kosmos with a parasol light, take extreme care not to break the light bulb. TABLETOP COVER 2. Put the seat cover on the Kosmos with 3. Pull the sides of the cover tight to the the pie-shaped opening in the entrance to bottom of the cabinet.
-
Page 26: Maintenance
If the getting dirty. from getting really dirty. Use the slip-over Kosmos is used outdoors, always cover cover as much as possible. it completely with the optional cover Never leave the parasol unattended when you are not using it, as the cushions when opened. -
Page 27: Changing The Light Bulb
nederlands changing the light bulb 1. Remove the parasol frame’s protective 2. Detach the red and the black cable from 3. Remove the protective cap at the other cap with the switch and remove the LED the adapter. end of the parasol frame. Pull the cable adapter from the parasol frame. - Page 28 KOSMOS www.extremis.be kosmos freestanding table 1 x tabletop 1 x tube 1 x base plate 3 x M6 x 25 countersunk bolt 8 x M6 x 12 hexagon socket bolt assembly utilities min. 1 person hexagon socket wrench no. 4 +/- 15 min.
- Page 29 www.extremis.be...
- Page 30 tools for togetherness...
- Page 31 www.extremis.be...
- Page 32 All images, ideas, designs and design content are the intellectual property of Extremis and may not be copied, imitated or used, in whole or in part, without the prior written permission of Extremis. © extremis 2014...
Need help?
Do you have a question about the kosmos and is the answer not in the manual?
Questions and answers