ZOLL Propaq MD Quick Reference Manual
Hide thumbs
Also See for Propaq MD:
- Operator's manual (326 pages) ,
- Service manual (142 pages) ,
- Quick reference manual (10 pages)
Table of Contents
Advertisement
Quick Links
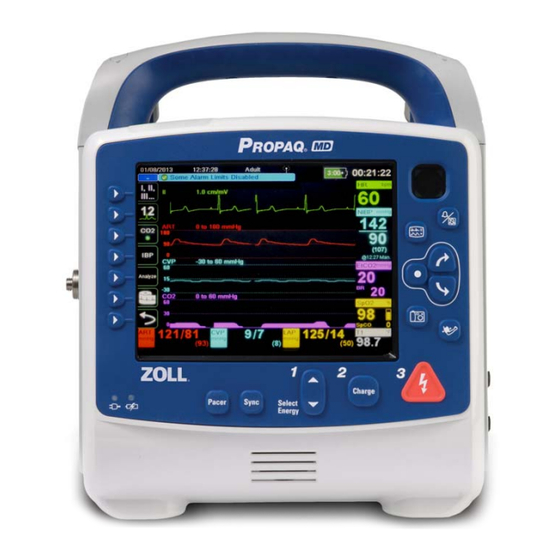
Quick Reference Guide
Controls & Indicators
Equipment Alert
LED
Data
Transfer
LED
Quick
Access
Keys
Auxiliary
Power
LED
Battery
Charge
LED
Auxiliary Power Connection
Align arrow with dot and
push connector until it locks.
Patient Alarm
LED
Pacer
Sync
Power Button
1
2
Select
Charge
Energy
Battery Insertion
Align battery with battery well
and push battery into place.
Ready For Use
Indicator
Alarm Silence/
Reset
Display/Home
Up/Clockwise
Select
Down/
Counterclockwise
Snapshot
NIBP Start/Stop
3
Shock
9652-0370-01 Rev. B
Advertisement
Table of Contents

Related Manuals for ZOLL Propaq MD


Summary of Contents for ZOLL Propaq MD
- Page 1 Quick Reference Guide Controls & Indicators Equipment Alert Patient Alarm Power Button Ready For Use Indicator Alarm Silence/ Data Reset Transfer Display/Home Up/Clockwise Quick Access Keys Select Down/ Counterclockwise Snapshot Auxiliary NIBP Start/Stop Power Battery Pacer Sync Charge Select Charge Shock Energy Auxiliary Power Connection...
-
Page 2: Changing Display Brightness
Quick Reference Guide Changing Patient Mode 1. Press & to highlight the patient mode field at the top of the display. Press 2. Press & to highlight correct patient mode. Press Neonate: Birth through 28 days, or 44 weeks gestational Pediatric: 29 days through 12 years Adult: 12 years or greater Changing Screen Views... -
Page 3: Ecg Monitoring
Quick Reference Guide ECG Monitoring Apply ECG electrodes. 3-Lead Electrode Placement 5-Lead Electrode Placement Changing the Lead Source in Waveform Trace 1 I, II, Press to cycle through leads until the desired lead is displayed. III... Changing the Lead Source in Waveform Trace 1-4 1. - Page 4 Quick Reference Guide 12-Lead ECG Monitoring Apply ECG electrodes. Jugular Notch Angle of Louis Limb Lead Electrode Placement V-Lead Electrode Placement Acquiring a 12-Lead ECG Snapshot 1. Press to enter 12-lead mode. 2. Check for a good quality signal and ensure all leads are displayed.
- Page 5 3. Attach the hose to the Propaq MD unit. 4. Apply the cuff to the patient’s limb. 5. Place the limb at the same level as the patient’s heart. 6. Verify the correct patient mode on the Propaq MD unit. Single Lumen Hose Connection Dual Lumen Hose Connection Initiating an NIBP Reading 1.
- Page 6 Press 2. Press to highlight Remove. Press Note: You can add the pleth waveform back to the display by selecting Insert from the Source Label menu or by reconnecting the sensor to the Propaq MD unit and the patient.
- Page 7 Connecting the CO Sampling Line 1. Slide open the CO inlet port cover on the Propaq MD unit. 2. Insert the fitting at end of the sampling line into the inlet port. 3. Rotate the fitting clockwise to tighten. 4. Attach sampling line to patient or endotracheal tube.
- Page 8 Quick Reference Guide Enabling Individual Alarms & Setting Alarm Limits 1. Press & to highlight the parameter label for the alarm you want to set (e.g., HR/PR). Press 2. Press & to highlight the desired parameter alarm (e.g., HR/PR Alarm). Press 3.
-
Page 9: Performing Defibrillation
Sync mode. Verify sync marker is placed over the R-wave. 2. Press to select desired energy. 3. Press to charge the Propaq MD unit. 4. After the Propaq MD unit is charged, stand clear then press and hold to deliver energy. - Page 10 Quick Reference Guide Starting the Pacer & Changing Pacer Settings 1. Press to bring up the Pacer menu. Pacer 2. Confirm Pacer Mode and Pacer Rate. 3. Press & to highlight Start Pacer. 4. Press to begin pacing. 5. Press &...
Need help?
Do you have a question about the Propaq MD and is the answer not in the manual?
Questions and answers