Omlet Eglu Cube Instruction Manual
Hide thumbs
Also See for Eglu Cube:
- Instructions manual (60 pages) ,
- Manual (43 pages) ,
- Instruction manual (28 pages)
Table of Contents
Advertisement
Quick Links
Omlet Limited
Unit 4 Tuthill Park
Wardington
Oxon OX17 1RY
www.omlet.co.uk
info@omlet.co.uk
Helpdesk: 0845 450 20 56
Right Side
Front Face
Ramp
Front Upper
Side Large
Front Lower
End Skirt
Instruction Manual
What you have received
Partition
Top
Lid
Rear Panel
Base
Side Small Right
Side Large
Page1
Dropping Trays
Side hatch
Left Side
Rear
End Skirt
Side Small Left
Wheel Assembly x 2
Advertisement
Table of Contents

Subscribe to Our Youtube Channel
Related Manuals for Omlet Eglu Cube


Summary of Contents for Omlet Eglu Cube
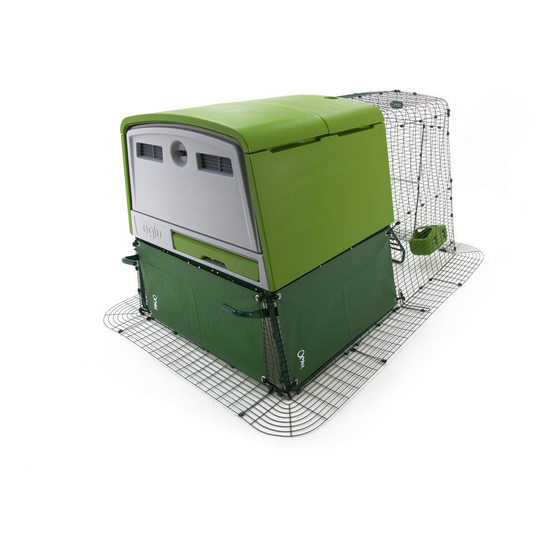
- Page 1 Omlet Limited Unit 4 Tuthill Park Wardington Instruction Manual Oxon OX17 1RY www.omlet.co.uk info@omlet.co.uk Helpdesk: 0845 450 20 56 What you have received Rear Panel Partition Dropping Trays Right Side Front Face Side hatch Ramp Base Left Side Side Small Right...
- Page 2 Run Clips > 80 Other things you might need Around 2 hours to A Phillips Screwdriver A friend with a assemble your eglu cube cordless screwdriver could also come in handy What should I do with the packaging? If your eglu arrived by courier, please remember to retain all the packaging it arrived in.
- Page 3 Step 1 - Find a suitable surface and location in your garden Make sure you assemble the eglu on a spot that is reasonably even and fl at. The diagram shows the eglu cube dimensions only. Make sure you leave enough 1.6m space behind the eglu to allow...
- Page 4 Page4...
- Page 5 Step 6 - Clip the End Skirt to the Rear panel and Small Side Panels The End Skirt panel should join the edges of the Small Side Panels, but overlap the rear panel by one rectangle. Step 7 - Place the Front Face on to the Base Turn the Base the right way up.
- Page 6 Page6...
- Page 7 Lay the Frame sections on the ground infront of the eglu. The curved section of the Frame simply slides onto the two side pieces. Line up the frame with the run making sure that the fl at sides of the tube ends are against the inside of the run.
- Page 8 Step 15 - Inserting the Partition Wall The partition wall has no Bolts. Push it into to the slot on the Front Face and Base. The Partition can be easily removed when cleaning the eglu cube. Page8...
- Page 9 Step 16 - Screw the Lid Tracks onto the Side Panels Step 17 - Screw the Lid Hooks onto the Side Panels Step 18 - Fitting the Lid To put the Lid on, lift it to the top of the eglu, with the bolts at the back.
- Page 10 Step 20 - Fitting the Rear Panel Place the bottom of the Rear Panel on the back of the Base then rotate it up to vertical. Step 21 - Locking the Rear panel The Rear Panel locks to the side panels with two locking bolts on the inside of the panel.
- Page 11 Once moved, you can dis-engage your foot until the pedal clicks footpedal to lift the eglu cube and the wheels by pressing down and into position at the bottom of its run several inches off the ground across with your foot allowing the...
- Page 12 If you have any problems assembling your eglu cube call us on 0845 450 20 56 or email info@omlet.co.uk Omlet Ltd, Tuthill Park, Wardington, Banbury, OX17 1RR Omlet,eglu & No foxes allowed are trademarks of Hebe Studio Ltd. - Company reg. no.5028498 - VAT reg. no. 837106436 Page12...
Need help?
Do you have a question about the Eglu Cube and is the answer not in the manual?
Questions and answers