
Subscribe to Our Youtube Channel
Related Manuals for TESTO 616


Summary of Contents for TESTO 616
- Page 1 616 Materialfeuchte-Messgerät Bedienungsanleitung Material moisture measuring instrument Instruction manual Appareil de mesure de l'humidité des matériaux. Mode d’emploi...
-
Page 2: Table Of Contents
Content 17 Content General notes ............18 Safety instructions ..........19 Intended purpose ..........20 Product description ..........21 Display and control elements ........21 Voltage supply ..............22 Humidity measurement procedure ........22 Commissioning ..........23 Operation ............23 Switching the instrument on/off ........23 Switching the display light on/off ........24 Performing settings ............24 Measuring ............25 Care and maintenance ........27... -
Page 3: General Notes
General notes General notes This chapter provides important advice on using this documentation. This documentation contains information that must be applied if the product is to be used safely and efficiently. Please read this documentation through carefully and familiarize yourself with the operation of the product before putting it to use. -
Page 4: Safety Instructions
Ensure correct disposal Take faulty rechargeable batteries/spent batteries to the collection points provided for them. Send the product back to testo at the end of its useful life. We will ensure that it is disposed of in an environmentally friendly manner. -
Page 5: Intended Purpose
This chapter gives the areas of application for which the product is intended. Use the product only for those applications for which it was designed. Ask testo if you are in any doubt. The product was designed for the following tasks/applications: ·... -
Page 6: Product Description
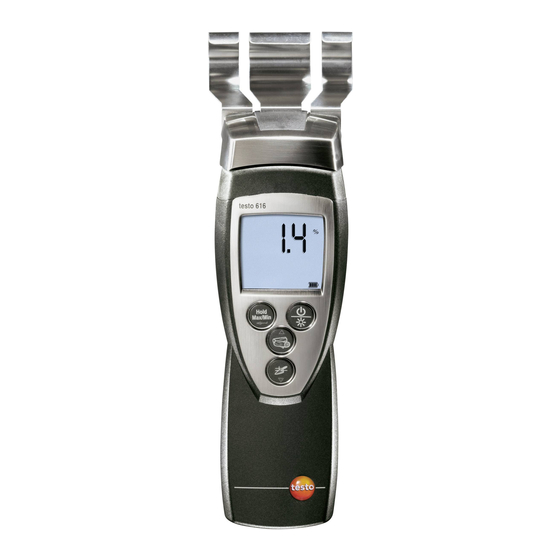
3. Product description 21 Product description This chapter provides an overview of the components of the product and their functions. 3.1 Display and control elements Overview Contact plates Display Control keys Battery compartment (rear) Key functions Functions Switch instrument on; switch instrument off (press and hold) Switch display light on/off Keep reading, display... -
Page 7: Voltage Supply
3. Product description 3.2 Voltage supply Voltage is supplied by means of a 9 V monobloc battery (included in delivery) or rechargeable battery. It is not possible to run the instrument from the mains supply or charge a rechargeable battery in the instrument. 3.3 Humidity measurement procedure The non-destructive stray field measurement uses the... -
Page 8: Commissioning
4. Commissioning 23 Commissioning This chapter describes the steps required to commission the product. Removing the protective film on the display: Pull the protective film off carefully. Inserting a battery/rechargeable battery: To open the battery compartment on the rear of the instrument, push the lid of the battery compartment in the direction of the arrow and remove it. -
Page 9: Switching The Display Light On/Off
5. Operation 5.2 Switching the display light on/off Switching the display light on/off: The instrument is switched on. Press 5.3 Performing settings To open configuration mode: The instrument is switched on and is in measurement view. Hold, Max or Min are not activated. Press and hold (for approx. -
Page 10: Measuring
6. Measuring 25 To reset: Configuration mode is opened, RESET is lit. Select the desired option with and confirm with · no: Instrument is not reset. · Yes: Instrument is reset. The instrument is reset to the factory settings. - The instrument returns to measurement view. Measuring This chapter describes the steps that are required to perform measurements with the product. - Page 11 6. Measuring Taking a measurement: The instrument is switched on and is in measurement view. Hold instrument horizontal to contact surface. Slowly increase contact pressure to 1 to 3 kg until a stable value is shown In order to be able to evaluate a moisture course, several measurements at different positions or at different times are necessary.
-
Page 12: Care And Maintenance
7. Care and maintenance 27 Care and maintenance This chapter describes the steps that help to maintain the functionality of the product and extend its operating life. Cleaning the housing: Clean the housing with a moist cloth (soap suds) if it is dirty. -
Page 13: Questions And Answers
· Permitted measuring range · Keep to permitted was exceeded. measuring range. If we could not answer your question, please contact your dealer or testo Customer Service. Contact details can be found on the guarantee card or on the Internet under www.testo.com . Technical data... -
Page 14: Tips And Assistance
In ambient conditions 20 °C and 65 %RH 11. Accessories/spare parts Designation Article no. Case 0516 0210 For a complete list of all accessories and spare parts, please refer to the product catalogues and brochures or look up our website at: www.testo.com... - Page 15 Notes...
Need help?
Do you have a question about the 616 and is the answer not in the manual?
Questions and answers